An always-online, free-to-play Hack and Slash Action RPG developed by Grasshopper Manufacture and published by GungHo Online Entertainment, directed by Hideyuki Shin (Killer is Dead). The game was released for the PlayStation 4 in December 3, 2016. The game would later receive a release on PC in September 26, 2018.
Taking advantage of the online resources available as of their acquisition by GungHo, it is an action game in which dead players will be turned into enemies in other players' games. It was originally announced as Lily Bergamo, which had a more anime-like art style. The devs have been quiet on details regarding that version of the game, but apparently the gameplay ideas were the same. After touting a tentative 2016 release date since October 2015, the game was unexpectedly released during the 2016 PlayStation Experience event on December 3rd. The gameplay and story are similar to Konami's Rengoku series on the PSP platform, both featuring highly customizable protagonists blasting upwards in a gigantic procedurally generated maze.
In any case, you are... well, you. And not only do you find yourself in your undies, you also realize that you're trapped in the post-apocalyptic remains of Tokyo - transformed into the "Tower of Barbs" - fighting for your life against horrific mutants who really want to kill you. Or at least, that's what it seems. Actually, you're just in an arcade, where you learn about a large tectonic disturbance that occurred in the year 2026 AD, causing mass destruction around the world. The south western side of Tokyo split off into the ocean, and became an island covered by a deep fog, becoming what is now known as the Tower of Barbs.
Anyway, you're playing Let It Die, said to be the greatest game on the bizarre console known as the "Death Drive 128." To make matters even stranger than they already are, you are playing it with the Grim Reaper, or rather "Uncle Death" as he calls himself. He calls you "senpai" and inexplicably looks up to you. What's more, he also exists within the game, where he runs a service called "Uncle Prime." Still with us? Okay, because there's also a young woman named Kiwako Seto, who is bizarrely perky considering she works with Direct Hell Insurance, an insurance claim that can give you perks and the chance to get back into the game should you meet an untimely demise (and you will have several demises).
In any case, the Tower of Barbs holds many secrets within. Some even say there's a treasure for anyone who somehow manages to climb their way to the top. Suffice it to say, something screwy is going on here, and if anyone is going to make sense of anything, it might as well be you, right? Besides, it's all just a game. What could happen?
In a departure from most major Grasshopper games since No More Heroes, the gameplay is more slow-paced, resembling Dark Souls. Here's its first trailer![]() and its cinematic trailer.
and its cinematic trailer.![]()
A sequel, Deathverse: Let it Die, was announced on October 2021 and released in October 2022. Switching genres to a Battle Royale Game but utilizing many of the original game's mechanics, you now play as a contestant in the in-universe game show "DEATH JAMBOREE", competing in death matches and fighting cryptids to earn fame and glory.
Let it Die provides examples of:
- Absurdly High Level Cap: The highest attainable level is 247, which is only possible through materials procured in Post-End Game Content. The highest attainable level level by the end of the main campaign, on the other hand, is 145 to 175 depending on the player's upgrade materials and Kill Coins.
- Action Girl: Female Fighters, natch.
- After the End: The game takes place in the South Tokyo Island after the Earth Rage earthquake split the world into four continents and ripped South Tokyo away from the rest of the city. The tower is filled with toxic spores and adventurers have to send remote control bodies to even have a chance at finding fortune. That being said, the fact that countries can be able to control them in the comfort of an arcade/bar, let alone even make them, proves that society has bounced back fairly well.
- Allegedly Free Game: Even though the game is completely free, it does have Death Medals available via the PSN Store. That said, it's entirely possible to receive more of them via quest rewards, the Uncle Prime box, or as login rewards. The game also sells DH Express tickets, which let you use the DHE elevator and the Tokyo Death Metro for free.
- Amusement Park of Doom: Kamatech, the third area of the game, the screamers are armed with a bunch of feudal weapons from across the world as part of the Candlewolf faction.
- And Show It to You: The iron claw's goretastic. You rip your victim's heart out and hold it up, where they give you a look begging you to give it back right before you crush it.
- And Then John Was a Zombie: If you give up after dying, your character's corpse becomes a Hater, one of the monsters in the Tower of Barbs (and is usually stronger than the regular enemies, with a name displayed in orange). You can hunt them down with a new character or let someone online finish them off, although if you leave it unclaimed, you get bonuses for people the Hater kills sent to your gift box.
- Anti-Climax: You reach the top of the tower and are told Uncle Death was using all the SPLithium to somehow set the moon on fire and Colony Drop it on the Earth, so you think he must be the final boss. Then he says he changed his mind right before the moon hits. It just drops out of sight. Then a giant monster climbs up from behind him. At this point, the game even explicitly says that this must be the final boss. However, he says he's tired of that and instantly kills it with a casual swing of his scythe. Then he invites you to play videogames with him. The End.
- Anti-Frustration Features:
- If you die, your enemies will ignore your corpse and return to their previous positions, so if you choose to revive, you won't have them standing over your newly-resurrected self to kill it again. If you're in a position where that's not possible (either in an enclosed space or during a boss fight), you will be temporarily cloaked once you come back from the dead, allowing you to subdue your surrounding foes unseen or possibly retreat if able.
- A number of updates to the game have added these, from removing the penalty for failing raids on other player's bases to recycling duplicate blueprints and unwanted premium skill decals into points that can be used to buy rare R & D materials.
- Anti-Hoarding: You can stack coins and SPLithium, but once you log out or journey into the Tower, it's probably gonna be raided (a small percentage of the total each raid). You have to invest in gear, since stored items can't be stolen. But gear gets broken fast and takes storage, so it's better to spend what you get and use your items every once in a while.
- Apocalypse How: A Class 1 example. The game apparently takes place After the End and has you stuck in a tower of junk (in your underpants as a guy or undergarments as a girl no less, but you can rectify that matter quickly) going to war against viciously-looking, body horrific mutant creatures.
- Arson, Murder, and Jaywalking: Among the various items highlighted in the E3 announcement trailer, you've got morning stars, hatchets, spiked baseball bats, a power saw, and safety goggles (although the last one was highlighted first).
- Artificial Human: Mother Barbs implies that your avatars in the in-game version of Let It Die are remote-controlled artificial humans and that certain portions of the tower were commandeered by scientists, corporations, and criminals to create even stronger cybernetic homunculi. These experiments yielded the feral autonomous Screamers, the uncannily robotic Tubers, the grotesque trio of Shocks Terror mini-bosses, and the Haters created by the Dons.
- Artificial Stupidity:
- The Screamer/Hater AI for ranged weapons has them constantly back away from you so they can have the range to attack you. Either fortunately or unfortunately, Waiting Room Defenders use the same AI when wielding ranged weapons. Snipers will also rush you if you turn a corner instead of waiting for you to show up.
- Similarly Haters will usually block when they are near you, and more than often keep the guard up during the combo. As blocking only reduces the damage taken, with a strong enough weapon you can simply wail on them while they are blocking constantly.
- Ascended Glitch: The "Dubstep Bonus Round" was a glitch that occurred when a Fighter returned to their waiting room when another player was raiding it, causing them to fight a copy of themselves in slow-motion. The development team decided to keep it in and make it another way to gather SPLithium.
- Auto-Revive: Killing a Rolly-Poly (Hint: Smash the bastard with your foot, stunning it, and then hitting them with an attack other than stomping) will drop a literal 1-Up that gives your character a one-time auto-revive, restoring 25% (50% cooked) health when you reach 0 HP; and the auto-revive is an infinite-duration status effect while in control of the affected fighter. Make sure to take the lifeshroom from the rolly-polly before cooking, as cooking the rolly-polly will prevent the lifeshroom from spawning. Naturally, Rolly-Pollies are extremely rare... when you're not on the 11th-20th floors.
- Awesome, but Impractical: Dropkicks. They look amazing and powerful but being off your target by even a slight margin will leave you in an incredibly vulnerable position. At higher levels, Dropkicks do middling damage and enemies will recover from being knocked down faster than you can get up.
- Capturing other players' fighters in the Tokyo Death Metro. First, you'll need to have a slot in your freezer open to bring them back. Next, you have to pray to the RNG that a defeated Fighter in your target's Waiting Room will actually be put in a stunned state once defeated, rather than being too dead to bring back. And then, you have to survive a very, very long time without having the Fighter taken right back out of your hands by one of the many, many players who will see your name specifically come up in the 'Rescue' menu of the TDM. And since you can't choose the model, category, or tier of who you capture, you may as well just make a new Fighter from scratch and max out his level yourself to save both your time and patience. You also gain SPLithium by minutes but the 'Rescue' menu is the busiest, so keeping a Fighter for 48 hours is mostly for the challenge. note
- War Ensemble armor provides the best defense in the game against piercing weapons, like guns. Unfortunately, as mentioned under Artificial Stupidity, Screamers and Haters armed with ranged weaponry have pitiful AI, and almost all of them require a large amount of a hard-to-farm resource to make upgrading them worth it.
- Jackals' equipment; they used to be the highest-tier equipment, but tier four equipment has the same or better stats and requires less materials to farm.note
- 4 Forcemen equipment varies; it is generally superior in terms of durability, meaning you can traverse dozens of floors without requiring a resupply. But its durability-to-cost ratio is middling at best.
- Back Stab: More like Back Drop. If you can sneak up on a Screamer or Hater, you suplex them for major damage, and wail on them while they're prone.
- Bad Boss: Uncle Death is revealed to be genial to and well-liked by his employees. However, he has no qualms about killing them all without their knowledge once the Colony Drop plan they're unwittingly helping him instigate comes to fruition.
- Badass in a Nice Suit: The Jackals X, Y, and Z are "collection agents" for the Dons and are as badass as a person would be if they lived in the Tower for years.
- Ball Cannon: Pitching Machines are a one-handed ranged weapon with a bit of ramp-up time in exchange for massive damage potential.
- Battle in the Center of the Mind: If you return to the waiting room but a raid is in the middle of happening, your character will fight a copy of himself in slow motion, gaining SPLithium for every hit you land.
- Berserk Button: The first boss used to crucify anyone who called him "Crab Man"...and that was before he became a monster.
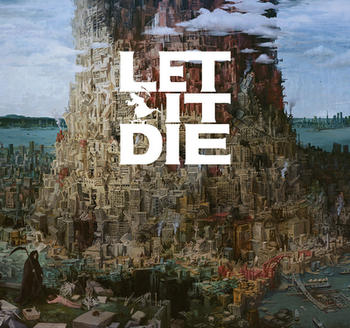
- Biblical Motifs: The Tower of Barbs is an obvious reference to the Tower of Babel. The Tower of Barbs reaches the heavens causing great chaos and instability in the area it inhabits, with the divine forces surrounding it Uncle Death and the Underworld controlling everything from behind the scenes. The picture above in particular is clearly based off of the Pieter Bruegel the Elder painting
 ◊ of the tower.
 - Big Bad: Uncle Death... kinda. While he had absolutely nothing to do with the Earth Rage earthquake and the construction of the Tower of Barbs, he was quick to commandeer the Tower for his own purposes. He was the one who started the rumor about there being a treasure at the top and is using the SPLithium generated from the Fighters, Haters, and Hunters in the Tower to somehow fuel a Colony Drop to crash the Moon into the Earth. He's also the owner of Yotsuyama Enterprises and the creator of the Death Drive 128... However, once you reach the top of the tower, he admits he's bored of his world destroying plan and would rather just watch you play on his new Death Drive XXX system.
- Bizarrchitecture: The Tower of Barbs is an example that's absolutely gigantic. It's a chaotic mishmash of random buildings that were smashed together during the "Earth Rage" earthquake, with its total height equivalent to a 30-story skyscraper with very high ceilings. It's also said to be growing by itself, and the area layouts of floors are procedurally generated every time you leave the Waiting Room.note
- The tower does grow twice, thanks to updates. Floors 42-50 simply appeared one day. Once you make it to floor 50, floors 51-351 grow right on top of the tower, leading to Uncle Death crying a single tear.
- Blood Sport: The Muscle International League of Killers, or M.I.L.K., are an in-universe blood sport created by the fourth Don of the Tower. They came under vast scrutiny and were investigated, but their founder was killed in a press conference during the Earth Rage. After their disbandment, their modified sports gear and training grounds found their way to the 30th-40th floors of the tower.
- Body Horror: Where to start...
- Your Fighters all have weird ports in them (20 in all) and have a strange glowing bar running across their chest a few inches under their collar bones. Those ports are for some kind of interface, as they have tubes/cables hooked up to them whenever they're on the Fighter Depo train, in the Fighter Freezer, or leveling up via Mingo Head. Then, when they turn into Haters, their skin turns grey, and they get these weird growths on them.
- The animals you can catch to restore your health have mushrooms growing off of them. You can take the mushrooms if you kill them.
- Enemies have a random chance of exploding into fungus patches when they die, rather than dissolve into puddles of blood. You can even harvest mushrooms from the resulting fungus patch, which causes them to disintegrate into spores.
- The Three Shocks of Terror, the sub-bosses within the Tower of Barbs, are abominations created by fusing several Fighters into a singular entity. One of the sub-bosses, CO-EN, is a Hulkish creature with several body parts jutting from his massive body. Another, JIN-Die, has a Chest Blaster that fires the severed heads of her previous victims, and GOTO-9 has his head upside down, a carved-out mouth, an intestinal tongue, and walks on all fours (Uncle Death comments it barely looks human).
- U-10 is an abomination with no known past, the body of a desiccated corpse, a giant solar-panel bulb growing out of her back, a cybernetic tail with a bulbous laser lens stuck to the end, and the voice of a psychopathic woman-child.
- Max Sharp, the first Don, sawed his arms off and stitched them to his head so he could do micro-engineering more efficiently when he was a kid. He also stuck a nail through his jawline each time his criminal gang destroyed another, to the point he appears to have a beard made of nails in the present.
- Boom, Headshot!: A few Goretastic attacks employ this.
- The magnum's finisher has the Fighter hold the gun to the victim's head dramatically for a second or two before firing and turning their cranium into chunky salsa.
- The Firework Launcher's finisher has the Fighter unload fireworks into the victim's mouth until their head goes off like it's the Fourth of July.
- The Crossbow's finisher has the Fighter shoot a bolt into the victim's head, pinning it to a nearby wall.
- The Sniper Rifle's finisher has the Fighter blast the victim in the kneecap, then take their sweet time lining up a headshot on their now-helpless victim.
- The Pulse Stun Gun's finisher fires a taser dart into the victim's head, which the Fighter slowly yanks out as they're electrocuted.
- Boring, but Practical: The Good Old Fisticuffs. While not as flashy as irons or fireworks, they deal decent damage, are fast enough to stun-lock most enemies, and most importantly - don't break. It's a good idea to level their mastery as they are the perfect fallback weapon.
- Staminungus grants you Infinite Stamina for a time. Not the flashiest of abilities, but this mushroom can help you deal with the bigger mobs of enemies and run through the larger maps found in Crowley's area without fear of fatigue.
- The secondary attack of Iron weapons is purely defensive, but the small cloud it produces has a surprisingly large duration, allowing you to Perfect Block most melee attacks and staggering your opponent for a counter blow.
- Snails emit poisonous gas when in contact with a surface, which used with the Poison Eater Decal can restore a fighter to full health an unlimited number of times and be thrown at most non-boss enemies to drain their health as they stand or pass through the poison cloud...but actually killing an enemy and restoring to full health take a considerable amount of time to resolve, especially at higher levels.
- Breakable Weapons: Weapons and armor will break from overuse or damage, forcing you to fight with your hands if necessary. Firearms usually run out of ammo before they break, unless you use their rage attacks or Pistol-Whipping too often. Thankfully, you can just sell the cracked weapons and empty guns to Kommodore Suzuki for a 10% refund.
- All weapons will lose a serious chunk of their durability if you use them with your Limit Break, which can cause them to suddenly deal only 0 damage in the middle of a multi-hit rage move and instantly break after.
- There's even an achievement for breaking 500 units of gear (enemy gear, not your own).
- Breather Level: Invoked. Once you reach the surface the first area will have few enemies (sometimes one Hater) and plenty of new healing creatures like crabs and slugs who can heal up to 300 HP. Giving the difficulty spike waiting for you it's appreciated. While you may be tempted to think such, Floors 21 and 31 are most assuredly not this.
- Cap: A ton of them.
- The personal inventory for your Fighters is rather small. Grade and Class tie into the cap - higher Grades have larger inventories by default, while each class has its own individual inventory cap. Collector Class Fighters have the highest inventory caps in the game (27 + 3 * Star Grade of Fighter), even when compared to the highest-grade fighters. Getting a DH Express membership will temporarily increase your carry capacity by 10 for so long as you have an active membership.
- Each Grade of Fighter has their own max level cap. For example, Grade 1 Fighters cap at level 25 minimum. Max levels can vary between different Classes but are generally within a +-5 range.
- Your storage box has a starting capacity of 30 items and can be upgraded via the Direct Hell Insurance menu. You can purchase 10 extra slots for 2 Death Metals and do this repeatedly.
- Once you unlock Tokyo Death Metro and fight a trial match, you can also upgrade your Waiting Room Caps:
- The Fighter Freezer starts out being able to hold only 3 Fighters and can upgraded to a max of 10 Fighters.
- Your Kill Coin and SPLithium banks both start at a 40K capacity each. They can be upgraded up to 50 times each, capping at a total 1.280M capacity (which means opponents can harvest up to 64K of each resource during a raid).
- The bathroom/prison starts out with 1 cell but can be upgraded to a max of 6 cells.
- The floors above the last Don limit your inventory to five slots, only enough room for one equipment set and two weapons, with an Express Pass adding two more slots instead of ten. You can grab more items once you start climbing.
- Chalk Outline: If raiders died in your waiting room, a piece of their equipment can be found lying on the floor with a chalked outline of a body.
- Character Class System: The Fighters you can obtain all come in different classes.
- All-rounder: The Jack of All Stats that can level all their stats evenly.
- Striker: Close-ranged attack specialist, stat focus on HP and Strength.
- Defender: Defense specialist, stat focus on HP and Defense.
- Attacker: Attack specialist, stat focus on Strength and Dexterity. Max health is considerably low as a trade-off.
- Shooter: Ranged attack specialist, stat focus on HP and Dexterity.
- Collector: Has a larger personal inventory compared to other classes.
- Skill Master: Has more Skill Decal slots than other classes. In general, you do not want to play with this class unless you somehow hit the jackpot with mushroom stew.
- Lucky Star: Fate specialist, stat focus on Luck. Deals more critical hits and earns more kill coins.
- Occasionally, one stat will have a higher cap than standard for the class.
- Crossover: Sometimes has events themed around other games; the crossovers with other Grasshopper Manufacture titles are the most extensive.
- Cloudcuckoolander: Whoo-boy...
- Uncle Death, the unknown-aged Finnish guy who's both in the arcade and in the game, is a skateboarding otaku who is either dressed as, or is, the Grim Reaper and calls you senpai.
- Momoko Yamada, now known as the Mushroom Magistrate, has been driven insane by the mushrooms she's consumed over the years and regards them with a nearly fanatical religious fervor. She's even set up shop in the Tower of Barbs, not for the treasure rumored to be at the top, but just for all the weird varieties of mushrooms that grow within it.
- Clothing Damage: Killing a Screamer or a Hater will result in all of their armor either shattering or falling off for you to pick up. Also applies to armor you're wearing.
- Color-Coded Item Tiers: Special brand-name metals required for more advanced R&D follow thusly according to hierarchy: Blue, Green, Black, Red, Purple, Orange, and Platinum. However, some equipment may skip Black all together or require more than one color of metal to be upgraded.
- The Computer Is a Cheating Bastard: While most of what guards can do in Tokyo Death Metro is well within what a player can, they will occasionally pull cheap tricks that you cannot do, such as guarding at times that are impossible for a human to do, like when getting up from a strong attack or at the very end of a hit. Most importantly, the AI frequently knows exactly when you pull the trigger on a gun; they can time their block so that they mitigate most of the damage when a human would be incapable of predicting another human's firing pattern - basically 'screenwatching' the information that you have to feed your controller to play the game. The A.I. does limit itself on how much it nerfs your attacks, and never seems to go in for a hit after it does, although due to the strict time limit on TDM, 3:00 to kill all guards and wreck the place, this can produce just as much frustration as if they had simply gotten a cheap kill. They also can hit up to 6 times with a cleaver saber; even when perfectly timed, a player can only do a 3-hit combo, and it greatly drains stamina.
- Cooldown: There's two cooldown timers for the Choku-Funsha. One for R&D, when you're creating/upgrading equipment that you've submitted the blueprints for. The second one is for after you buy a piece of equipment, likely there to keep you from easily amassing a load of brand-new equipment. Upgrading your Waiting Room via the TDM terminal also has cooldown timers until the upgrades are complete. But all these timers can be expedited by spending Death Medals. The only timer that can't be expedited is the reprogramming countdown for captured Fighters.
- Crapsack World: A massive earthquake has destroyed the world, reducing the number of continents from seven down to four. Civilization has gone down the dumps, and everyone is dying (figuratively and literally) to get to the top of the Tower of Barbs. And that's not getting into what's in the Tower.
- Cycle of Revenge: In the Death Metro, anybody who raids you can show up in the "revenge" tab, allowing you to raid them back at any time. However, nothing stops them from showing back up after you've got your revenge and doing it again. Maybe not intentional, but with the name of the game it may possibly be the moral, telling you to take the grudge and Let It Die. In practice, strong teams frequently pick fights to induce hatred and start a revenge-fueled war, because the rewards for waging war include vast riches and the coveted Death Metals, paid by the Yotsuyama Corporation for being such good (blood)sports.
- Dark Action Girl: Jackal Z, the lone female member of the Jackals.
- Dark Is Not Evil: Uncle Death looks just like the Grim Reaper, but he's quite friendly and has nothing but the utmost respect for you as a gamer.
- Death Is Cheap: Played with. Should you die in the game, you are greeted by the Insurance Girl, who gives you the option of either trying again right where you left off or giving up. However, should you give up, then you really do have to start from scratch with a new Fighter, underpants and all.
- Death Is a Slap on the Wrist: Played straight early on, but then subverted the further one goes in the game. At first, the price to retrieve the Fighter is proportional to what you can gain at the level they died on. If you can't afford the modest fee to get it retrieved, you can recover the Fighter by going to the area it's in and killing it with no issues if the fallen Fighter had nothing of value left on it. After the 20th floor however, the game steps up the retrieval price significantly, and going any higher will inevitably need a lot of farming to replace lost equipment multiple times, since the Screamers will have elemental weapons that can break your gear faster. A death becomes a major setback in the highest levels where the cost is 250K or 3 Death Metals, which even for people who've beaten the game is traumatically expensive, especially if your best Fighter is unavailable due to being a Hater in one of the deadliest areas in the game.
- Delinquent Hair: Don Taro Gunkanyama has Regent Pompadour... made out of a battleship. See "Punny Name".
- Diegetic Character Creation: The player character controls a remote body shuttled in on a train while they are safely in an arcade. Thus, the game lets you choose an empty vessel to control in the game.
- Disc-One Nuke:
- Eating the Premium Mushroom Stew can earn you Decals that range from the moderately useful, to the semi-situational, to the absurdly powerful at any point in the game depending on random chance.
- The Machete blueprint, the enemies with slashing resistance aren't present until the third area and every equipment on lower level are weak to it. While still a good weapon later in game, for the first half of the game it's basically overpowered.
- Door to Before: Certain escalator entrances and exits are barred from the other side. You can unlock them by taking more circuitous routes, creating shortcuts for future exploration. However, some of these switches can only be activated after defeating certain bosses.
- The Dreaded: The Jackals, body collectors and scavengers outfitted with high-tech equipment. Most Fighters will avoid them, since fighting them is considered suicide. This is borne out in-game, as each Jackal is level 200.
- Drugs Are Bad: In a sense... mushrooms within the game can come in either beneficial or harmful varieties, just like their real-life counterparts (albeit, the ones in real life don't explode like some varieties in-game), with the player capable of weaponizing mushrooms either way. In the backstory the Mushroom Magistrate was outright driven insane from all the mushrooms she consumed while she traveled the world.
- Elite Mook: Haters, the revived corpses of players killed in the Tower of Barbs, hit a lot harder than Screamers and fight a lot more intelligently. They can also among other things use mastery attacks and rage moves, on top of eating food to heal. Hunters are sometimes worse since they are sent on expeditions and so can have a lot of gears and decals on them to make things harder.
- Enemy Civil War: Haters/Hunters will murderously rampage towards anything that isn't a hater or a hunter, and the feeling is mutual. You can sometimes ease your torment by waiting for a group of Screamers and Tubers to take on the local hunter, and then pick off the survivor(s) while they're taunting the corpse of their victim. Unfortunately for you, this civil war ends past Floor 40; standard TENGOKU floors are filled with only haters, and Boss Fights either have a souped-up boss or a horde of screamers (with some unfortunate Treasure Tubers to distract you).
- Evil Tower of Ominousness: The Tower of Barbs, which stretches 1686 feet into the sky and looks to be built from ruined buildings and uprooted subway tunnel sections. The layout of the floors inside it actively changes, and the tower is rumored to be building itself taller. It does, thanks to Uncle Death installing an add-on to the Death Drive 128 called the Death Drive XXX.
- Extreme Omnivore: Frogs, mushrooms, rats, giant bugs, your character will chew on all of them raw or cooked.
- Facepalm of Doom: The fire rod's goretastic has the fighter lifting his opponent with the hand on the rod before turning the whole body into fire.
- Failure Is the Only Option: The tutorial level when you start playing for the very first time. Your first Fighter ends up getting killed in a cutscene and becomes your tutorial fight for dealing with Haters.
- Fictional Currency:
ThreeFour of them.- Kill Coins are the world's standard currency, mainly earned in-universe from killing peoplenote . Its main use is purchasing standard items from various vendors.
- You need Kill Coins to buy higher-tier fighters.
- If a fighter dies and Haterfies in the tower, you can pay for retrieval instead of killing them yourself.
- You can buy (and sell, at a 10% rebate) weapons and armor from Komodore Suzuki. His brother runs a moving shop throughout the tower and will sell blueprints and rare materials.
- You can sometimes buy stuff from the Hernia vending machine with Kill Coins, most notably the health potions and town portal / suspend game items.
- You can buy mushroom decals from the Mushroom Vendor that give your Fighter passive abilities.
- The elevator charges a small fee for being used. Given how many laws of physics it has to defy to function up to 51 floors and across multiple non-adjacent buildings, this is understandable.
- Super Particle Lithium, or SPLithium, is a form of energy researched by Yotsuyama Enterprises, implied to be the fighting spirit of sapient beings, which primarily releases when a fighter dies. Its main use is in research and upgrades. Typically, you can farm this with TDM, since most players focus on spending Kill Coins before SPLithium.
- All weapons and armor development requires SPLithium of varying degrees.
- Upgrading your base requires massive amounts of SPLithium.
- Death Metals are the main currency you exchange real-world currency for or work the hardest quests to accomplish.
- The most important power of Death Metals is that they can immediately bring a dead fighter back to life with full HP and invisibility. Can you resist the temptation?
- If a character dies and Haterfies in the tower, they can be retrieved by spending Death Metals.
- The Hernia and Mushroom Vendor sell higher-quality equipment for Death Metals.
- Upgrading your storage space and base decor requires Death Metals.
- You can also expedite the cooldown timers - but at a staggering cost.
- Bloodinium, a strange substance which grows from specific mushrooms. Yotsuyama is offering a bounty of this strange substance in exchange for attempting climbs past the 50th floor.
- Its primary use is augmenting fighters with even higher stats.
- It can also be used at the Hernia to purchase endgame items.
- Kill Coins are the world's standard currency, mainly earned in-universe from killing peoplenote . Its main use is purchasing standard items from various vendors.
- Finishing Move: Goretastic attacks are not only visually spectacular, but finishing an enemy with one gives you bonus rewards.
- The Direct Hell Insurance girl will also say your own death was "gore-tastic" if an enemy Hater happens to finish you with a goretastic attack.
- Five-Second Foreshadowing: Buying a premium decal with mushroom stew— at least with coins— will indicate the quality of the decal you get by the intensity of the light emitting from the empty bowl. Higher ranking decals will give off rainbow light.
- Force Feeding: The pitching machines's Goretastic Attack involves jamming the machine in the victim's mouth and shooting dozens of baseballs inside them until they explode.
- Foreshadowing: The Cthulhu-like giant monster that's shrouded in shadows in the background during the opening cutscene explaining the Tower of Barbs turns out to be the "Final Boss". However, Uncle Death just kills it in one hit for you in a cutscene because he got bored. Which is just as well, since the normal game mechanics wouldn't have made it possible to fight an enemy that frigging huge anyway.
- The Mother Barbs exposition includes rumors that the Tower of Barbs slowly grows over the years. This is what happens, as the tower first grows an extra 10 floors, then ramps up with an expansion pack that added 250 floors, and recently grew to a grand total of of 351 floors.
- Four Is Death: There are four Dons, monsters who revive the slain remains of Fighters who die in the Tower of Barbs as Haters and serve as bosses. The Tower is divided into four sections, has forty floors (not counting the very top and the Waiting Room), and the world itself was split into four continents by the Earth Rage.
- Game-Over Man: Whenever you die, you are greeted by Kiwako Seto of Direct Hell Insurance, who offers you a chance to revive and continue.
- Gamer Chick: Averted with the Hater Arcade's clerk, Naomi Detox, who knows nothing about the medium. She'll still offer you quests, though.
- Game Within a Game: LET IT DIE is a video game for the Death Drive 128, which you play with Uncle Death at an arcade.
- Glass Cannon: Tubers; they are easier to kill than Screamers, but the later models can hurt a lot.
- Gorn: The aptly-named Goretastic moves are the most fitting example as each one just tries to one-up each other in creative methods to kill your enemies. Literally breaking the enemy in half with your bare hands over your back isn't enough? How about melting their face off with an iron? Or shooting fireworks in their head until it explodes?
- The Grim Reaper: He's in this...and he's a skateboarder. A Finnish skateboarder. Who calls you "Senpai". Really.
- Hand Cannon: The Magnum weapon type. It's a six-shooter gun and counts as a two-handed weapon; the equipped hand is used for aiming it and the offhand is the "Fire" button, although you can still shoot without aiming. Uncle Death gives one to you right off the bat after your first death.
- Hate Plague: Haters are Fighters revived by Dons who just goes on killing everything they see. Giving the lines your Fighter has even alive it's possible that they already are affected by it but you control them so they can't just kill on their own.
- Human Resources: The Screamers, the Tubers and the Dons are corpses and body parts of the Earth Rage's victims. Doctor Terada mentions that the casualty rates were so high that he concluded that he might as well use all the bodies lying around For Science! instead of just burying them.
- Hyperactive Metabolism: Be it mushroom or frog, anything you eat will take effect immediately. Same goes for the Haters you encounter.
- High-Pressure Blood: When an enemy is defeated, blood gushes out of their body like a crimson water balloon.
- I Know Madden Kombat: Taro Gunkanyama's MILK faction specializes in sports-based weapons, armor, and fighting styles.
- Improvised Weapon: Irons, fireworks, hammers... your Fighters can use anything they get their hands on, and they're forced to do so if they want to get any higher in the Tower.
- Inexplicable Treasure Chests: The Tower of Barbs is loaded with these because Uncle Death put them all there.
- Invisibility Cloak: Solo Shelters will allow you to quit the game if the area is clear thanks to one of these.
- Item Crafting: One of the services the Chokufunsha store provides. Just give Kommodore Suzuki a blueprint and you can craft new equipment, as well as upgrade already-researched equipment, provided you have enough of the right materials and SPLithium. Crafted equipment has a number of benefits over stuff salvaged from the Tower: they start with max durability, meaning they last longer than salvaged equipment; ranged weapons start with full ammo; crafted armor provides full defense right off the bat; and crafted equipment doesn't lose durability while its being used by Fighters assigned to defend your Waiting Room against TDM Raids.
- Impaled with Extreme Prejudice: The machete's Goretastic recreates the feat shown in the cinematic trailer, lopping the head off and catching it with the blade. The head will stay on the machete for a short while.
- The lance's Goretastic impales an enemy in the medieval sense, from one "end" to the other. Potentially pretty
 Squicky.
- The lance's Goretastic impales an enemy in the medieval sense, from one "end" to the other. Potentially pretty
- Joshikousei: Naomi Detox, the girl who "works" at the bar.
- Katanas Are Just Better: A late-game weapon called the "Masamune Blade" is a very powerful all-around 2-handed weapon with a very serviceable and diverse moveset, high damage, fast attacks, long reach, and even has good durability to boot.
- Killer Yo-Yo: Jackal Z, the sole female Jackal, uses a yo-yo to fearsome effect.
- Lethal Joke Item: The Firework Launcher is typically not as useful as other weapons, doing only modest damage and not even staggering enemies. Its Rage attack, however, can blow enemies away. Just be careful to give your target a wide berth, lest you get caught in the blast.
- Magikarp Power: Leveling up its mastery, however, can turn it into a potent and deadly weapon. The once-weak, slow fireworks now deal decent damage, shoot much faster, stick to enemies dealing damage-over-time and set them on fire too. Oh, and it can cook beasts too! (which is a good way to get around poison gas making snails).
- Similarly, the Motor Psycho is a rather cumbersome weapon with limited combos, low durability, and its massive damage potential is offset with how tricky actually landing a hit can be. Meijin himself calls it a joke... but in the same breath, he tells the player that its Rage Move is extraordinarily powerful.
- A good half of the weapons in the game don't even vaguely resemble weapons and yet are just as powerful as stuff like longswords and assault rifles. Who would've thunk that a clothing iron could be so powerful? Justified in-universe as the hot iron is among the customized weapons Max Sharp invented, and M.I.L.K sport equipment was built from the ground up for blood sports, so they are deadly weapons disguised as regular objects.
- The Shooter class, with its focus on guns. At first there are not enough bullets and damage to make them worthwhile, but uncapped firearms hurt almost as much as melee weapons, have head-shot bonus damage and enough bullets to clear ten floors by themselves. When uncapped, an assault rifle can hold 1,200 rounds. They pretty much trivialize end game content when properly used.
- Lighter and Softer: Not by much, as there's still plenty of gore and violence to go around, but it's certainly more comical than the footage from the original trailer showed with the asphyxiating stealth kills that were replaced by over-the-top wrestling moves.
- Limit Break: Rage attacks are only available when you have enough stocks of Rage but can turn the tide of a battle when used strategically.
- Low-Level Advantage: After you beat Coen on the 3rd Floor, the Tokyo Death Metro will unlock. This will give you the opportunity to upgrade various parts of your waiting room as well as the potential to find more character types that will make you go up a tier. As a consequence, you'll be forced to join one of the dozens of warring factions which will leave you susceptible to raids on your Kill Coin and SPLithium reserves. Going up tiers lets you access more equipment, but higher-level Haters will begin to crop up and your account will be made known to potential assassins. Staying on the first three floors (and the first tier) will limit how much you can level up and spend, but the lack of severe opposition will give patient players time to assemble a decent roster of reserve fighters to go on expeditions and guard their bases once they actually join the TDM. There's also nothing stopping you from achieving increased Weapon Mastery on those floors as those are not obstructed by levels or tiers, just by you killing enemies with the weapon in question.
- Luck-Based Mission: Many resource-limiting quests rely on you having Death Metals to spare or hoping another player doesn't send you a near-unkillable hunter. Quests that require you to use few to no items and equipment can be impossible if a hater or a hunter with end-game armor and/or overpowered ranged weapons hunts you down. This has been patched by having floor-based Haters instead of Fighter-level-based Haters, but even then, the higher floor quests can be an issue.
- Macrogame: See And Then John Was a Zombie.
- Aside from Haters (slain Fighters turned enemies), the player can also take one of their own characters and use them to invade other players' games as Hunters (Orange names with a red Mark beside them).
- Mad Eye: Don Taro Gunkanyama has a nasty case on his right eye with a mess of scars around it.
- Metafiction: The story seems to exist on multiple layers, one within an arcade where you're hanging with Uncle Death, and another within the game you're playing with him, which is the universe with the Tower of Barbs. But some characters seem to exist on multiple layers, and sometimes in-between them.
- Mood Whiplash: A barrage of this assails you after your first unavoidable death near the end of the tutorial. The previously goofy Uncle Death decapitates your murderer with his scythe, which then transforms into a golf club. Afterwards, he performs some flashy skateboard tricks to segue into the game's title. Then you're hit with a surreal little movie by Mother Barbs who gives you some extra information on the Tower you just died in. Your perspective pulls back to reveal that you and Uncle Death are in a video game arcade and what you just experienced was apparently just you playing Let It Die from the safety of the store. Uncle Death cheerfully explains this to you, then darkly coerces you into playing again. Once the game's been booted up via the DEATH DRIVE 128, you're presented with retro 80s graphics that lead to a bombastic old-school title screen flanked by 8-bit tunes. Then the colors are drained out of the menu and the music becomes much more haunting and sinister.
- Mook: Two general varieties: Metal Tubers, slow and clumsy enemies good for little more than beating and taking money from; and Screamers, a basic enemy type, varied only by being able to use equipment.
- Morph Weapon: Uncle Death's scythe is able to retract its blade, becoming a golf club.
- Nintendo Hard: The name of the game is to die, try again, die, try again, rinse and repeat as you (hopefully) get a bit further each time. Bad luck and items can screw a run, higher Rank foes will utterly slaughter you, and players can constantly raid your stuff all the time which diminishes your resources and assets for the long-term. And the boss fights? Good luck alone won't suffice.
- Otaku:
- Meijin's a pro-gamer and will usually be too engrossed in his fighting game to talk to you... but when he's not, he'll tell you secrets on how to play Let It Die, which aren't covered in the manual, because he's beaten it already.
- Uncle Death is a gamer, as well, who enjoys Japanese culture and affectionately refers to you as "Senpai".
- Within the Tower of Barbs, there's the Mushroom Magistrate, who is obsessed with mushrooms and explores the Tower not for the treasure at the top, but rather the many strange 'shrooms found within. Like Meijin, a positive example as she directly aids the player.
- Pay To Win: Direct Hell Express. It gives you access to the Express elevator and subway train, which are free to use. The Express subway train even lets you bail on a raid right off the bat, instead of waiting for the raid timer to reach a minute 30 seconds.
- Amassing Death Metal isn't much of concern starting out, but it becomes a major resource past a certain point in the game as the constant raids on your Waiting Room by other players will make you thankful that you have the one currency that can't be stolen.
- Peninsula of Power Leveling: Okusa rotation, on a specific day the 13 floor will have a room named Okusa, the room is basic but will always drop 3 golden snails, those snails heal fully, can be sold for a high price and is worth a lot of experience points when you kill them. Not only is the room easy to access but expedition can be sent there so you don't even have to go yourself. Lots of players stack on them so they can level up next grade Fighters to their maximum level without even making them fight.
- Floors 41-50 in general, as the reward for making it to an 'end room' is a golden chest with Black/Red/Purple Metals, the last of which is coveted for endgame-durable equipment.
- Pistol-Whipping: Any gun will have a mastery level unlock that allows you to physically smack nearby enemies with it. This is a desperation move meant for unloaded guns at close-range, as the attack has low range and damage, and the gun's durability will severely deteriorate if you use it like a club.
- Player Data Sharing: This is how the game facilitates its "multiplayer" features. Haters and enemy Fighters are always controlled by the AI and players never directly interact with other players.
- Player Versus Player: While this game is a total solitary experience, there are two ways through which players can interact with others.
- Tokyo Death Metro allows players to launch raids on others' waiting rooms to steal gold, SPLithium, and prisoners, fighting the other player's own Fighters (if they placed any on guard). Teams will compete to see who can smash more noobs; the participating winners and losers will get relative rewards, the most coveted of which are Death Metals.
- Players can also send their Fighters on Expeditions to hunt down other players.
- Non-reclaimed Haters will still bring rewards if they kill other players.
- Play Every Day: Not only is there a login bonus for playing every day, there's also Uncle Prime, where Uncle Death delivers a random item for you in a cardboard box that unlocks in twenty hours, but the timer only starts after you open your latest Uncle Prime cardboard box and enter the tower above ground level. Having a DH Express membership even earns you additional login bonuses.
- Post Apocalyptic Gasmask: It can look like just an aesthetic choice by the game's art style at first, but it's absolutely necessary. While some mushrooms in the Tower are harmless, others continuously release poisonous spores into the atmosphere, making the air in the Tower rife with incredibly toxic gases. It's why almost everyonenote
- Post-End Game Content: The campaign ends on floor 41, "CHOJO". After that, there's "TENGOKU", which is comprised of random prior levels, is seemingly infinite, and most importantly, every single Mook is a Hater. The upper levels are so ludicrous that boss fights can include souped-up Dons or hordes of optimized screamers. If the player beats floor 350, the 'letter' the player receives on floor 351 implies the Death Drive XXX has been on so long that it hass started to overheat, as the 'message' is nothing but a jumbled mess of random characters. (Uncle Death trying to cool the console with dry ice on floor 301 certainly doesn't help.) The run immediately ends there, with the 'letter' functioning as a sort of Kill Screen.
- Pokémon Speak: Some animals speak entirely in their Japanese names and onomatopoeia, even when the game's dialogue is set to English. Frogs, for instance, say "Gero gero!" (the Japanese onomatopoeia for a frog's croaking) while scorpions hiss "Sa-sa-sa-sasori!" (the Japanese word for "scorpion").
- Power-Up Food: Some varieties of mushrooms are beneficial: Heartshrooms recover health (in addition to critters you find in the tower such as frogs and rats), Yogashrooms regenerate health and your Rage meter, Toughshrooms bolster your defenses, and Crushrooms boost your attack power. There is also the Mushroom Magistrate's mushroom stew, which bestows your fighter with an extra-potent decal. Cooking food, either by throwing it into a fire or shooting it with a Fireworks Launcher, will increase both the effect and duration (where applicable).
- Press X to Die: Some mushrooms have detrimental effects when eaten: Doomshrooms are poisonous, Funny Fungi cause you to become sluggish and unable to attack, and Boomshrooms...eating those is a very, VERY bad idea. But they will give you XP when eaten.[[note]]You can negate the effects if your armor is extremely high... for some reason.
- Prestige Class: Although the quality of Fighters ends at Grade 6, players can upgrade them with better stats with "Death 'Roids" procured in Post-End Game Content floors. The game treats them as Grade 7 and Grade 8 Fighters, although the number of stars on their stat sheet don't change to match.
- Procedural Generation: The layout of each floor may not always be the same because of this; the levels are mostly hand-crafted, but individual rooms may be put together in a different order. Also, Screamers' equipment is random and you have a chance to take it from them when they die. The Post-End Game Content "TENGOKU" floor plays this straighter as each floor is randomly selected from all of the previous floors, even if they're not part of the current weekly rotation.
- Punny Name: Don Taro Gunkanyama has a miniature battleship for his pompadour because he has the word "battleship" in his name. Tales of Barbs explained that he used it to cheat the height requirement test when he became a sumo wrestler.
- Puppet King: Jackson, the second Don, doesn't seem actually aware that he's a Don, and the others don't seem to have that much authority either. Their symbols are on the walls, but they don't actively control "their" forces after raising them from the dead.
- Refuge in Audacity: The game's main icon is The Grim Reaper on a skateboard. Who calls you Senpai! Your weaponsmith also rocks a Hitler mustache, and the girl in charge of the Power Tattoo shop is covered in ugly tattoos but pole-dances when not conducting business with you.
- Your character can vocalize. Their only lines are profanities and once Haterified they'll start spouting them non-stop.
- Regenerating Health: Having a full stomach will cause you to regenerate health, albeit at a very slow pace. The effect stops once you start getting hungry.
- Some skill decals give you decent regenerating health, though it can take minutes to work fully.
- Roguelike: Floors with certain randomness to the layout, the same is said about enemies and dying is a Permadeath. In fact, Uncle Death outright calls it a Roguelike the first time you wake up in Hater Arcade. While this is generally downplayed and more of an RPG, the higher floors (41-351) resemble a roguelike; limited starting equipment, randomly selected floors, randomized enemies and items, few safe havens, and a general risk-versus-reward factor; are you willing to risk an expensive death for ultra-rare loot by fighting enemies way out of your league?
- RPG Mechanics 'Verse: Due to being a game within a game with Uncle Death in an arcade. ...maybe.
- Schmuck Bait: There is no treasure at the top of the Tower of Barbs. Uncle Death spread rumors of the tower to lure players into growing and harvesting the souls of Expendable Clone soldiers, and is using them as SPLithium fuel to set the Moon on blue fire until it drops out of the sky and destroys Earth.
- Sensory Abuse: The "Mother Barbs" videos that explain the lore of the game are intentionally painful to look at.
- Shout-Out:
- According to interviews, among several influences for the game were Violence Jack and Fist of the North Star.
- Meijin calls the Hurricanrana a Frankensteiner in his hints. note
- One of the songs on the soundtrack is called "HAIL 2 U".
- The Goretastic Finisher for the Machete has you decapitate your foe with a burst of lightning flashing from the wounds.
- Sir Swears-a-Lot: Haters / Hunters swear when they spot something to kill. This is your best method of identifying them.
- Fighters will sometimes swear when they (A) execute an enemy with a stealth suplex, dropkick, death-from-above, or rage move, or (B) screw up tremendously by missing during a dropkick or falling from a great height.
- Sorting Algorithm of Evil: Applies to all enemies in the game, as the higher you get in the Tower, the Dons and the monsters they control get more powerful and better equipped.
- Spiritual Successor: To Konami's Rengoku series on the PSP platform. A highly customizable player character thrown into a vertical megastructure filled with enemies, with the only goal being fighting their way to a higher level.
- Sprint Meter: Whenever you sprint, dodge, or attack, your heart will appear in your Fighter. It beats faster and grows brighter as your stamina depletes, and if you overexert yourself, you'll be left wide-open to attack when you're forced to stop and catch your breath. Fortunately, once you take a breather, it takes only a fraction of the time to regenerate than it does to deplete it.
- Stalked by the Bell: If you loiter on one floor for too long after killing every enemy there, the Jackals will come for you.
- Synchro-Vox: Yes, this is a thing. It's used for the intro and outro for all four of the Dons.
- Tagline: Death Cancels Everything, Except The Truth.
- The cinematic trailer has "What's your Death wish?"
- The Unfought: That towering, gimp-masked behemoth with arms for teeth and a throbbing tumor on its shoulders, big enough to squash you flat with the palm of its hand, that appears in the final cutscene? Uncle Death takes it down with one swing of his golden golf club scythe. Without even looking at it.
- There Is No Kill Like Overkill: Gore Attacks are special finishing moves you can use on an enemy that has been beaten to an inch of their life and is too groggy from trauma to do anything for the next five seconds. You can just kill them with a regular attack at this point, but each execution is bloody humor that doesn't use up any durability or ammo and earns you more kill coins.
- Tom the Dark Lord: The first mid boss you'll meet is a hulking abomination made from different body parts, and his name is Coen. (Mother Barbs pronounces his name "Co-En," but that might be a different trope altogether.)
- Too Dumb to Live: The Dons have hobbies that should have gotten them all killed long before they got to the Tower. There is a reason why they are just talking heads when you meet them properly.
- Max Sharp, being a D.I.Y. prodigy by the age of three, watched a show about body modification when he was young, was inspired by what he saw, and then cut both of his arms off and (somehow) stitched them onto his head without dying from the physical trauma.
- Jackson used to take totally naked selfies near explosions for the thrills with grenades on his crotch. It didn't end well... for his fiancé. He died when Jackson wanted to make another explosion selfie. Jackson lost his mind to grief and went on a killing spree armed with a box of grenades and a selfie stick until the Earth Rage killed him with his own grenade.
- Crowley went through self-surgery so he could look like a wizard and then used his studies in plasma to cause destruction. However, he died a Karmic Death when a thunderbolt killed him during the Earth Rage after he confessed to being behind a freak accident that caused 200 deaths.
- Taro founded a league where he fought other athletes to the death and most likely ate their remains afterward. Not all of this was legal, yet he broadcasted himself with record ratings. He got killed when sports equipment started flying due to the Earth Rage and was beheaded by the equipment of the one sport he sucked at.
- Unexpectedly Realistic Gameplay: Of all the games to have this trope, Let It Die has some examples.
- If your fighter falls off a speeding train, they take damage and somehow latch on to the caboose to try again. But if your fighter falls off a building, they die. Your lifeshrooms and anti-fall damage decals don't work, presumably because of the sheer number of instant-death body slams your fighter endures while falling from a tower taller than Mount Everest and filled with chaotic architecture.
- Armor generally functions with the same strengths and weaknesses as the real-life equipment they're based on. Do-Or-Die Arms gear is resistant to elements because they are modified work uniforms for craftsmen and engineers, who work in high-risk environments on a daily basis, but is generally less effective against all regular attacks because workers aren't attacked with weapons on a daily basis. War Ensemble gear is resistant to bullets and other projectiles because it's standard military Kevlar, but is weak to slashing attacks because the Kevlar gets sliced up. Candle Wolf gear is based on medieval armor, meaning it uses ancient designs that were perfected to resist slashing attacks, but can sometimes be smashed in with a hammer and can't hold up to a modern gun. M.I.L.K. armor is resistant to blunt attacks because it was specifically made for extreme versions of contact sports.
- The Screamers can hear gunshots, so shooting one might alert others in the area, they might not find you but they will be nearby since they know someone's in the area.
- You think a professional killer with their wits intact is going to let a player character with resurrective immortality get back up and assassinate them while they're distracted? If you die to a Jackal, they'll use their equipment to capture your body before it can resurrect.
- Unflinching Walk: The Jackals. While most enemies run around like lunatics, the Jackals never move at anything faster than a leisurely stroll. Of course, you might not want to assume you'll escape them that easily...
- Valley Girl: Detox.Detox: Sorry I was such a biatch earlier, my mullethead douchebag boyfriend...
- Villain Teleportation: How the Jackals get around.
- Vomit Indiscretion Shot
- The Mushroom Magistrate throws up spectacularly after you feed her a mushroom in the tutorial.
- Enemies that are poisoned will yack, leaving themselves vulnerable. If you get poisoned, you'll be prompted to induce vomiting to purge the toxins from your system.
- Wake-Up Call Boss: Jin-Die on floor 16, Kaga. The arena is a pain, and the boss damage is how you'll get introduced to buying new tier fighters, because tier one fighters won't last against it.
- We ARE Struggling Together: Players that enter the Tower of Barbs are perhaps an even greater danger to one another than any hazard that can be found in the complex. While the Screamers, Jackals, Haters, and other monstrosities will kill you if they can, at least they have the decency to leave your Waiting Room (and all the currency therein) alone.
- Even in-universe, it seems that most of the enemies you run into are just the corrupted Fighters (Screamers, Haters, and Hunters), as those outnumber the Tubers by a considerable margin. This means the Tower is overflowing with the animated corpses of past failures who got killed at some point climbing its heights. Every new loser makes the job harder for those treasure hunters who follow after.
- Weapons Kitchen Sink: Mostly thanks to the different armaments each Don makes their floor's Screamers use.
- Weird Science: The Death Drive 128 is a weird 3-tier deck, the games appear to come in vinyl record sleeves, even though the games are so tiny they look like they'd work on a Play Station Vita. The console needs no TV or monitor: instead, games are displayed by a scarab beetle that can project photo-realistic holograms.
- And the Death Drive XXX is an add-on to the Death Drive 128 that comes in the form of a fourth tier that uses soda pop as "liquid software". Seriously, WHAT?
- Wrestler in All of Us: Dropkicks, Suplexes, and more can be employed against unprepared and unsuspecting enemies.