Vanilla Terraria has a lot of characters already, and the mod adds even more by giving the game a fully-fledged story.
Pre-Hardmode Bosses

Once a peaceful filter-feeder ocean worm, which was forced to become an aggressive predator to survive after the ocean kingdom Ilmeris was incinerated by Yharim's war. It's the first Calamity-exclusive boss that's intended to be fought after you start the game, and has to be fought in the Desert.
The Desert Scourge drops various water-themed weaponry/equipment, and gives all the ingredients required to make Sea Remains, an early crafting material required to make beginner-level equipment. Killing it enables sandstorms and also allows the blocks in the Sunken Sea to be mined, allowing true access into the biome.
- Art Evolution: It went from a blue worm into a drier-looking brown worm, which looks more terrifying than its old sprite.
- Contractual Boss Immunity: Unlike the vanilla worm bosses, the Desert Scourge reduces the damage of piercing weapons with every segment they pierce, which massively reduces the damage they would normally cause to it - a trait shared by a number of the Calamity worms and the Revengeance/Death Mode versions of the vanilla worms, but more noticeable considering its earlygame status. In addition, it massively resists explosive weapons, which are normally the kryptonite of early worm bosses.
- Dishing Out Dirt: Can shoot sand blasts and also create sand eruptions whenever it digs out of the ground.
- Eyeless Face: Appears to just have empty sockets instead of actual eyes.
- Flunky Boss: Summons two Desert Nuisances in Revengenace mode and above.
- Gentle Giant: It used to feed only on microorganisms; however, due to the destruction of its usual habitat, it learned to hunt for greater prey.
- Leitmotif: Guardian of the Former Seas
 .
. - More Teeth than the Osmond Family: Its head is practically all teeth.
- Names to Run Away from Really Fast: Desert Scourge. Ironically, it's one of the easiest Calamity bosses.
- Sand Worm: That used to be a water worm, no less.
- Segmented Serpent: Likely the first Worm boss a player will fight.
- Wake-Up Call Boss: As a worm enemy, it's very hard to dodge its attacks unless you have some sort of vertical mobility or dash, especially since it also gains the ability to dash itself partway through the fight. The earliest you can get an accessory that lets you dash is after beating the Eye of Cthulhu, the very next boss, and in the early-game very few items that enhance your vertical mobility are readily available.
- Wolfpack Boss: In Revengeance, you have to fight 3 of them at once.

A giant crab from the same evaporated ocean that the Desert Scourge came from. After its home was incinerated, it migrated to the Glowing Mushroom biome, only to perish and become a host to parasitic fungi. Must be fought in the Mushroom Biome.
Crabulon drops numerous mushroom-themed weapons, and drops the Mushroom Plasma Root in Revengeance which permanently boosts your Rage Mode damage.
- Art Evolution: The new sprite is much more accurate to normal crabs, with a lot more detail as well.
- Body Horror: It's the dried-up, decaying body of a dead ocean crab that has become a home and vessel to countless parasitic mushrooms that have filled up the husk of its body.
- Death from Above: Its arcing shots of exploding mushrooms can sometimes cause this, and it also rains drifting Crab Shrooms from the sky as an attack. In Revengeance Mode and higher, it can sometmes summon evenly spaced walls of mushrooms that fall from the sky, which become angled and harder to dodge once it's taken enough damage.
- Empty Shell: Literally and figuratively. Only the barest scraps of meat remain in its parasite-ridden husk, the mushrooms festering within compelling it to move and feed even in death. The actual crab has no will left of its own.
- Expy: Its design coupled with its lore can bring Parasect to mind.
- Festering Fungus: It has been infected with parasitic fungi, akin to the Cordyceps.
- Flunky Boss: While Crabulon is capable of directly fighting you, most of the challenge in its fight comes from the fact that it fires out huge clumps of Crab Shrooms that descend across the screen and deal massive damage when they hit the player.
- Giant Enemy Crab: Well, yeah. Downplayed because it isn't as big as many other bosses, but it still towers over the player.
- Leitmotif: 1NF3S+@+!0N.
- Mushroom Man: Downplayed, being a crab and all, but still.
- Our Zombies Are Different: It's the decaying corpse of an ocean-dwelling crab that is now controlled by parasitic mushrooms.
- Puppeteer Parasite: The mushrooms growing all over it are actually what control it.
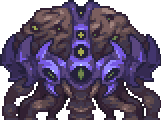

A futile attempt by the mind of the slain god that spawned the Corruption to reform itself, creating a grotesque brain-like monster of corrupted biomass. It can be spawned naturally after destroying a Hive Tumor, which is an uncommon enemy that spawns in the Corruption.
It drops dark-themed equipment, along with Rotten matter which are used to make higher-level Corruption gear. Killing it (or its Crimson counterpart) will unlock the Aerialite Ore in your world and allow it to be mined.
- Art Evolution: The eyes on its body don't resemble the eyes of Eaters of Souls anymore, now having turned into Yellow Eyes of Sneakiness. It also gained four small legs that it uses for landing, two tubes that constantly pump out Corruption in its first phase, its "crown" is now composed of rotton matter that twitch during the fight. And it now has holes all over its head, which would definitely bring Trypophobia to mind. Oh, and it has become smaller, too..
- Brain Monster: A giant grey brain-like atrocity made up of rotting flesh and pockmarked with holes all over the body, with a crown made of Rotten Matter. It was also formed by the brain of a dead god trying to resurrect itself.
- The Darkness Gazes Back: Its second form invokes this, with its eyes lighting up within the numerous holes in its body.
- Death from Above: In its second form, it can produce rain clouds that rain down plagued rain whenever it dashes.
- Flunky Boss: Spams various Corrupt enemies as it loses health, which include Hive Blobs, Dank Creepers, Dark Hearts, Eaters of Souls and Devourers.
- Hive Mind: Averted. Although it certainly looks the part, it's actually a collection of biomass gathered by a dead god.
- Leitmotif: The Filthy Mind.
- Lightning Bruiser: While it is normally quite slow in its second form, it can perform some extremely fast dashes and maneuvers to compensate.
- Marathon Boss: The battle tends to play out like this; It's got high health and teleports a lot, but will also hit you pretty infrequently.
- Stationary Boss: During its first phase, it is completely immobile save for the occasional teleport, and has to rely on swarms of Mooks to defend itself.
- Stone Wall: Its first phase, where contact damage is very minimal and it cannot move, but has a fair amount of health and enemies to keep the player distracted.
- Suspiciously Similar Substitute: To the Brain of Cthulhu from the base game. The similarity used to be even stronger, as the Hive Mind and Brain of Cthulhu once shared a very similar AI.
- Teleport Spam: Can do this in its stationary form to get the jump on unwary players. In the second phase, the Hive Mind teleports and dashes at the same time to confuse its foes.
- Turns Red:
- Once you deal enough damage, it uproots itself and begins rapidly charging at players while teleporting.
- If you exit the Corruption, the Hive Mind will become almost immune to damage.
- Yellow Eyes of Sneakiness: Hive Mind's eyes in its second phase resembles this.

Monsters born from the corpse of the slain god that spawned the Crimson, who attempt to wield their raw power in the form of their blood and viscera in an endless desire to consume. They can spawn naturally after killing a Perforator Cyst, which is an uncommon enemy that spawns in the Crimson.
They drop equipment based around blood and flesh, and also drop Blood Samples which are used to make higher-level Crimson gear. Killing it (or its Corruption counterpart) will unlock the Aerialite Ore in your world and allow it to be mined.
- Art Evolution: The Perforator Hive has become a lot more mushroom shaped, with faces with rows of sharp teeth across its body and a shifting eye in the center. The worms, on the other hand, look much more terrifying than before by having their own Body Horror amplified.
- Bloody Murder: The Perforator Hive's main attack, shooting a shotgun spread of blood into the air to rain down on the player. Yharim presumes that this is their attempt to gain the power of the Gods in a straightforward, pure way.
- Body Horror: Not only do all of the Perforators look grotesque as all hell, resembling twisting and infectious masses of raw flesh with far too many eyes and teeth, the Perforator Hive has an attack that inflicts a debuff named Burning Blood. Its tooltip? "Your blood is on fire". It's literally causing your blood to boil while you're still awake and alive.
- Cyclops
- Damage-Increasing Debuff: Its golden shots inflict Ichor, which massively reduces your defenses. Later on, it'll start leaving blobs of Ichor everywhere that do the same thing.
- Damage Over Time: The Burning Blood debuff.
- Death from Above: The Perforator Hive's main attack is raining red or golden blasts from above that inflict the Burning Blood or Ichor debuff.
- Eyes Do Not Belong There: Both the Hive and the Worms are covered in Yellow Eyes of Sneakiness, with the Hive having a main one.
- Flunky Boss: Every time the Perforator Hive takes enough damage, it spawns one of the Perforators proper to assist it. It will spawn them in order from weakest to strongest - the largest worm in particular must be killed to finish off the Hive.
- Fragile Speedster: The first Perforator Worm, with the lowest attack and health but the highest speed.
- Jack of All Stats: The second Perforator Worm, with middling stats in comparison to the other two and the ability to divide into smaller worms like the Eater of Worlds.
- Kill One, Others Get Stronger: As more Perforator Worms die, the surviving ones gain speed and attack boosts.
- Lamprey Mouth: The largest worm has this.
- Leitmotif: Blood Coagulant.
- Meaningful Name: Named after the Perforator veins. Can also be a Double Meaning, as to perforate is to pierce/make holes in something, like how the worms would pierce out of the ground, supported by the first Perforator's needle-like mouth.
- Mighty Glacier: The last Perforator Worm, the strongest and tankiest but also the slowest outside of occasional lunges.
- Overdrawn at the Blood Bank: If all of those blood and ichor shots from the Perforator Hive are any indication.
- Ramming Always Works: If no worms are alive, the Perforator Hive will try to run you over. However, if there is more than one worm alive, the Hive will figure that you're trying to burst it down and start ramming regardless.
- Segmented Serpent: The Perforators, obviously.
- Yellow Eyes of Sneakiness: Their resprites gave all of them this, the worms in particular having numerous that somewhat resemble the Hive Mind's.

A God formerly worshiped as a being of purity before being corrupted, the Slime God is an elusive and cowardly being who delegates its protection to guardians fashioned from whatever biomass it can manipulate, such as the Ebonian and Crimulan Paladins.note It is the final Pre-Hardmode boss in the mod, and is intended to be fought right before the Wall of Flesh.
The Slime God drops slime-themed weapons and Purified Gel, which is used to make Statigel armor and other slime-themed weapons. In Revengeance, it notably drops the Electrolyte Gel Pack which permanently increases your Adrenaline damage and damage reduction.
- Art Evolution: It became much more detailed-looking in the Draedon update.
- Asteroids Monster: In Expert and above, each lesser Slime God can split into 2 when at half health. They'll also shed lesser slimes as they take damage.
- Blob Monster: Of course.
- Canon Character All Along: In Calamity's lore, the Slime God would go on to create the Queen Slime, unwittingly becoming her core in the process .
- Death from Above: Both of its guardians can rain down showers of slime balls.
- Even Evil Has Standards: Despite being a gluttonous slime that lives to devour and add to itself, the Slime God purposely holds back from growing too large to avoid endangering the balance of the world.
- Flunky Boss: Not only does the Slime God delegate most of the fighting to the Crimulan/Ebonian Slime Gods, even those can summon waves of minions when hurt.
- Kill One, Others Get Stronger: Depending on which Paladin you take down first, the other will get a unique boost.
- Killing the Crimulan Paladin first will massively increase the physical attack rate of the Ebonian Paladin.
- Killing the Ebonian Paladin first will double the defense of the Crimulan Paladin.
- Leitmotif: Return to Slime.
- Know When to Fold 'Em: Once its guardians are defeated, the Slime God itself will flee from battle, leaving its loot behind without you having to kill it. By the time you make it to Hardmode and it faces you again as the Queen Slime, however, it can't flee in time and is Killed Off for Real.
- Lightning Bruiser: The Ebonian/Crimulan Slime Gods are far faster than you think they are.
- Magic Knight: All three Slime Gods possess powerful melee and ranged attacks, the Ebonian Slime God leaning towards stronger ranged shots while the Crimulan Slime God has stronger defenses.
- Status Effects: The Ebonian Slimes can inflict Weak, while the Crimulan Slimes can inflict Darkness. The Slime God proper can inflict both, along with Slow.
- Super-Empowering: The Slime God Core can temporarily possess one of its lesser Slime Gods, juicing up its AI while significantly buffing its damage and defense.
- We Have Reserves: Even if its guardians are defeated, it can simply retreat and create new ones endlessly.
Hardmode Bosses

A construct of Calamitas made from the teachings of the Archmage Permafrost, where the Witch sealed him away out of mercy instead of killing him following his desertion from Yharim. It has since aimlessly haunted the place of its creation, the Snow biome where it must be fought.
Drops ice-based equipment. Killing Cryogen also causes Cryonic Ore to generate within your world, and allows the Archmage to move in.
- Action Bomb: Throughout its battle, it summons small snowflake-like bombs that explode into showers of icicles.
- Animate Inanimate Object: A giant ice cube with crystals around it to look like a snowflake.
- An Ice Person: Well, what did you expect from an oversized living snowflake?
- Art Evolution: Its new sprite is much more detailed than its old one, with each phase visually cracking.
- Confusion Fu: Has a whopping total of six phases, with a different attack pattern in each. While this might not seem extreme for a modded boss, the number of bosses in the vanilla game with more than two distinct phases can be counted on one hand.
- Death from Above: Starting from its second phase, it can try to rain icicles down on the player if they are below it. In addition, one of its later attacks has it launching spreads of icicles into the air, which crash down on enemies.
- Empathic Environment: An aurora appears in the sky when its battle begins. As it nears death, the aurora gradually gets more vibrant and dynamic.
- Flechette Storm: Its primary means of attack are radial bursts of icicles.
- Flunky Boss: Summons Cryocores and Aurora Spirits as it loses health.
- Heel–Face Turn: After destroying Cryogen, the freed Permafrost joins you as an NPC.
- Leitmotif: Antarctic Reinforcement.
- Ramming Always Works: Its last phase has it abandon all of its projectiles and simply try to fly right into you at top speed.
- Regenerating Shields, Static Health: Cryogen has an ice barrier that must be destroyed before damaging it, which will also explode into a burst of shots when broken. It will regenerate several moments after being destroyed.
- Sequential Boss: It has six phases, more than the Final Boss of the vanilla game! And it's only the first Calamity boss in hardmode... However, this may be downplayed due to all six phases fitting into a single health bar.
- Spectacular Spinning: In its last phase it starts to spin erratically.
- Teleport Spam: Will do this in his semifinal phase.
- Turns Red: Taking it out of the Snow biome will massively increase its speed.
- Was Once a Man: Cryogen used to be the Archmage of Ice Permafrost, but after Permafrost abandoned Yharim, he was sealed into a mindless hunk of magical ice by Calamitas.

A relative of the Desert Scourge found in the Sulphurous Sea, where the rapidly evolving microorganisms allowed it to maintain its peaceful filter-feeding diet in spite of the acidifying waters. It can only be fought in the Sulphurous Sea, and can uniquely spawn by itself, although regardless of its spawning methods it will be passive until attacked.
The Aquatic Scourge drops beefed-up versions of Desert Scourge's equipment, and also unlocks the second tier of the Acid Rain due to its presence no longer scaring off the more dangerous foes in the Sulphurous Sea.
- Early-Bird Boss: Much like Anahita/Leviathan, the Aquatic Scourge can rarely spawn at any point in the game, including Pre-Hardmode. Unlike Anahita, however, it aggroes instantly if you hit it even once, so if you have any enemies that spawned before it spawned and the boss is circling around you...
- Elite Mook: Or rather Elite Boss, the Aquatic Scourge serves as a harder version of the Desert Scourge, and its drops are simply direct upgrades to the Desert Scourge's own.
- Flechette Storm: Can fire a large number of homing needles to skewer you with.
- Flunky Boss: Rapidly spawns Aquatic Seekers, Aquatic Parasites and Aquatic Urchins as it takes damage.
- Gameplay and Story Integration:
- The Aquatic Scourge is essentially the Desert Scourge before its home was dried up. As such, not only does it fight like a much stronger Desert Scourge, but its drops are just souped-up versions of the Desert Scourge's own drops.
- Also mentioned is its lessened aggression. Sure enough, it won't attack unless hit first.
- Gentle Giant: While it is huge and quite powerful, it won't attack unless attacked first. Justified because unlike the Desert Scourge, it's not desperate for food.
- Helpful Mook: Like other bosses, its presence prevents other enemies from spawning. However, it can spawn naturally and it won't attack unless hit first, making fishing much less stressful.
- Homing Projectile: It rapidly fires homing needles at the player to attack. Some of its other projectiles also home.
- Leitmotif: Outcast of the Sulphurous Seas.
- Making a Splash: Rapidly fires blasts of sulphuric water to attack, in both streams and ring patterns. Some of them even have homing properties.
- Poisonous Person: Can spew out clouds of toxic gas as it moves. They either linger in place or accelerate.
- Recurring Boss: A stronger, hydrated version of the Desert Scourge.
- Segmented Serpent: Much like its predecessor. And if its lore item is any indication, the one you fight is apparently still a juvenile.
- Team Pet: Served as this for the moderators/cool guys' server, preventing enemies from spawning while they fish.
- Underground Monkey: Debatably the most prominent one, with it literally being the Desert Scourge except in the Sulphuric Ocean. This is downplayed as the fight plays out pretty uniquely in comparison.

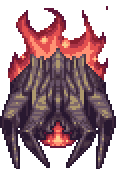
One of the once-dormant Elementals, beings who wield the power of nature. After her sudden awakening in Azafure, the First City, she attacked the city before being fought to a standstill by Calamitas, with the fierce battle completely annihilating the underworld civilization. She now stands vigil in the mod-exclusive Brimstone Crags, where she must be fought in. Drops a number of brimstone weapons and accessories.
- Art Evolution: Overall looks like a more polished version of its older sprite. A planned resprite for her made her slimmer and more fiery, as well as replacing her rocky "throne" with a dress made of stone petals.
- Cheerful Child: The Brimling summon, stated to be a younger Brimstone Elemental, is adorable.
- Cool Chair: The brimstone rose is actually part of her body but when she's in her humanoid form she 'sits' on it like a chair, complete with armrests. The player can craft one using Bloodstone.
- Curb-Stomp Battle: Was on the recieving end of one courtesy of Calamitas when she invaded the Underworld, due to being far weakened by a lack of faith.
- Cute Monster Girl: It's a woman made of fire that has a rose made of brimstone for a lower body.
- Cyclops: Sources say Brimstone Elemental was originally to have two eyes that fuse into one while she attacks, but now she is a full on cyclops.
- Death from Above: One of her phases has her try to fly above the player while launching brimstone fireballs, which create large lingering explosions on impact with blocks.
- Defeat Equals Friendship: If you collected her Rose Stone, you can summon her to fight for you.
- Defend Command: For one of her phases, she will retreat into her shell and become nearly immune to damage. You simply have to outlast it as she fires waves of projectiles at you.
- Elemental Embodiment: Of fire, specifically that of the Underworld.
- Eye Laser: Below 50% HP in Revengeance+, she will gain the ability to shoot death rays from her eye, which will split perpendicularly into brimstone darts. These rays lead the player's movement and are preceded by warning lasers a few seconds before firing. In Death Mode, the split darts will home in on the player.
- Full-Frontal Assault: She's completely naked, yet lacks any genitalia or nipples.
- Flaming Hair
- Flunky Boss: In Revengeance Mode and above, she maintains a small squad of Brimlings during combat, which teleport around and unleash fireballs of their own at you. If one is killed, it will respawn instantly.
- Gods Need Prayer Badly: As humanity began to reject the Elementals as they lost faith in them figured out the secrets of their magic, the Elementals in turn lost power to the point of many of them fading away, and the ones who survived were severely weakened.
- High-Heel–Face Turn: Joins the player as a summonable minion if you obtained the Rose Stone.
- How the Mighty Have Fallen: She and her "sisters" make it look like Desert Scourge had it easy. Originally praised as goddesses, they lost their followers as the years went by. Unlike the others, however, Brimstone Elemental got it even worse, when Calamitas rained havoc on the underworld where the Brimstone Elemental thrived, now rendered weak and vengeful against humanity.
- Leitmotif: Left Alone.
- Playing with Fire / Casting a Shadow: Uses brimstone fire attacks like lingering explosive fireballs, darts, and blasts. All of these inflict a seriously damaging debuff called Brimstone Flames.
- Teleport Spam: Can do this in one of her phases.
A mechanical monster created by Draedon, which houses an inhuman clone of the Brimstone Witch herself created in secret. It aimlessly wanders the night, driven insane by even a mere fragment of its inherited power.
Calamitas drops a number of useful brimstone items and Ashes of Calamity, a mid-Hardmode crafting material. Killing her also makes enemies in the Abyss start dropping materials among other changes to the biome.
- Art Evolution: She and her brothers were formerly recolors of The Twins. In her case, she was one of Retinazer. Now, she resembles a flaming wood-like eyeball. She recieved another minor one later on, which made her fire more polished and added a more distinguishable difference for her second phase. The update that gave Calamitas her updated humanoid appearance led to the Clone adopting their old sprite for their bullet-hell phases, although she's confirmed to be eventually getting a redesign more appropriate to her new human design.
- Bond One-Liner: "If you wanted a fight, you should have come more prepared."
- Bullet Hell: At specific health intervals, she'll go invincible and spam a gridlike barrage of fireballs, forcing the player to weave and survive until the phase ends. This is specifically designed to foreshadow the much harder version of this attack used as the true Calamitas' signature attack.
- Evil Brit: Her voice actress for her appearances in DM DOKURO's videos has a British accent.
- Flunky Boss: She can summon her brothers Catastrophe and Cataclysm to assist her when she's hurt enough, the former of which charges and spits fireballs and the latter of which charges and breathes fire. She also summons rings of Soul Seekers to protect her when at low health.
- Fighting a Shadow: Turns out this Calamitas is just a watered down clone of the original.
- Leitmotif: Raw, Unfiltered Calamity.
- Mascot Mook: Well, more than a Mook, really, but she is featured heavily in the mod's logo and, to an extent, its name.
- Names to Run Away from Really Fast: Her name means "disaster" in Latin, as well as bears resemblance to the English word Calamity.
- Orbiting Particle Shield: Pulls this off by summoning a rotating ring of Soul Seekers at half health, which soak up hits for her while firing projectiles of their own.
- Playing with Fire: Attacks using fireballs that inflict the Brimstone Flames debuff.
- Red Eyes, Take Warning: She IS the red eye...at least for now.
- Reprise Medley: Her Leitmotif reuses some melodies from nearly every boss that came before hernote , along with her original Leitmotif.
- Secret Weapon: Was designed to be one of sorts by Draedon, for reasons currently unknown.
- Shielded Core Boss: She takes Scratch Damage from everything until her brothers are destroyed. While this is a lesser example, the ring of Soul Seekers she summons at low health brings this to mind.
- Tron Lines: Sports pulsing red ones.
- Villain Respect: Once you deplete half of her health in her second phase, she compliments your skill.Impressive child, most impressive...

The Water Elemental, a being of great power who was forced out of her Abyssal home by Silva, the Goddess of Life. She fled to shallower waters, accompanied by the great beast known as the Leviathan, where the two of them live in solitude as Anahita wishes to see the whole world become her watery domain.
They are intended to be fought after Plantera and before the Golem, but can theoretically be fought at any point in the game due to the way they spawn.note
The Leviathan drops aquatic-themed weapons and accessories, and Anahita (both before and after activation) can drop some very useful acessories.
- An Ice Person: Anahita can fire icy mist that freezes players. She can also create defensive armour for herself that absorbs damage until it breaks.
- Art Evolution:
- The Leviathan goes from more curved and tuskless to a more ferocious, bumpy look. The most recent resprite gave it a more streamlined, menacing appearance that does away with its missing back half.
- Played up more with the lure; starting out as a recolor of a sprite, then becoming its own thing albeit rather plain, to a gorgeously designed and detailed siren. Another resprite gave it a thinner, more polished look. One more outright replaced the Siren with the Water Elemental herself, Anahita.
- Autobots, Rock Out!: "Forbidden Lullaby" amps up the heavy metal after gradually building up in intensity from "Siren's Call" and "Siren's War Cry".
- Battle in the Rain: A storm starts when they spawn.
- Badass Adorable: Anahita is on the cute side of the monster spectrum, and can easily send you packing if you aren't prepared.
- Bait-and-Switch Boss: A bit literally in this case, with Anahita being the bait. Different than the norm however is that both are fought at the same time.
- Optional Boss: Downplayed. While they can technically be fought at any point in the game, the duo still have an "order" in that they should be fought before Astrum Aureus and the Golem. They're notably one of the few bosses in the game that have practically no effects on progression when defeat.
- Bullfight Boss: The Leviathan likes to charge into the player a lot, dealing tons of damage.
- Cheerful Child: Delve within the Abyss, and you can gain the Strange Orb. The item in question summons the adorable Young Siren. D'awww! Subverted by the time of the 'Rust and Dust' update which gives the similarly adorable Water Spirit.
- Confusion Fu: Anahita is already versatile, but with the attacks the Leviathan has as well, it's hard to predict what they're going to use next.
- Cute Monster Girl: Compared to the rest of the cast, Anahita is downright gorgeous with a nicely detailed sprite to help.
- Cuteness Proximity: Lampshaded by the Water Spirit's Buff tooltip, calling it "Small and Cute."
- Death Is Cheap: Anahita can be killed off and later be summoned, now on your side, by using the Heart of the Elements, Siren's Heart or Strange Orb.
- Decapitation Presentation: Uniquely, the Leviathan's trophy is the only one to actually be a head; the Siren's. The 'Rust and Dust' update adds a separate trophy of one of the Leviathan's teeth while Anahita's head is still available as a trophy.
- Dishing Out Dirt: The Leviathan spits out massive boulders, or "meteors", to hit the player with, inflicting a severe defense reduction if one connects.
- Dual Boss: The fight consists of the Leviathan herself and Anahita - the latter will start the fight, hand off the battle to the Leviahan at 40% HP, and rejoin it once the Leviathan is also at 40% HP. In Death Mode, this dynamic is reversed, with the Leviathan spawning first and Anahita moving in to assist her when she's injured. Both must be killed for loot.
- Early-Bird Boss: Meant to be fought around the same time as Plantera and Calamitas, but Anahita's silhouette is able to spawn in the Ocean at any time as soon as a given world is created. This can also potentially be an Inverted Trope because of said factor, possibly being able to be fought after the Devourer of Gods or higher.
- Easter Egg: Getting inflicted with the Wet debuff (from Anahita's water lances) actually weakens the bosses' attacks, slightly reducing the velocity of Anahita's projectiles.
- Empathic Environment: Beyond the aforementioned rain, the background turns pitch black once the Leviathan spawns.
- Expy: Of Lurerre the Abysroid, both being hulking aquatic behemoths with a lure in the shape of a mermaid. This is a given, as the lure, prior to an update, was a recolor with some tweaks. Even with later updates separating the mermaid-shaped lure into a separate character - Anahita the Water Elemental - it still checks out.
- Eyes Always Shut: Anahita never opens her eyes when you can see her. Even her trophy and mask depict her with her eyes closed. The only time they're open is when she's stealthed as ???, since you can see them glow.
- Face Framed in Shadow: The top half of Siren's face was hidden in her old sprite, with only her eyes visible. Her new sprite settles for bangs.
- Fan Disservice: In a roundabout way; Anahita is an attractive mermaid-like water goddess, but acts as bait for Leviathan - a terrifying aquatic behemoth in the vague shape of a whale or anglerfish - who will suddenly tag in for the former midway into the fight. You're given no indication this will happen until the first time you get at least that far in the boss fight.
- Female Monster Surprise: While Anahita is rather obviously female, what isn't as obvious is that the Leviathan also is. Truth in Television, as female angler fish are far larger and deadlier than the practically helpless males.
- Flunky Boss: During the fight, Paraseas and Aquatic Aberrations will spawn and attempt to attack you.
- Flying Broomstick: This was possibly the case with Anahita's older design as the Siren, who was capable of flying and often seen riding on top of her trident. Averted in her present design, however.
- Flying Seafood Special: Anahita can fly around above the surface and the Leviathan can also spawn above the seas and chase you without even needing to be in the water. More unusual is the Leviathan capable of moving above the water.
- Fragile Speedster: Not very tanky, but Anahita is quite quick, and her attacks come very fast. Leviathan is instead a Lightning Bruiser.
- Full-Frontal Assault: Just like the other Elementals, Anahita lacks clothing, but also has Barbie Doll Anatomy. Could also be a Downplayed Trope seeing as the majority of the skin on Anahita's torso is grey, contrasting with the blue of her head, arms and hair, making it look like she's wearing a dress, even though she isn't.
- Glass Cannon: Anahita isn't too bulky, but is very versatile and hard hitting with her attacks.
- Glowing Eyes of Doom: Anahita's been this way, even back when she was known as the Siren. She doesn't open them during combat, but as her silhouette named ???, they're open and glow white, making her easy to find in the dark depths of the Ocean.
- Genius Bruiser: Not in the traditional way, but Leviathan is this in a relative sense due to it supposedly being "just" an animal. It's capable of forming strategies with Anahita and comes to her aid when the fight starts to turn in the player's favor.
- Horned Humanoid: Subverted in Anahita's case, but when she was known as the Siren, this was played straight with ther third redesign, which had orange horns that twisted forward.
- Human Head on the Wall: Well, as close as it can get given the context, but Anahita's trophy is her severed head mounted to a wooden rack.
- Interspecies Friendship: A Mermaid and a giant Anglerfish in the past, but retconned into a Water Elemental and a just-as-giant ancient sea predator in the present lore. A little downplayed, as they both are aquatic beings.
- It Can Think:
- The Lure (what Anahita was originally called) was not actually an extension of the Leviathan, but a separate living entity that had helped the Leviathan survive by bringing it corpses of fishermen.
- The Leviathan itself shows signs of this as well, being able to form a mutual bond between itself and Anahita, as well as forming a strategy with her.
- Kill One, Others Get Stronger: Defeat one first, and the other will enrage and grow stronger. In Death Mode, both of them will be enraged from the start.
- Leitmotif: "Siren's Call" for the ???, "Siren's War Cry" for Anahita, & "Forbidden Lullaby" for the Leviathan, starting out with a somewhat somber melody that gradually gets more and more rocking.
- Lightning Bruiser:
- Once it's below half health, the Leviathan can hurl itself at you at alarming speeds. In Death Mode, she'll always do this.
- Anahita can be this as well while the ice shield is up, especially in Revengeance mode where she attacks more aggressively and uses the Leviathan as a meat shield.
- Make Me Wanna Shout: Anahita, rather obviously, uses quite a few sound attacks, like treble clefs. Its even implied that she is the one singing in all three of their leitmotifs.
- Making a Splash: Anahita's very capable of doing this with attacks like bubbles and water spears.
- Mighty Glacier: The Leviathan by herself is really tanky and hits like a runaway freight train, but she barely moves vertically.
- My Name Is ???: Anahita's name at first, when stumbled upon in the Ocean as a dark silhouette with glowing eyes, is three question marks. If the player approaches and damages her enough, she'll drop the disguise.
- Off With Her Head!: Implied. Anahita's boss trophy is her severed and mounted head, implying her canonical death involves her decapitation.
- Our Mermaids Are Different: This one is actually a disgraced goddess of the seas who just so happens to fit the physical description of a mermaid.
- Palette Swap: The Siren was formerly this for Lurerre the Abysroid's lure with some touch ups, but it is now averted, as she's undergone several redesigns, up to her current one that coincided with her being renamed to Anahita and her backstory being totally changed.
- The Power of Friendship: A recurring theme revolving around Anahita:
- The Leviathan was the only living thing Anahita can call a companion, and the two are completely inseparable.
- The Aquatic Heart, which gives the player access to a Super Mode that grants them Anahita's powers and likeness. Its old name was the Siren’s Heart.
- How about the little Ocean Spirit that helps provide light upon being summoned with the Strange Orb, which is all but stated to be a baby Anahita? Again, like the Aquatic Heart, the light pet's name made this trope clearer when it was still named the Young Siren.
- The best example would be their special drop The Community, described as "The heart of the Terraria community", an incredibly strong item that provides a myriad of scaling stat bonuses. On the other hand, it can be Exhumed by Calamitas to turn it into the Shattered Community, which is pretty much the opposite of this trope.
- Ramming Always Works: The Leviathan will do this every now and then. Anahita will also attempt to ram players at low health.
- Regenerating Shields, Static Health: Anahita has an ice shield that must be broken before you damage her; she can regain the shield at certain health intervals. The shield also blocks piercing projectiles.
- Ridiculously Cute Critter: The Leviathan pet you can get at the end of the game. Interestingly, it resembles its older sprite.
- Schmuck Bait:
- Anahita initially appears as the harmless "???". Kill it, and Anahita will immediately attack you.
- Also worth noting is that you can find the Anahita Lure anytime, even right when you start the game. Any new player that kills it is going to be in for a nasty surprise...
- Short Range Guy, Long Range Guy: The Leviathan specializes in getting up close and personal to deal melee damage, while Anahita stays at range and primarily summons rings of projectiles around the target. However, they both have alternative attacks - Leviathan with her boulder shots, and Anahita with her trident lunges.
- Status Effects: Anahita can inflict Dazed with her treble clefs, as well as Chilled and Frostburn with her icy mist.
- Stationary Boss: Leviathan was originally this, not moving as much as the other bosses, albeit in a downplayed fashion, as it would still chase after you if you move horizontally. In modern versions however, Leviathan totally averts this, being fairly mobile albeit still rather slow, for something its size.
- Super Mode: You can get one by obtaining the Aquatic Heart, allowing you to turn into Anahita herself and use some of her powers.
- Suspiciously Stealthy Predator: Leviathan is somehow capable of pulling this off, remaing completely undetected until Anahita is at low health despite being nearly the size of the screen.
- Theme Music Powerup: At first, Anahita's theme is serene and unsuspecting. Then, when she begins her attack, the song picks up and gains intensity. And when the Leviathan itself finally shows up, the song descends into full metal territory.
- True Companions: Anahita and Leviathan are unwaveringly loyal to each other, even in death.
- Villainous Friendship: It's uncertain how Anahita and Leviathan actually met or what their relationship is, but they genuinely care for each other and will assist each other in combat without hesitation.
- Villain Song: Downplayed, as Anahita never really says a word, but it's implied she is the one that's singing throughout all three phases.
- Wake-Up Call Boss: By virtue of the fact that it can be fought at any time, it can potentially be fought before King Slime or the Eye of Cthulhu.

A colossal, spider-like machine designed by Draedon to research the Astral Infection. However, it eventually succumbed to the disease despite its inorganic nature, leading it to be abandoned in the Astral Infection as a mindless servant of the blight. Killing it spawns an additional Astral Meteor, but you need to kill Astrum Deus first in order to mine the Astral Ore contained within it.
Drops an abundance of Stardust and Fallen Stars, star-themed weapons, and Aureus Cells; in Revengeance, it also drops the Starlight Fuel Cell to increase adrenaline damage. Killing it unlocks the Astral Chest in the dungeon, and buffs up Astral enemies in exchange for allowing them to drop exclusive items. After Moon Lord is defeated in Revengeance, it becomes substantially more powerful in exchange for dropping a unique mount.
- Action Bomb: Summons Aureus Spawn, which will chase players and attempt to explode on them. In Death Mode, they can also actively fire homing crystals at the player.
- A.I. Is a Crapshoot: Draedon didn't expect the Astral virus to be powerful enough to infect a mechanical being, but it was. Not that he was upset, though - he considered it an overall success.
- Beam Spam: Rapidly launches shotgun blasts of fireballs and radial bursts of homing missiles to bombard players.
- Big Creepy-Crawlies: A giant mechanical spider-crab monster infected with a cosmic pathogen.
- Cast From Hitpoints: In Death Mode, its Aureus Spawns are more dangerous and get the ability to fire projectiles of their own, but Astrum Aureus will lose some of its HP each time it spawns one.
- Damage Over Time: Its attacks inflict the Astral Infection debuff, which quickly drains HP over time.
- Expy: Of Security Robot B.O.X. from Metroid Fusion, both being giant quadrupedal cyborgs that became infected by space-borne diseases. Even their methods of battle vaguely resemble each other.
- Gemstone Assault: Can launch barrages of astral crystals, which will travel a distance before attempting to track down players.
- Homing Projectile: The barrages of crystals that it fires will start seeking out players after travelling a certain distance.
- Leitmotif: "Interstellar Stomper".
- Meaningful Name: Astrum Aureus translates to "Golden Star" in Latin. While it is by no means golden, its name also brings Staphylococcus Aureus to mind, fitting for a being whose death kick-starts an Astral Infection.
- Mighty Glacier: Aureus has high HP, sturdy defense and deals a lot of damage with each attack, but it's fairly slow and can't fly.
- Misguided Missile: Damaging its Aureus Spawn enough will cause them to become unstable and chase faster. However, tricking them into colliding with Aureus itself in this state will cause them to explode and deal a Percent Damage Attack to the boss.
- Playing with Fire: It launches directed spreads of fireballs and flaming, homing crystals. Its back is also alight with red flames, which will occasionally stop burning when it rests.
- Teleport Spam: It will frequently vanish and reappear from a different angle to get the jump on players.
The result of one of Draedon's most nefarious experiments, virulent nanomachines that would enslave their minds of biologicals and turn them into obedient rotting slaves - in this case, a mechanized Queen Bee that serves as a core unit for the infected hive mind. Although Yharim was outraged by the experiment, Draedon paid him no heed, leading to Yharim cutting contact with him and the end of their partnership.
Killing it rewards you with various powerful plague-themed weaponry and equipment. It also drops Infected Armor Plating, a late hardmode crafting ingredient.
- Action Bomb: In Revengeance, it can summon Plague Mines that chase players before exploding. It can also fire homing missiles that can be fortunately shot down before they hit you.
- Artificial Zombie: A combination of this and Plague Zombie, being bees that have been infected by a nano-virus that turns the poor creature into a rotting carcass enslaved to Draedon's will before being fitted with missile pods and armor plating. Oh, and they can spread their horrible condition to others too.
- Art Evolution: Thrice. At first rather plain, then a bit more detailed as a Queen Bee recolor, then a more sleek design with fang-like mandibles. The third resprite completely alters its appearance, making it larger and more robotic. In addition, it now has a blade in place of its sting, a canister containing green liquid attached to its back, and its wings have been replaced with two large jet engines.
- Bee Afraid
- Big Creepy-Crawlies: Was originally a giant bee like the Queen Bee. It has since been transformed into an undead cyborg monstrosity.
- Body Horror: Whatever parts of the Goliath's body that are not mechanical are rotted away from Draedon's virus. It's pretty obvious that the things you fight are no longer alive by this stage. Hopefully.
- Cyborg: Draedon mechanically modified the Queen Bees before infecting them, presumably to allow them to interface with the virus more. Although it looks like they're more machine than bee at this point, as their liquified remnants are dripping out of their armor.
- Death from Above: When it says "PLAGUE NUKE BARRAGE ARMED, PREPARING FOR LAUNCH!!!", it will gain the ability to charge around above the player, raining down plague rockets in the process.
- Degraded Boss: Right after Golem is killed, weaker versions of itself simply called Plaguebringers can start showing up in the jungle, identifiable by their smaller size and green eyes as opposed to the Goliath's red.
- The Dreaded: Feared both for their incredible destructive power and the murderous plague they spread in their wake.
- Empathic Environment: It will tint the screen greenish when summoned.
- King Mook: Serves as one for the Plaguebringers, down to their sprites formerly being almost identical.
- Leitmotif: "Fly of Beelzebub".
- Lightning Bruiser: It's extremely quick, has a surprising amount of bulk, and hits like a truck. That's not even getting into its arsenal of explosive artillery...
- Macross Missile Massacre: Constantly unloads enormous fusillades of stingers and rockets aimed at targets, especially when it charges. It can also fire storms of destructible, homing rockets at players.
- More Dakka: Besides firing volumes of rockets, one of its other attacks is to spray plagued stingers at the target. In Expert mode, these explode too.
- Mechanical Monster: An abomination made of rotted flesh and metal that functions as a mindless killing machine.
- Names to Run Away from Really Fast
- Ninja Pirate Zombie Robot: A giant rotting undead robot bee armed to the teeth with military-grade weaponry and outfitted with jet engines, and is capable of spreading a deadly plague wherever it goes.
- No Indoor Voice: Given all of its lines are in all caps and have a minimum of two exclamation points.
- Our Zombies Are Different: Technically, the Goliath isn't even alive: it's essentially an dead, diseased, rotting bee that only operates due to being composed of mostly machinery.
- Person of Mass Destruction: It is described as being able to easily raze an entire city to the ground through its artillery. And due to the deadly plague it spreads, anything that isn't blown up will be turned into an apocalyptic wasteland.
- Plague Master: Hey, it's in the name. All of its attacks also inflict the debilitating Plague debuff.
- Poisonous Person: By extension of the above trope.
- Red Eyes, Take Warning
- Sickly Green Glow: A recurring theme with the Plaguebringers, but the Goliath takes this further by tinting the screen green-ish when active.
- Turns Red: When below half health in Expert Mode, it will activate the Plague Nuke Barrage, which allows it to rain down large quantities of missiles from above the player.
- Upgraded Boss: A mechanized, infected Queen Bee that at its core fights similarly to its original counterpart, but now packs a large number of new capabilities to match its new position.
- Weaksauce Weakness: Despite being a biomechanical zombie, the Plaguebringer Goliath is still classified as a bee enemy, and as such can have its contact damage halved through the use of the Honey Dew accessory or its upgrades.

A horrific amalgamate created from countless ardent sacrifices fused together as one to reincarnate the God of Sacrifices, the Ravager was created as a last resort against Yharim's troops by a desperate group of faithful, using their own lives as the catalyst. Designed solely for the purpose of killing and with nothing remaining of its old Godly mind, the Ravager aimlessly roams the land as a mindless engine of slaughter. Gains an immense stat buff (and unique loot drops) after Providence is killed.
Drops various bars and cores which would have required a lot more effort to craft, along with several unique weapons and accessories. After Providence is killed, it begins dropping Bloodstone as well. Notably drops the Infernal Blood in Revengeance, which permanently boosts your Rage Mode damage.
- A.I. Is a Crapshoot: The first thing it did after its creation was turn on its creators and slay them. Perhaps making its only motivation "mindless destruction" wasn't such a good idea...
- Art Evolution: Heavily resembles a walking fortress with flaming towers now, and overall looks far more polished and coherent.
- Beam Spam: Its body rapidly fires off rings of lasers in its second phase, and its head launches homing ones.
- Bizarre Alien Biology: Its head can fly off and attack you once sufficiently damaged. There is also the natural blue flames on its tower-like "shoulders," as well as one of the skulls seemingly growing from beneath the other.
- Body of Bodies: The Ravager is an abomination created from a reanimated mass of human sacrifices.
- Cognizant Limbs: Much like Golem, Ravager's arms can fire at you independently.
- Damage-Sponge Boss: With its massive health pool, sturdy defenses, and multiple body parts, the Ravager can take a huge amount of punishment before going down.
- Dem Bones: Its body is supposedly made out of unbreakable bone fortified by its dark magic. Its twin skulls are also its most prominent feature.
- Detachment Combat: When its head loses all its HP, it starts flying around, trying to ram players and fire rockets.
- Dishing Out Dirt: Whenever it stomps, it can cause giant damaging pillars of rock to appear. These will quickly launch out of the ground and attempt to land on players, although they can be destroyed before they land.
- Eldritch Abomination: A massive, grotesque monster that looks like an amalgamated fusion of flesh, bones, and rock, with 2 skulls and purple flames erupting from its "shoulders."
- Expy: Its general 'headless' design, otherwordly design and traits, and the placement of its twin skulls could bring Sachiel to mind.
- Flesh Golem: It's a Living Weapon made out of fused corpses and weapons. It even has a similar AI as the Golem from the original game.
- Gone Horribly Right: It was made by a group of surviving refugees to be an engine of mass murder. Clearly, they succeeded.
- Gameplay and Story Segregation: In its lore, it is stated to have the "regenerative durability of a fortress". While it may be a Damage-Sponge Boss in game, it has no healing abilities whatsoever.
- Gravity Screw: Upon having its limbs taken care of, the Ravager will permanently inflict all players with Weak Petrification, which severely limits the players' mobility by cutting flight time by 90%, disabling mounts, disabling any additional jumps, and removing all jump height boosts.
- Hoist by His Own Petard: The first thing it did after its creation was kill its creators.
- Homing Projectile: It can launch giant missiles that home in on players before exploding for enormous amounts of damage. Its head also launches smaller, red flares that have a weak tracking property.
- Leitmotif: "Open Frenzy".
- Last Stand: Was designed to be this by a particularly desperate group of human survivors.
- Living Weapon: It was created for the sole purpose of destruction, and it boasts enough power and weapons to single-handedly wage wars.
- Losing Your Head: As seems to be growing common nowadays, the Ravager's head will detach and fly after you when destroyed.
- Mighty Glacier:
- Ravager isn't very mobile compared to many of the other bosses (not helped by a lack of flight/teleportation abilities), but it has very high HP at the point you're supposed to fight it and deals incredibly high damage with a wide range of attacks. Not to mention that instead of running to you, it can force you to itself using its flight-nerfing powers.
- It can quickly turn into a Lightning Bruiser in Phase 2, where its mobility skyrockets to the point where it can take massive leaps across the screen to slam players. Combine that with said mobility nerf, and dodging Ravager's attacks just got a lot harder...
- Names to Run Away from Really Fast: Ravager.
- Omnicidal Maniac: It only has one driving motivation: destroy everything in sight.
- Our Zombies Are Different: It's essentially a weaponized mass of corpses given life by dark magic.
- Playing with Fire: Periodically summons pillars of blue flame around the player, which deal high contact damage and lob bouncing fireballs. In addition, its body can launch bouncing fireballs like Golem.
- Roar Before Beating: More like an unholy scream as it appears.
- Red Eyes, Take Warning: Well, one of them anyway.
- Rocket Punch: Like Golem, its fists can extend to punch you.
- Shielded Core Boss: Ravager's main body is invulnerable until all of its body parts are destroyed.
- Taken for Granite: Implied with the Weak Petrification debuff it hammers you with in its second phase.
- The Power of Blood: Played with. While it doesn't use this itself, all of its items that aren't Cores or Bars (the Hematemesis, Bloodflare Core, Blood Pact, and Flesh Totem) seem to use blood as a central theme. The item obtainable from fusing all of Ravager's accessories together is even called the Core of the Blood God.
- Took a Level in Badass:
- Ravager gains an enormous stat boost after Providence is killed, multiplying its health and damage immensely. However, it also drops loot that it didn't before.
- On a more meta level, the Ravager used to be just a stronger Golem clone with a few more attacks (that were developed from Golem itself). Now, it is far more powerful, possessing higher damage output, a more diverse and unique moveset, and the ability to uniquely inflict a debuff that nearly completely neuters your flight power.
- Undead Abomination: A mass of corpses and Magitek fuelled by dark magic that was created as a failed attempt at defence against Yharim's marauders, and so utterly mindless that it destroyed friend and foe alike upon being brought to life.

An ancient starborne serpent revered as a deity who consumed dying stars and birthed them anew, Astrum Deus was corrupted by the Astral Infection and attempted to spread the infection to Terraria under its thrall, fiercely attacking those who would attempt to stop it. Astrum Deus is summoned by sacrificing a Titan Heart at the Astral Beacon within the Astral Infection biome, but can also be summoned via a non-consumable Starcore after its first defeat.
They drop some star-themed equipment and an abundance of Celestial Fragments, but killing it allows the player to mine Astral Ore to make Astral Bars.
- Art Evolution: From a rocky, predominantly gold-and-purple serpent to a metallic silver one with blue-and-red accents, to fit with the revamp of the Astral Biome. A future redesign is hinted by its relic, resembling a much more alien-looking worm wrapped in rings and flexible feelers.
- Beam Spam: Much like Destroyer, it fires off lasers like a machine gun. To make things better or worse, it can sometimes fire these in nigh-solid waves rather than a sporadic barrage. Later in the fight, it'll start firing larger helical lasers as well.
- Bilingual Bonus: Its name means "Star God" in Latin.
- Celestial Body: It was allegedly once a divine serpent of incomprehensible proportions said to devour dying stars and birth them anew.
- Color-Coded for Your Convenience: In its second phase, the worm using its grounded behavior will glow red while the airborne worm will glow blue instead. These will alternate to match their switching behavior.
- Damage Over Time: Its attacks inflict the Astral Infection debuff, which quickly drains HP over time.
- Dual Boss: Once the original Astrum Deus is brought to half HP, it will vanish and split into two. Each worm has the same HP as the original, but killing one will end the fight. The two worms each have identical movesets, but they will alternate their behaviors to coordinate their attacks, with one going directly for the player while the other attacks from the side.
- Eldritch Abomination: Back when it was a full-fledged star god, its very nature was unimaginable, to the point that its presence in reality could only be glimpsed through the countless stars its body birthed.
- Gravity Master: In Revengeance and above, it'll inflict Extreme Gravity for the duration of the fight, severely hampering flight time and making it harder to avoid its attacks.
- Grenade Spam: It can leave lines of lingering astral mines as it flies to limit player movement. Some of these will explode into additional lasers after some time.
- Heavily Armored Mook: Among the worm bosses, Astrum Deus has very high defense and significant piercing resistance, meaning that it's not going down fast regardless of what weapons you use on it.
- How the Mighty Have Fallen: Astrum Deus was once a mighty being of the stars, but has been laid low by the Astral Infection that turned it into a mindless puppet.
- Kill One, Others Get Stronger: In Death Mode, instead of the second worm dying when the first one does, the surviving worm will enrage, forcing you to kill them too. In this state, the worm is significantly faster and more damaging, but is also less durable.
- Leitmotif: "Pest of the Cosmos".
- Meaningful Name: Its name translates into "Star God", which is exactly what it is. Or at least, what it used to be.
- Our Gods Are Different: In the context of Calamity, at least. Astrum Deus isn't native to Terraria and didn't consume an Auric Soul like the other Gods of the world. It is only referred to as a deity because it's an object of worship, and allegedly boasts similar power to one. As a result, Yharim actually holds no ill will towards it.
- Reincarnation: Even after its death, Yharim speculates that a being such as it can't truly die, and that it may have been reborn among the stars.
- Took a Level in Badass: In previous versions of the mod, Astrum Deus was meant to be fought between Plantera and Golem. The boss has since been buffed to be fought between Lunatic Cultist and Moon Lord.
Post-Moon Lord Bosses

Three of the four soldiers who slew the Dragon of Flame and allowed Providence to devour its Auric Soul, becoming her stalwart guardians in their next lives after being empowered by her flames. They now work together to eliminate threats, defend her shrines, and expand her territory. They are meant to be the first boss you fight after Moon Lord, and can only be fought in the Daytime Hallow/Underworld.
The Guardian Commander drops a Profaned Core, which is used to summon Providence herself. All of them also have a chance at dropping accessories that represent mobility/defense/healing respectively.
- Art Evolution: They have become far more polished and organic-looking, with each guardian receiving its own unique sprite. A later redesign turned them into beings that more closely resemble Providence herself.
- Call-Forward: Their attacks directly parallel those used by Providence herself, but are considerably weaker to prepare you for the real deal.
- Combat Medic: The Guardian Healer will restore the HP of its other cohorts fast enough to make them effectively immortal at the tier where they're supposed to be fought, meaning that it must be killed first to make the other two killable.
- Degraded Boss: They are also summoned by Providence as minions during her boss fight. Unlike before, they don't attack, but instead block shots for her and give her buffs while active.
- Heel–Face Turn: Smaller versions of the Guardians can be summoned as helpers by the Profaned Soul Artifact obtainable after Providence.
- Kill One, Others Get Stronger: Every Guardian defeated will make the other two more aggressive and give them new attacks.
- Leitmotif: "Unholy Ambush".
- Mini-Boss: Usually seen as this, since they're not particularly strong and pretty much solely exist to summon their master. However, underestimating them would still be unwise.
- Orbiting Particle Shield: The Guardian Defender periodically generates a shield of Profaned Rocks that protects it and deals damage on contact. In the second phase, it can also throw it as a storm of projectiles.
- Oxymoronic Being: They seem to be made partially of wood, despite the rest of their bodies being flaming rock and them using fire as their main power.
- Playing with Fire: They all attack using fireballs and holy flame spears.
- Power Crystal: The Guardian Healer has purple crystals on its body and can rain down showers of crystal shards.
- Rock Monster: Much like their master, their bodies are mostly made of rock.
- Shielded Core Boss: The main and most powerful Guardian is effectively invulnerable until the other two are killed.
- Spikes of Doom: The Guardian Commander has a prominent molten spike on its front.
- Support Party Member: The Guardian Defender and Healer are this, with the former providing the Commander with a significant defense buff when alive, while the latter rapidly heals the other two.
- Tactical Suicide Boss: The Guardian Healer can fire spreads of damaging stars, but will also fire green stars that heal players that collect them. Downplayed in the fact that the boss can still be killed if this attack is not used, and the attack only slightly helps the player. Averted in Death Mode, where it will no longer fires healing stars.
- Wave-Motion Gun: When the Healer is brought to half health, it will group up with the other Guardians and fire a large sweeping laser ray. In Revengeance or higher, it will instead fire two that converge in a scissor pattern.
- Wolfpack Boss: There are 3 Profaned Guardians that must be killed. Each one provides a different buff that makes it important to eliminate them in a particular order, and they'll switch up their patterns as they are felled one by one.

One of the impure draconic species that were offshoots of the Auric Dragons during the Draconic Era. The Follies were one of the few species that survived the great purges of the Deific Era, and have become reclusive and exceedingly violent as a result.
Dragonfollies drop several weapons, a ranger accessory, and Effulgent Feathers, which are primarily used to make Silva Armor and craft the Dragon Egg to summon Yharon. In Revengeance, it also drops the Red Lightning Container to permanently buff your Rage Mode damage.
- Art Evolution: Its new sprite is a lot more detailed, and makes it look a lot more like a deformed Yharon.
- Death from Above: In addition to raining feathers, it can also call down lightning strikes in later phases.
- Energy Weapon: In its second phase, it will start creating pillars of energy on the ground to limit the player's movement. In its third phase, it will summon them in pairs.
- Extra Eyes: Has four eyes, much like the being they were cloned from.
- Fastball Special: Its accessory drop, the Dynamo Stem Cells, gives your ranged weapons a 20% chance to fire miniature Dragonfollies, with their damage increasing the slower said weapon is.
- Feather Flechettes: Will frequently summon rings of electric feathers around players, which converge before homing in on them.
- Flechette Storm: Often the result if it uses its feather burst attack a lot.
- Fluffy the Terrible: Back when it was called the Bumblebirb, it was this.
- Flunky Boss: Summons Draconic Swarmers to assist it. These are essentially smaller versions of itself but with lower stats and no projectile attacks.
- Homing Projectile: The electrified feathers it launches will redirect towards and fire themselves at players.
- Leitmotif: "Murderswarm".
- Lightning Bruiser: Hits like a runaway bullet train and moves just as fast. Its HP, while nothing obscene, is still passable.
- Meaningful Rename: From Bumblebirb to Dragonfolly, shifting it from being a semi-joke boss to posing a legitimate threat to the player's quest.
- Punny Name: It's a creature that resembles a mix of a dragon, a bird and an insect, that is an offshoot of the true dragons. A dragon folly.
- Red Eyes, Take Warning: Four of them.
- Shock and Awe: They generate immense static charge from the rubbing of their golden feathers, and use it to hunt. In combat, it'll use electrified feathers, red lightning bolts, and pillars of lightning to attack.
- Took a Level in Badass: The Dragonfolly used to effectively be a stronger Mothron clone that occasionally threw projectiles. Now, while it retains most of that, it has several phases and an expanded repertoire of attacks to threaten with.
- Turns Red:
- Literally. When it enters a new phase, it lights up with red lightning, then yellow.
- If you leave the jungle or get too far from it, the Dragonfolly will enrage, increasing its aggression and projectile speed. If you do both at the same time...
- Wolfpack Boss: It can spawn small Draconic Swarmers to attack alongside it.

One of the mightiest Gods of Terraria who slew and devoured the Dragon of Flame in a time lost to memory, Providence is a fiery deity who seeks to end all inequality and pain by reducing all things to impartial ashes. She enthralled countless worshippers to her side, eluded and decimated the Godseeker's forces for decades…and now, she has you in her crosshairs after you slew her Guardians.
She is meant to be fought right after the Profaned Guardians, and like them can only be fought in the Hallow/Underworld, with her drops and attacks differing depending on where you battle her. She is supposed to be summoned at daytime, but she can be summoned at night to fight an empowered form for bonus rewards.
Providence drops many weapons which revolve around holy fire, Divine Geodes used to make Tarragon Armor among other things, and also drops the Rune of Kos, used to summon the Sentinels of the Devourer. Her death also causes Uelibloom Ore to generate in the world. In addition, she drops a unique accessory depending on where she's killed (the Elysian Aegis for the Underworld, and the Elysian Wings for the Hallow). Killing her also buffs up Brimstone Crag enemies (along with Ravager), while allowing them to drop Bloodstone respectively.
- Art Evolution: Formerly, Providence was a massive moth with red wings. Then, she was a large statue-like mass with flaming wings. Her current sprite takes this even further by giving her a more cohesive design with an actual head, pale purple crystals lining her "shoulders," and flame wings that now resembles a Daimonji.
- Big Creepy-Crawlies: Her old design was this, instead of the mass of rock and flame she is currently. She still had some traits in some former sprites, primarily her "head" having mandible-like protrusions (which she retained in her newest sprite).
- Blue-and-Orange Morality: Sees existence itself as the root of all suffering, and wants to purify the world by completely annihilating it.
- Bragging Rights Reward: If she's summoned at night, she becomes substantially harder in exchange for dropping...a set of dyes that give you the same aurora effect when she is spawned.
- Bullet Hell: Her cocoon phases fire many, many layers of projectiles. The whole fight can also become this if you don't bait her attacks around well enough.
- Damage-Sponge Boss: She has a lot of HP, sturdy defenses, defensive stances which can further reduce incoming damage, and self-healing once she summons her Healer Guardian. Fortunately, her huge size makes her an easy target.
- Defeat Equals Explosion: When killed, she becomes engulfed by blinding light before disintegrating in a massive explosion.
- Defend Command: Occasionally Providence will retreat into her shell and increase her damage reduction to 90%, while spraying either a maelstrom of stars or a barrage of flaming spears. In both cases, dodging is your best option - although, unlike Brimstone Elemental it's still possible to do reasonable damage to her during this state.
- Dynamic Entry: Appears with the sound of a fiery explosion and an aurora-like aura of radiant light. If fought at night, this light will be blue-and-purple instead. And no, you can't attack her during this entrance, as she'll gain huge damage reduction before she starts attacking.
- Empathic Environment: Causes the area to turn orange, or a greyish-blue if fought at night.
- Expy: Being a six-winged, vaguely insectoid being of fire, she bears similarities to Volcarona, which were especially evident with her older sprites. Her current sprite also somewhat resembles The Radiance, being a vaguely mothlike and malevolent goddess of fire and light.
- Fire Purifies: Her flames supposedly purify everything they touch. "Purify" meaning reduced to an impartial ash, free of all desires and sin.
- Flechette Storm: One of her attacks summons a swarm of flaming spears to pincushion you with. She'll both fire these spears directly and in a spiral formation.
- Flunky Boss: Although plenty powerful by herself, she can summon a group of Profaned Guardians at 35% HP that orbit her. Each one gives her a different stat buff until killed.
- Gravity Screw: She inflicts the debuff Icarus' Folly, which greatly reduces flight time.
- Hit-and-Run Tactics: Her main strategy during her war against Yharim, appearing and decimating his forces before vanishing just as fast. The main reason you're able to defeat her in single combat is because Providence got overconfident when faced with only a single warrior.
- Hot Wings: Her wings are entirely made of fire. This fire becomes a greenish-white color if fought at night.
- Invincible Minor Minion: Once below a certain amount of health in the Underworld (or the Boss Rush), she'll summon an invincible crystal that hovers over the player for the rest of the battle, showering them with damaging crystal shards.
- Leitmotif: "Unholy Insurgency".
- Lightning Bruiser: She's very fast, extraordinarily bulky, and deals huge amounts of damage through her projectile spam.
- Light Is Not Good: Primarily wields fire and light based powers, and is an Omnicidal Maniac who wants to destroy all life.
- No Fair Cheating: When fought at night, Providence will gain adaptive damage reduction if you try to kill her too quickly, making her Nigh-Invulnerable and forcing you to fight her for a certain amount of time as the DR decays.note This is designed to counteract coming back for her with endgame gear and trying to curb-stomp her, making the fight roughly the same length (and roughly the same difficulty given how hard she hits) no matter when you fight her.
- Omnicidal Maniac: Seeks to obliterate everything in an attempt to purify the world of both vices and virtues.
- Oxymoronic Being:
- Since "profaned" means desecrated or defiled, she is essentially an unholy god.
- Her new sprite takes it even further, since she has wooden parts despite being on fire.
- Physical God: Specifically, a fire/sun goddess of light and darkness who seeks to erase everything to cleanse the world. Even among the Gods, Yharim notes that she may be among the strongest.
- Playing with Fire / The Power of the Sun: Her main method of attack is obliterating her target with showers of holy fire blasts. She shoots volumes of fireballs, exploding flares, fireballs that explode into more fireballs, molten blasts, flaming spears, fireballs that launch more fireballs...you get the point.
- Power Crystal: Her shoulders feature prominent purple crystals, and she has a purple gem which serves as her core. When fought in the Underworld or the Boss Rush, she can also summon an invincible crystal that rains down crystal shards on you.
- Power Gives You Wings: Whenever she's in her active state, she has distinct wings made of pure flame.
- Pure Is Not Good: She seeks to purify the world of all sin...by wiping out everything there is.
- Rock Monster: Her body is mostly made of rock and purple crystals, intertwined with wood and veins of fire.
-
 Self-Imposed Challenge: Two, in fact!
- Summoning Providence in the night will cause her flames to turn white, make her attack much faster, give her a full moveset with some upgrades, make her much sturdier, and make her attacks all inflict maximum damage, among other things. Beating Providence in this state rewards you with Profaned Moonlight Dye, which gives the player the same aura that Providence has when summoned.
- There is a specific challenge in the mod where the player must defeat Providence while only using the Profaned Soul Artifact's minions and the Golden Gun. Defeating Providence this way will make her drop the Profaned Soul Crystal, an extremely powerful endgame accessory that turns the user into an emissary of the Goddess herself.
- Shout-Out: Her having a significantly harder fight if battled at a time you weren't supposed to fight her which drops a special reward is a direct reference to Terraria 1.4's Empress of Light, who becomes enraged if fought at daytime instead (see Hilarious in Hindsight in the YMMV tab for more info). However, unlike enraged Empress, whose attacks all become a One-Hit Kill and drops an Infinity +1 Sword as a reward, Providence gains a more varied set of buffs and only gives a Bragging Rights Reward. The 1.4 port later changed the Empress of Light's daytime enrage to be similar to Providence's instead of just being a No-Damage Run.
- Tactical Suicide Boss: In one of her phases, she summons a number of deadly stars. Along with them, she summons green orbs that heal players that collect them. Downplayed in the fact that she can still be killed if this attack is not used, and the attack only slightly helps the player. Averted in Deathmode, where she no longer fires healing stars.
- Turns Red: If you get too far from her, she'll inflict the Holy Inferno debuff until you come back. Said debuff drains your HP at an exponentially increasing rate to ensure quick death should you refuse to get closer to her.
- Wave-Motion Gun: Once she's below a certain HP threshold and fought in the Hallow (or the Boss Rush), she can charge up and fire a gigantic laser beam that sweeps the area in a circular motion. However, she will slow down while firing to compensate, although she takes significantly reduced damage while charging. On Revengeance or higher, she will fire two of these beams that converge in a scissor motion, and in her Night form, she fires four.

A group of three wildly different entities that are linked by their connection to the Devourer of Gods and the Distortion he hails from. The Rune of Kos, which can only be obtained by defeating Providence, allows the player to use a fragment of Providence's power to lure them out of hiding. They are all supposed to be battled before the Polterghast and after Providence, and each of them drops one component used to craft various items, or an alternate recipe for the Cosmic Worm to summon their master.
Each Sentinel must be summoned by the Rune in a different location. Signus must be spawned in the underworld, the Storm Weaver must be spawned in space, and the Ceaseless Void must be spawned in the Dungeon.
- Artifact Title: As of the lore rewrite, none of them are directly affiliated with the Devourer of Gods anymore. It is unknown if their title will be abolished to reflect this, or further revelations will suggest otherwise.
- Eldritch Abomination: A trio of them taking on the forms of a Humanoid Abomination followed by a normal Eldritch Abomination and finally an Animalistic Abomination.
- Leitmotif: "Servants of the Scourge", which is shared by all three of them. Uniquely, it's divided into three individual variations for each Sentinel: the first for Storm Weaver, the second for Ceaseless Void, and finally, Signus, Envoy of the Devourer.
- Mini-Boss: Often regarded as these rather than full bosses, but are far tougher than the average Mini-Boss.
- Purple Is Powerful: All three have purple as a predominant color much like the Devourer, and they're each very deadly.
- Land, Sea, Sky: Sort of. Signus is in the lava filled underworld, Ceaseless Void is in the dungeon complex beneath the surface, and the Storm Weaver is miles above the clouds, found in space.
Signus, Envoy of the Devourer

A frightening specter of tremendous power and even greater mystery revered by the Onyx Kinsmen, all that is known about Signus is that it hails from the Distortion like the Devourer of Gods and seems to be linked to him somehow. Its goals are unknown, but its capacity for deceit and ruthlessness is well documented, as is its killing potential.
Drops several weapons themed after him and Twisting Nether, which is used in several weapon recipes but mainly used to complete the Cosmic Worm.
- Action Bomb: Can summon Cosmic Mines that fly at players and explode.
- All-Encompassing Mantle: Wears a purple cloak that obscures everything on him, minus his glowing eyes, a set of spikes on his back and his rather misshapen lower half.
- Art Evolution: His cloak became a bit more detailed as he gained two more eyes, all in pink, and his tail became more smog-like. A planned resprite makes him bigger and gives him more detail.
- Badass Long Robe: An all encompassing one in purple.
- Battle Boomerang: The knives he throws return to him after travelling a fixed distance.
- Belly Mouth: During one of his phases, his face becomes a mass of black tendrils while he grows a toothy purple maw on his torso.
- Bizarre Alien Biology: His eyes are glowing purple teeth.
- Bullfight Boss: During one of its phases, Signus will rapidly lunge at the player several times in succession.
- By the Lights of Their Eyes: The only thing on his face that's usually always visible. Except their teeth.
- Cthulhumanoid: His second phase resembles one, where his face is entirely replaced with tentacles.
- Damage-Increasing Debuff: Nearly all his attacks inflict the Whispering Death debuff, which significantly lowers defense, cuts your damage output, and decreases life regeneration.
- Death from Above: One of his attacks has him fly above the player and rapidly fire knives down at them.
- Expy: A hooded being of high levels of magical power as well as some Facial Horror, serving as The Dragon to an Eldritch Abomination related to invertebrates can bring The Hooded One to mind.
- Flunky Boss: Summons Cosmic Lanterns to provide melee combat assistance and block off the player's escape path while he's charging. Notably, the lanterns have practically no HP but hit almost as hard as Signus himself.
- Glowing Eyes of Doom: Six pink and narrowed ones.
- Hero Killer: Potentially the one who ultimately killed Braelor.
- Humanoid Abomination: The only humanoid one of the Sentinels. However, it's painfully obvious that he is anything but human, given that he comes from the Distortion and can seemingly exist in multiple places at once, among his other otherworldly powers.
- In the Hood: Has a hood that completely hides his face, save for his eyes.
- Lightning Bruiser: Travels very fast, teleports a lot, and hits like a truck. In his charging phase, he can dash across the screen in less than a second.
- Playing with Fire: Can summon cosmic flames to blind and burn anyone he fights.
- Red Eyes, Take Warning: His old sprite had four of them.
- Shapeshifting: Capable of doing this by virtue of the fact that he lacks a true form. It has even been seen consuming bodies and taking their appearances after. In battle, he can takes on three wildly different forms as he switches phases.
- Spikes of Villainy: Has 3 spikes on his back. And they move.
- The Spook: No one knows who the hell Signus really is, nor what he wants. Even though he comes from the Distortion and helped the Devourer of Gods against Braelor and Statis, it's not even clear whether he's actually an ally of the Devourer or not.
- Teleport Spam: As part of his stealth motif, he will teleport constantly during one of his phases.
- Turns Red: While his phases are time-based and follow a set pattern, they will become enhanced as he loses HP. As he nears death, he will teleport and move faster, become Immune to Flinching, shoot knives faster, and leave behind exploding dust as he charges. In general, he also becomes harder to see as he loses health - below half health, he stops emitting particles altogether.
Ceaseless Void

An incredibly ancient, seemingly sentient portal to the Distortion, previously kept sealed in the dungeon and predating even the Devourer of Gods himself. Despite the Devourer's claims that he created the portal like he did the one to his home, Yharim suspected something far greater was looming within, but chose to abandon the mysterious rift and never return.
Drops some equipment based off of it and also drops Dark Plasma, which is used for several weapons as well as the Cosmic Worm.
- Armored But Frail: Although it has a high 50% DR, it also has far less HP than its cohorts and less HP than most late Hardmode bosses. It makes up for this HP defecit through the swarms of Dark Energy that must be destroyed to make it vulnerable.
- Art Evolution: Ceaseless Void formerly resembled a mirror grasped between two claws. It has been redesigned to look more jagged, like a maw filled with teeth held together by crystals. A second resprite took this even further, detailing the sprite even more, adding Sucking-In Lines for the void itself, and changing its purple-and-pink wings to black ones made of chaotic void energy.
- Eldritch Abomination: A semi-sentient living tear in reality leading to an Eldritch Location, with the ability to weaponize its rifts to indiscriminately attack foes.
- Flunky Boss: Relies on the melee damage of its orbiting Dark Energy minions to attack, only taking direct action once its minions have been wiped out.
- Glass Cannon: Its attacks hit hard and its Dark Energy swarms can rack up a ton of damage, but it's comparatively very frail even with its heavy armor. It circumvents this by turning invincible whenever a new horde of Dark Energy is summoned.
- Gravity Screw: Getting hit by its Dark Energy will inflict Distorted.
- Gravity Sucks: When its current Dark Energy swarm has been hurt enough, it'll start sucking in all players along with a spiral of invincible Dark Energies and homing lasers. This is the only time that it'll take damage.
- Hold the Line: On its last legs, it'll go invincible and start using a stronger version of its suction attack as its health burns away, forcing you to survive for 15 seconds before the Void implodes on itself and dies.
- Nothing Is Scarier: Unlike every other enemy, its bestiary entry is completely empty, as is the one for its Dark Energies.
- Shielded Core Boss: Only turns vulnerable if its Dark Energy swarms are thinned out. It will replenish them at certain HP thresholds.
- Wham Line: Its lore item reveals that the Distortion is far, far older than anyone had previously imagined, and serves as the first clue behind its true nature and that of the Devourer of Gods.
- You Will Not Evade Me: When doing its stationary attack, it will quickly reposition if the player tries to run away from it.
Storm Weaver


A lesser serpent of the same species as the Devourer of Gods, which slipped into Terraria through one of the many rifts he created. Although it is currently little but an electrifying beast roaming the skies and devouring sky beasts for sustenance, the Devourer of Gods monitors it carefully in case it ever grows strong enough to threaten him.
Drops weapons based off of it, and also drops Armored Shells which are used for a few weapons and the Cosmic Worm.
- Animalistic Abomination: The most animal-like in the form of a worm, and also more or less Devourer of Gods Jr.
- Always a Bigger Fish: The creature feasts upon Wyverns that are in the air with it.
- The Assimilator: Like the Devourer of Gods, it gains the powers of those it consumes. Eating all of the creatures living in the sky is what gave it its various electrokinetic and storm-related powers.
- Attack Its Weak Point: Its tail in the first phase, which takes massive damage from all attacks. Inversely, attacking anywhere else will result in Scratch Damage.
- Attack the Tail: The only weakspot in its first form is the tail, and attacking anywhere else does 0 or 1 damage.
- Art Evolution: Got one that made the armored phase look much more vicious, coated with spines and crystals, while making the unarmored phase look bigger and more threatening than its old sprite. Later it got another one that made it even spinier, with its armored phase getting more than one lightning-bolt design.
- Blow You Away: Can start summoning lingering tornadoes when sufficiently damaged.
- Death from Above: Lightning bolts will rain down from the sky whenever it lunges. After taking some damage, it'll also start raining down rows of ice blasts from the sky.
- Empathic Environment: It begins to rain when the Storm Weaver spawns. As the fight progresses, the rain will become accompanied by snow when it starts using ice attacks, and then finally turn into a thunderstorm when it starts using wind.
- High-Altitude Battle: It's in space.
- Lightning Bruiser: While it appears to be only moderately fast in its first form, that all changes when it sheds its armor. It hits like a freight train and can take quite a bit of damage in both forms, due to its massive defense in its first form and enormous health bar in its second.
- Segmented Serpent
- Shed Armor, Gain Speed: After you damage it enough, its armor shatters and it becomes much faster and more deadly, albeit losing all its defense.
- Shock and Awe: Can spawn orbs which fire lightning bolts. It also rains lightning from the sky, and can summon a surge of lightning as it charges players in Rev+.
- Super-Toughness: In its armored state, it will shrug off anything that doesn't hit its tail.
- There Is Another: A serpent of the same kind of the previously thought to be one-of-a-kind Devourer of Gods.
- Turns Red: Damaging its tail enough causes it to lose its shell and become far more aggressive.
- Unskilled, but Strong: The Storm Weaver acts like a feral beast and seemingly lacks any real goals or motivations outside of eating and growing, but it possesses the size and strength to pull its weight regardless.

As the death toll of Yharim's crusade rose and his apathetic neglect continued to grow, the prisoners and jailors within his dungeons died in scores, but the dungeon's hexes prevented their souls from moving on, causing the souls to fuse into a terrible amalgam. The monstrosity was ferocious and uncontrollable, yet Yharim ignored it in his blind crusade, leaving it to rampage endlessly in the Dungeon. It appears naturally after you kill 30 Phantom Spirits.
Drops numerous spectral weapons as well as the Ectoheart in Revengeance which permanently increases Adrenaline damage. Killing it also allows certain Abyss foes to start dropping items, while unlocking the final tier of the Acid Rain event. Also drops Ruinous Souls, which are used to create weapons and gear, most notably the Stratus line of equipment and Bloodflare/Omega Blue Armor.
- Almighty Idiot: The Polterghast is tremendously powerful, but nearly mindless. It is driven purely by madness, wrath, and sorrow.
- Animated Armor: Its armor and chains are just scraps of metal animated by its power.
- Anti-Frustration Features: After you've defeated it for the first time, killing Phantom Spirits will no longer force-summon the Polterghast and possibly interrupt your other dungeon activities. Instead, if you want to refight it, you'll have to make a Necroplasmic Beacon.
- Art Evolution: Planned concept art for it discards most of its insectoid shape for a more amorphous mass of limbs, mouths, and eyes to emphasize its status as a spirit amalgam.
- Big Creepy-Crawlies: Vaguely resembles a stag beetle.
- Beam Spam: Its primary means of attack in Phase 1 and 2. They alternately bounce off surfaces or home and pierce walls.
- Cannibalism Superpower: Originally a number of separate spirits, the Polterghast came to be after the spirits turned on each other and began to consume and merge with one another.
- Combat Tentacles: In a similar vein to Plantera, it uses damaging hooks to move itself around. Turns out it actually doesn't need them - once it loses enough health, it will detach its hooks and turn them into invincible turrets while it begins flying.
- Damage-Sponge Boss: While it doesn't have a particularly stellar HP pool (actually having less health than Providence on an equal difficulty), it has damage reduction that increases as it loses HP, which makes it nigh-impossible to burst down and allowing it to actually take less damage the more injured it is.
- Death or Glory Attack: At critical health, the Necroplasm gains a massive speed boost at the cost of no longer spawning minions.
- Doppelgänger Attack: As the Necroplasm, it can spawn clone of itself that attacks just like it, and can launch coordinated charges along with itself. You can destroy the clone at the cost of enraging the Polterghast itself.
- Expy: The Polterghast, in particular its last form the Necroplasm resembles the Metroid Prime.
- Flunky Boss: It can summon Phantoms in its final phase that orbit itself while shooting, along with the aforementioned clone. Once it's at low HP, it'll also start spawning Happy Phantom Spirits that chase players while firing.
- Fusion Dance: A fusion of numerous spirits into one creature.
- He Was Right There All Along: How do you summon Polterghast before killing it once? You don't, because Polterghast summons itself after the player kills enough Phantom Spirits in the dungeon.
- Improvised Armor / Improvised Weapon: In order to hunt its fellow spirits more effectively, the Polterghast scraped together and animated loose fragments of metal to create its armor and chains.
- Invincible Minor Minion:
- The Phantoms it spawns as the Necroplasm (one stage earlier as Necroghast in Death Mode). They are invincible and will rotate around the boss, deploying spectral mines which slowly accelerate towards their target.
- Once it becomes the Necroghast, its hooks detach and become mobile turrets. They will stop this once it becomes the Necroplasm.
- King Mook: Seems to be one to the various spirits roaming the dungeon. Its lore reveals that it's actually a mass fusion of said spirits, and actively hunts its own kind to grow stronger.
- Leitmotif: "Feral Amalgamation".
- Lightning Bruiser: While it normally moves at a fairly slow pace, as the Necroplasm it's capable of terrifying bursts of speed, very fast charges, and deals immense damage on contact. In addition, it should still have a good amount of HP left on top of its significant damage resistance.
- Merger of Souls: It is an entire legion of souls that fused into a single, monstrous being.
- Our Ghosts Are Different: For one thing, it's a giant spectral insect-like thing with a rocky shell that fires lasers. Not to mention it's actually a fusion of innumerable spirits instead of being just one.
- Pinball Projectile: Its shots bounce off walls.
- Ramming Always Works: While all of its forms can use fast charge attacks, the Necroplasm abandons all of its projectiles and resorts to simply ramming into you and launching coordinated lunges with its clone. Of course, its minions will supplement some of its former projectile spam.
- Schmuck Bait: Thinking of farming some Phantom Spirits right after Providence? Well, make sure not to kill that many, lest you want this spectral nightmare to show up and quickly murder you.
- Sequential Boss Fight: The Polterghast has 3 phases, one as the Polterghast, one where it transforms into the Necroghast, and a final one when it transforms into the Necroplasm.
- Shed Armor, Gain Speed: With every phase, more of its stone shell falls off and the faster it gets. While its defense goes down as a result, its damage reduction actually goes up as it loses health.
- Tortured Monster: It might be a terrifyingly powerful phantom, but it's still a possibly-unwilling fusion of spirits that Yharim murdered or imprisoned, driven by only hatred and hunger. In some ways, destroying it can seem like a bit of a Mercy Kill.
- Turns Red:
- It makes up for its average HP with passive damage resistance that increases as its HP goes down. And of course, as it moves through its phases it gradually gets more and more dangerous. Special mention to its second phase, where its shots literally turn red and become more damaging.
- In addition, the more open space their is around it, the more aggressive and damaging it will become.
- If you leave the dungeon, Polterghast goes absolutely berserk until you go back in.
- Unstoppable Rage: The only thing that drives this abomination is an undying rage pointed at nobody in particular, leading it on a nigh-unstoppable rampage until you kill it for good.
- Undead Abomination: An extremely powerful spectral amalgamation of the countless victims claimed by Yharim's reign of terror, driven completely mindless with rage and hunger by their gradual metamorphosis.
- Vengeful Ghost: The circumstances of their deaths mean that the spirits of the Polterghast alternate between despair, madness, and rage at the same time. This translates to them violently lashing out at the living.

One of the oldest living beings on Terraria and last living relatives of the Auric Dragons, revered in the past as a legendary apex predator despite its lack of an Auric Soul. Even weakened by the passage of time and the poisoning of its home, this living legend still persists to fight another day. It appears at the end of a Tier 3 Acid Rain or when fished up using a Bloodworm, and drops a number of sulphur-themed weapons.
- Artificial Brilliance: Unlike Duke Fishron, or even Yharon for that matter, the Old Duke aims his charges while taking the player's momentum into account. This allows him to predict the player's movements and catch them out, making dodging his attacks more difficult than your average charging boss.
- Blow You Away: Can create acidic vortexes that suck the player in.
- Call-Back: To Duke Fishron, obviously. Besides their similar appearance, it also has similar attacks, and is even summoned in a nearly identical manner.
- Composite Character: While clearly based on Duke Fishron, many of its attacks are derived from the Aquatic Scourge. This would in turn make it the Aquatic Scourge to Duke Fishron's Desert Scourge, as a member of its species mutated by the Sulphurous Sea.
- Flechette Storm: The tooth balls it fires explode into volumes of spikes.
- Flunky Boss: Can summon large numbers of Sulphurous Sharkrons to ram you.
- Four Is Death: The Bloodworms which can be used to summon it have 4444% bait power.
- Glowing Eyes of Doom: Like his younger counterpart, The Old Duke gains these after he transitions into his second phase.
- Leitmotif: Toxic Wisdom.
- Lightning Bruiser: Duke Fishron was already one, but this guy takes all of that up to eleven.
- Logical Weakness: The Old Duke is normally extremely resistant to damage, making him an Implacable Man - however, due to his age, he will get tired and stop to rest every ten attacks, greatly reducing his defenses during that time.
- Mythology Gag: The Old Duke was released in an update that went live on April Fools. The original Duke Fishron was initially part of an April Fools joke by the Terraria devs.
- Our Dragons Are Different: The entire Fishron species are one of the closest relatives to the Auric Dragons, and the Old Duke's bloodline is even stronger due to its age.
- Poisonous Person: As per a monster from the Sulphurous Sea. Its attacks can sometimes leave poison clouds like the Aquatic Scourge.
- Stronger with Age: It's one of the oldest living members of a species already hailed as peerless apex predators and adjacent to Physical Gods, having survived both the Deific Era's purges and the poisoning of the Sulphurous Sea. It's clear that time not only honed its intellect, but also its raw power.
- Teleport Spam: Will occasionally teleport behind the player in its last phase.
- Zombie Puke Attack: Can vomit out large amounts of toxic gore to attack.


Cunning, conceited, and exceedingly powerful, the Devourer of Gods is a massive, reality-warping serpent from an alternate plane known only as the Distortion, with the uncanny ability to devour and absorb the essence of even the Gods themselves. Yharim begrudgingly recruited it in an attempt to decisively win his crusade against the Gods, even equipping it with its now-infamous cosmic steel armor - but not only did the serpent's whisperings eventually catalyze his downfall, its true goals may lie somewhere beyond mere gluttony…
The Devourer drops a number of weapons based off of him, but his most important drops are Cosmilite Bars, which are used in most endgame recipes as well as the Cosmic Anvil used to make them. Killing him also buffs up the Frost/Pumpkin Moons and Solar Eclipse while making them drop Endothermic Energy, Nightmare Fuel, and Darksun Fragments respectively, all of which are essential endgame crafting materials.
- A God Am I: Firmly believes himself to be one. Given his immense strength and the fact that he eats Gods and assimilates their power, his claims are likely justified.
- All Your Powers Combined: Takes something away from each of his Sentinels. The most obvious parallel is Storm Weaver, as they're both flying metallic worms who must be attacked at certain weak points to do significant damage. However, the Devourer of Gods uses laser attacks like Ceaseless Void, and changes its behaviour and method of attack on a fixed timer like Signus, in addition to using Signus' Whispering Death debuff. In lore, it's also said to gain the abilities of anyone it consumes.
- Anti-Air: During its airborne "blue" phase, it will only physically attack players that are in the air.
- Anti-Frustration Features: A few.
- Minions and homing attacks ignore the Devourer's massively resistant body segments, going for his vulnerable head and tail instead.
- The Cosmic Guardians are intangible for the first few seconds of their lives. While this makes it impossible to instantly kill them on spawn, it prevents them from dealing cheap hits.
- While invisible in his second phase, he cannot deal contact damage to the player, although he can still be hit.
- When firing its laser walls, the player is given infinite flight time to avoid putting them into an unwinnable situation.
- Armor of Invincibility: The Cosmilite armor Draedon made for it is said to resist any attack while still retaining enough flexibility that the Devourer can move as if it weren't wearing it at all. In-game, while it does give him insane damage resistances on his body, it doesn't protect his head or tail despite them also being armored.
- Art Evolution: Starting from a purple Palette Swap of The Destroyer, he gradually got more and more detailed through its many balances, culminating in the eldritch monstrosity that is his final form.
- The Assimilator: It absorbs the powers of anything it consumes.
- Attack Its Weak Point: Its head and tail. Not only do they take increased damage from all attacks (especially the former), they're the only parts of its body that don't have massive amounts of damage reduction.
- Beam Spam: Follows the proud tradition of worm bosses spraying lasers, although he summons them in converging spreads around the player instead. Its second form adds in fireballs and timed laser grids.
- Boss Banter: The creature's surprisingly talkative during its fight.
- Bragging Rights Reward:
- The Cosmic Plushie, which is obtained by opening The Devourer of Gods' Treasure Bag with a Hardcore character while Deathmode is active. It's a pet-summoning item that summons a miniature anthropomorphic Devourer of Gods known as the Chibii Devourer. As expected, it acts like a normal pet item... except not. If you and Chibii are in very dark areas, Chibii Devourer may meow, scream, or stab the player for 500 damage.
- If it stabs the player, it will additionally spawn a real Cosmic Guardian enemy identical to the one spawned by The Devourer of Gods. If the player character has the name "Terry"note then the Chibii Devourer will instead spawn the Devourer of Gods in its final form when it stabs the player.
- Bullet Hell: His first form starts off by firing telegraphed sprays of lasers from around the player, but this really shines in his second form where he'll periodically summon telegraphed grids of laser beams that'll require some precise movements to dodge through. Later on, he'll start adding in targeted converging spreads of lasers to spice things up.
- Bullfight Boss: Well, half the time. It spends some time flying and some time chasing players on the ground... though this is never an excuse to underestimate its insane killing power.
- Cannibalism Superpower: As said before, he can devour the essence of the Gods.
- Contractual Boss Immunity: The Devourer's body segments are massively resistant to damage, making piercing weapons next to pointless save to hit its weak points easier. If that wasn't enough, its body segments also have the standard Calamity piercing resistance, lowering your damage output even more.
- The Corruptor: The Devourer of Gods constantly whispered in Yharim's ear, driving him to lower depths of villainy and ultimately catalyzing his downfall.
- Damage-Increasing Debuff: Contact with him inflicts the Whispering Death debuff, which significantly lowers defense, cuts your damage output, and decreases life regeneration.
- Defeat Equals Explosion: When killed, the Devourer's body disintegrates part by part before he explodes in a blinding flash.
- Defiant to the End: When he's on low health, he shouts "A GOD DOES NOT FEAR DEATH!"
- Eaten Alive: Ninety percent of all player deaths against this boss will be to its freakishly powerful jaws. Notably, this was also the fate that likely met many of the Gods Yharim sicced him on.
- Eldritch Abomination:
- A giant predatory worm of immense power that possesses reality warping capabilities and resides in its own dimensional plane. Simply being near it warps gravity and it can seemingly phase out of reality at will.
- If the tooltip for Metastasis is any indication, it could potentially become something far more gruesome if it continues to recklessly consume beings for power.
- Empathic Environment: The sky will alternate between pink or blue in his presence to signify his phase changes. When he's at low health (or always in Deathmode), the sky will turn pitch-black instead.
- Evil Is Hammy: Boy, is he ever. Just take a look at his quotes.
- Fluffy the Terrible: Often referred to by its community-given name, Doggo.
- Flunky Boss: It can summon smaller versions of itself at certain health intervals in Revengeance mode, as well as summoning them when at low health in its second form. In addition, he will call his Sentinels to assist him when first brought to phase 2.
- God-Eating: It's in the name. It loves devouring gods and absorbing their powers.
- Gravity Screw: Simply being near it inflicts either Extreme Gravity or Warped depending on its current attack phase, which cripple flight time and distort falling speed respectively.
- Hero Killer: Launched a sneak attack on Braelor and Statis when they were locked in combat with Yharim, seemingly killing them both. On a meta level, the Devourer is notoriously competent at ripping unfamiliar players to shreds time and time again.
- Hidden Agenda Villain: His disloyalty and self-serving nature are as clear as day, but Yharim suspects that his true motivations may actually lie with a higher power. From what little information can be gleaned, it seem to point towards the Devourer being a servant of Noxus, albeit one with his own selfish desires as well.
- Leitmotif:
- "Scourge of the Universe".
- His second phase instead boasts "Universal Collapse", a remix of the aforementioned song.
- "Scourge of the Universe"
- Lightning Bruiser: Moves scarily fast, dishes out One-Hit Kill attacks like nothing, has a ton of health and resistance - and that's just its first form...
- Names to Run Away from Really Fast:
- The Devourer of Gods.
- Even the names of its themes, Scourge of the Universe and Universal Collapse, qualify in their own right.
- No Fair Cheating: Trying to outrun it with accessories from other mods like the Omega Core or Soul of Dimensions cause it to speed up with you - potentially reaching speeds so high that he catapults himself off the world map entirely. Because of this, the Omega Core was coded to not work during the fight in a joint effort from Thorium and Calamity's dev teams.
- No-Sell: Formerly, the Devourer of Gods (and his Cosmic Guardians in Revengeance+) would nullify any attack that deals more than 1/2 of their max HP in one hit - making attempts to instakill it with something like Cheat Sheet's butcher function do absolutely nothing. In fact, the Devourer would actually mock you if you try to do so.You think...you can butcher...ME?
- One-Hit Kill: Formerly, in Deathmode, getting hit by its head segment would be an instant kill regardless of your HP, even if you had godmode active. This was phased out in the Draedon Update, but getting hit by its head would still not be advised.
- One-Winged Angel: After you seemingly shoo him off, he returns in a larger and more monstrous final form.
- Physical God: Mildly ironic that the entity that prides itself on devouring gods is essentially a god as well.
- Playing with Fire: In its second phase, it has the ability to occasionally breathe fireballs which deal a ton of damage and hammer you with a lengthy dose of God Slayer Inferno. In addition, touching him will inflict the God Slayer Inferno as well.
- Psycho for Hire: The Devourer is as murderous as he is arrogant, and his disloyalty is as clear as day. Yharim only recruited him because of his sheer strength and his God-devouring ability removing the need to safely dispose of the essence of the Gods he slayed.
- Purple Is Powerful: Primarily associated with the color purple, and one of the more powerful entities in canon.
- Reality Warper: Its very presence causes gravity to go haywire and it can rip holes through dimensions at will.
- Roar Before Beating: When you summon the Devourer, it can be heard tearing its way into reality before giving an unholy screech as it initiates combat.
- Segmented Serpent: With ~100 segments, the thing is even larger than Destroyer, easily spanning most of an unzoomed minimap, and immensely more dangerous. You can't even take advantage of its size like most worms, due to its body taking little to no damage from all attacks.
- Sequential Boss: Once you hurt him enough, he'll leave through a portal and then you'll have to take care of his Sentinels again. Kill them, and he'll return again, extra powerful and quite angry.It's not over yet, kid!
- Super-Persistent Predator: Once summoned, the Devourer of Gods will not stop until you kill it or it kills you. Even if you teleport away from one corner of the world to the other, it will hunt you down.
- Super-Speed: Can effortlessly overtake the player, even with Seraph Tracers equipped... which isn't much, but it also scales with their acceleration. While this isn't too significant in normal gameplay, using other mods to massively increase your speed will also increase the Devourer's speed as he chases you. Even if you're hurtling along at over four thousand miles per hour, the Devourer of Gods is still faster.
- Theme Music Powerup: When you kill all of his Sentinels, Universal Collapse kicks in as the Devourer unleashes its final form in one last attempt to destroy you. For bonus points, the quiet intro to the song plays during the downtime between the Sentinels and his final form, with the song kicking in at full force when he appears.
- Took a Level in Badass: The Devourer used to be nothing more than a direct Destroyer clone that could be fought immediately after Plantera. It was then overhauled, buffed, moved to post-Providence, and continued receiving countless mixed balance adjustments over a long period of time. Now unrecognizable from what it used to be in the past, the Devourer has become one of the deadliest and most renowned bosses the mod has to offer.
- Trash Talk: Yes, really. The interdimensional god-killing cosmic worm is not only the chattiest boss, but also very prone to throwing out taunts and snide remarks whenever the opportunity presents itself.
- Turns Red: When you deplete its enormous health bar and destroy his Sentinels, all becomes calm for a few seconds...then he comes back with a new sprite and a deadly new arsenal of attacks.
- Unskilled, but Strong: Fitting given his extreme arrogance, this is reflected in game by him having a very simple attack pattern compared to the other bosses around his level, offset by immense damage output and defenses.
- Villainous Breakdown: It's not as evident, but the Devourer seems to mostly speak with a snarky or mocking tone for the entirety of the fight...except when it's at critical health, which it will hike up its aggression and announces an enraged, denying cry of:
- Villain Respect: After reaching a stalemate with Signus, it eventually developed a grudging respect for the ethereal assassin.
- Wolfpack Boss:
- It can summon a Cosmic Guardian in Revengeance Mode when hurt enough, which flies alongside him. When hurt some more, it will summon 2 more. If you do too much damage to the Devourer at once, you may have to contend with all three Cosmic Guardians at once.
- In all difficulties, it also summons more Cosmic Guardians at low health in its second phase.
- You Will Not Evade Me: It can create portals to charge out of if the player moves too far away. It will also do this after a laser wall phase to attack, creating an explosion of fire at the same time.

The last of the Auric Dragons with the domain of Rebirth, who made his kind immortal through his powers. The egg of his latest reincarnation was destined to be consumed by Yharim to cement his position as an eternal God-Emperor, but Yharim rejected this destiny and was thrown into the underworld's lava along with the egg as punishment, only for the heat to make Yharon to hatch and save him. Yharon revealed the truth behind the Gods and gave Yharim his life's goal, after which he witnessed the start of Yharim's crusade, served as his closest partner and strongest ally during it…and now, witnessing Yharim's fall from grace, will see the end of it as well.
Drops a number of extremely powerful fire-based weapons along with Yharon Soul Fragments, which are used in many endgame recipes. Killing him also allows Auric Ore to generate in your world, allowing for the crafting of Auric Bars and their corresponding equipment.
- Art Evolution: Not currently, but Yharon has a confirmed resprite◊ in the works which gives him greatly increased definition and makes him look more regal, as well as emphasizing his phoenix traits with multicolored feathered wings. It's unknown when it will be finished, however.
- Blow You Away: Exaggerated by creating flaming tornadoes. He can create smaller Flarenados, along with gigantic Infernadoes.
- Bullet Hell: He can sometimes disappear in a fireball and let loose with a deluge of fireballs. Fortunately, he loses a bit of health every time he does this.
- Bullfight Boss: He charges a lot, interspersing regular charges with faster telegraphed lunges.
- Death from Above: In his final phase, he has the ability to rain down massive quantities of flaming meteors from the sky.
- Death Song: The lyrics to "Roar of the Jungle Dragon" lead up to his death, with the Jungle Dragon using his last words to warn his master of the great danger that the Player poses to him.If you proceed, I will not blame you.I will move forth and win your war.But if I should die before you continue,You shall have heard my final dying roar.
- Defiant to the End: "Roar of the Jungle Dragon" makes him out to be this, fully aware that he is to die and that Yharim is no longer the hero he used to be, but will continue fighting for Yharim out of Undying Loyalty.
- The Dragon: Yharim's personal pet, closest companion, and most trusted underling. Bonus points for actually being a dragon.
- Early-Installment Weirdness: Before it was moved, Yharon would actually restrict you from fighting him until you killed a Mothron in the upgraded Solar Eclipse, which was unlocked by beating Yharon's first phase. He also dropped his Treasure Bag when leaving.
- Empathic Environment: Tints the screen orange, possibly from the enormous amounts of fire he's tossing around.
- Extra Eyes: If you look close enough, you'll notice that he actually has four eyes.
- Feathered Fiend: Has many traits associated with birds, and he is most certainly not your friend.
- Hoist by His Own Petard: As the underworld denizens who punished Yharim would find out, throwing a phoenix dragon's egg into lava along with the traitor they want to execute is a very bad idea.
- Homing Projectile: Can spam homing fireballs. In his last phase, some of the meteors that he rains from the sky will track players.
- Hope Bringer: In the early stages of Yharim's crusade, Yharon served as a beacon of hope for all those oppressed by the Gods.
- Last of Its Kind: The only known remaining Auric Dragon after the Deific purge.
- Last Stand: Yharon's second phase, although stronger than his first, gets increasingly frantic and desperate as he nears death. And from Roar of the Jungle Dragon playing in the background, it's clear that these are Yharon's final moments, and he knows it.
- Leitmotif:
- "Infernal Catharsis", later remastered as "Infernal Catharsis (Rebirth)".
- His second phase has "Roar of the Jungle Dragon", which is notable for being the first lyrical piece in the Calamity soundtrack.
- "Infernal Catharsis"
- Lightning Bruiser: He's huge, incredibly fast, very durable, and deals near-lethal damage with each hit. He even spices up his attacks with countless fireballs and tornadoes.
- Living Emotional Crutch: Heavily implied to be one for Yharim, as well as a Morality Pet.
- No Final Boss for You: Prior to the Draedon Update, the first time you brought him to low health, Yharon would actually deem you an unworthy opponent and leave the fight entirely, making you unable to kill him (he would, however, still drop most of his equipment sans the Yharon Soul Fragments and some exceptions). In order to unlock his last phase (and therefore kill him), you would need to challenge him again, most likely with Darksun gear to prepare for his significantly harder second phase. However, after said update, both of Yharon's phases are merged into one that is always available, with the empowered Solar Eclipse being shifted to post-Devourer of Gods."My dragon deems you an unworthy opponent. You must acquire the power of the dark sun to witness his true power."
- Our Dragons Are Different: Despite having a lot of draconic traits, Yharon has quite a few avian attributes, such as his feathers, beak, and wings, which ties in with his theme of being a phoenix-like dragon of rebirth. In his second phase, any remaining subtlety goes out the window as his name changes to Yharon, Resplendent Phoenix.
- Physical God: Unlike the offshoots like the Dragonfollies, Fishrons, and even Eidolon Wyrms, Yharon is a fully fledged Auric Dragon, and wields the divine power befitting of his kind. In fact, he's even stronger than most of the Auric Dragons that lived in the past due to his life of constant training and war.
- Playing with Fire: He uses all manner of apocalyptic-level fire attacks including explosive fireballs, meteor showers, pillars of flame, and gigantic flaming tornadoes. In-story, his fire is stated to be able to burn away just about anything.
- Ramming Always Works: Once he's hit critical HP in his second phase, he will discard all of his fancier patterns and resort to extremely fast teleporting rams coupled with periodic spirals of flame.
- Resurrective Immortality: As a phoenix dragon with domain over rebirth, Yharon can resurrect indefinitely seemingly as long as his soul remains, even if fragments of it are spalled off. However, this takes a long enough time that Yharon said his last farewells to Yharim before facing the player, both of them knowing that by the time Yharon comes back, Yharim will be long gone one way or another.
- Sequence Breaking: One of the more egregious examples in the game, as he can actually be fought right after the Lunar Event and before the Moon Lord, since the Dragonfolly can technically be fought as soon as you get Solar Fragments. Good luck actually beating him at this point, though.
- Signature Roar: A harsh roar that also features a distinct, high-pitched whining sound.
- Taking You with Me: Upon death, he explodes into a ring of obscenely damaging fireballs. It's not really a Kaizo Trap, though - while the attack deals so much damage it's perfectly liable to kill a low-health or unaware player after his battle, he'll still drop his loot, which means the worst it can do is waste your time.
- Teleport Spam: Can do this to prepare for a Bullet Hell attack, and will also do this in his last phase.
- Theme Music Powerup: Once he's at 55% HP, Yharon's title will change to "Resplendent Phoenix" and Roar of the Jungle Dragon will start playing as Yharon unleashes a brand new arsenal of enhanced fiery attacks.
- Tornado Move: Flaming ones that can possibly pull off a One-Hit Kill, no less.
- Turns Red: He very clearly defines that he wants the player to remain in a certain area (read: gigantic flame pillars), and should you leave the area he gets even more dangerous until you return.
- Undying Loyalty: The lyrics to "Roar of the Jungle Dragon" all but state that Yharon knows that he's already lost the fight, but he still persists because of his absolute loyalty to Yharim in spite of his fall.
- Wreathed in Flames: During the transition to his last phase, his entire body becomes engulfed in harsh flames.

A mysterious machine with an unknown origin, Draedon is a genius researcher and inventor without equal, whose sole goal is to sate his curiosity for experiments and knowledge at any cost. He was employed by Yharim as a means of creating weapons for his God-slaying crusade, but eventually earned his ire as the Godseeker came to realize the scope of his amoral obsession.
Draedon also has a series of guarded laboratories scattered across the world, which can be looted to recover his abandoned technology and his research notes about the world. Decrypting the schematics within and rebuilding the technology it depicts might just be able to catch his attention…
- Actually a Doombot: As revealed if you try to attack him, the Draedon you see in his fight is just a remotely controlled robot body, and a disposable one if its worn, rusty appearance is to be trusted. His actual, likely far more advanced body is never seen, and since he's heavily implied to be an AI or similarly digital entity, he probably doesn't even have a real body to begin with.
- Affably Evil: Despite being an amoral Mad Scientist who only cares about creation and research, he treats the player fairly cordially, sincerely wishing them luck with their ordeals and encouraging their progress.
- Badass Transplant: His accessory drop is the aptly named Draedon's Heart, which can utilize nanomachines, not unlike a certain senator. It gives significant defensive buffs (notably halving Defense Damage taken) while replacing the Adrenaline meter with a Nanomachines meter which will heal the player for a good chunk of health instead of giving them a damage boost.
- Blue-and-Orange Morality: He doesn't see himself as good or evil, just someone in constant pursuit of knowledge. Because of this, he often comes across as incredibly detached and callous towards any suffering he causes, seeing nothing wrong with it as long as it provides results. Yharim certainly has reservations about his behavior, disdainfully calling him an amoral monster with no heart or compassion.
- Bond One-Liner: "An imperfection after all...what a shame."
- Cool Chair: Observes your fight from the safety of a rocket-powered flying chair with various computers built in to it. You can loot your own flying chair as a mount after defeating him, affectionately called "Draedon's Gaming Chair".
- Evil Laugh: A repeated mechanical clicking that plays every time you advance to the next stage of his fight.
- Extra Eyes: Each of his "eyes" seems to be made up of several other ones in a geometric pattern.
- Flunky Boss: Befitting for a hands-off researcher, Draedon engages in combat using massively powered-up versions of the Mech Trio called the Exo Mechs, who will take you on as a team. Draedon himself just observes the fight and remains The Unfought - you can actually attack him during his closing monologue, but that just causes him to chide you.Amidias: Draedon isn't a frontline fighter; he is a scientist and inventor. He is unlikely to face you directly, and will likely have his creations confront you instead. Be prepared for anything that blasphemous machine could throw at you.
- Foil: To Calamitas. Both are/were among the highest echolons of Yharim's forces and share a tier as the final two foes you must defeat to access Yharim himself, and either one can be fought before the other based on the player's preference. However, most of the the similarities end there:
- Calamitas fought for Yharim without much of a say in the matter, and once fanatically supported his cause only to deeply regret it afterwards; meanwhile, Draedon gladly worked for Yharim out of personal interest, was never particularly devoted to his crusade, and remains uncaring of any harm he caused. While both of them survive their battles and gain respect for you, Calamitas joins you after her defeat while Draedon leaves without directly helping you.
- Calamitas' actions under Yharim's command drive many of the key events of the mod's lore, while Draedon's machinations serve as the setup for many of its background events.
- Calamitas is an extraordinarily powerful mage and necromancer who fights exclusively with her own arcane powers, while Draedon is an engineer and blacksmith who exclusively uses his advanced technology to fight in his stead.
- Calamitas appears to be a small, regular human at first glance, while Draedon is a unnaturally large automaton with a quartet of gigantic machines. They also have opposing color schemes, with Calamitas and her minions using organic browns, reds, and golds, and Draedon's mechs using mechanical greys, silvers, and bright rainbow colors.
- While Calamitas is an extremely powerful fighter who fights you directly and only summons minions to supplement her own attacks, Draedon has no combative ability of his own and relies solely on his creations to do battle.
- The emotionally unstable Calamitas has a fire motif and powers described as uncontrolled and furious, while the eerily logical Draedon has a lightning motif and is renowned for his perfectionism and precision.
- The fight with Calamitas is a mostly one-on-one duel in an enclosed space, promoting precise movement and a more methodical approach where panicking generally leads to death. Draedon's fight is a chaotic warzone with multiple simultaneous targets, where constant rapid movement in an open space and reflexive actions are the key to survival. In addition, while Calamitas is heavily based around micrododging and randomized Bullet Hell, Draedon's mechs use more patterned and sparse attacks that compensate by being predictive and coordinated.
- Calamitas' rewards focus on the "magical" damage types (Magic, Summoner), while Draedon's revolve around "physical" damage types (Melee, Ranged, Rogue). Calamitas' Enchantments also allow you to enhance and transform existing weapons to make them stronger, while Draedon focuses more on making entirely new equipment with his Forge and Miracle Matter.
- Calamitas' Demonshade Armor and Calamity accessory are straightfoward and focus on massively increasing your damage with no regard for survivability, while Draedon's planned Exo Armor and Draedon's Heart focus on modular customization or boosting durability at the cost of lowered damage output.
- For Science!: Basically his sole motivation. He does all sorts of stuff just to see what would happen, morals be damned. This also applies to his motivation to fight you once you fulfill the requirements to summoning him in the first place, intrigued by how mysterious and unpredictable you are.
- If My Calculations Are Correct: His dialogue indicates that he's used to predicting others' performance through calculation alone, bragging that "Nothing should escape the bounds of [his] calculations". Once you destroy 2 of his Exo Mechs in battle however, Draedon, while in surprise and awe, decides to defy this trope.Absurd. I will no longer let my calculations impede my observation of this battle.
I shall show you the full fury of my final machine. - Karma Houdini: He can't be killed, instead surrendering and fleeing once his Exo Mechs are destroyed, meaning he can get away scot-free for all his experimentation and enabling of Yharim's conquest. You can attack Draedon after the battle is finished, but he simply reappears as a projection and turns invulnerable, showing only minor annoyance for being attacked, before continuing his dialogue....Quite unnecessary.
- Lean and Mean: He's very tall and incredibly skinny.
- Machine Monotone: Seems to display this, if his cameo at the end of Blood Coagulant is anything to go off of. Subverted with his cameo at the end of Reign of Lords, where Gianni Matragano gives him a voice that is still mostly monotonous, but audibly gets excited at the prospect of testing his Exo Mechs.
- Mad Scientist: He's not exactly okay in the head, and for all his inventions, he also seems to have a heavy tendency towards incredibly destructive weaponry for no real reason besides curiosity. Aside from crafting weapons for Yharim, he also built the Mechanical Bosses and Astrum Aureus.Cyborg: Draedon? He's...a little 'high octane' if you know what I mean.
- The Perfectionist: His final goal seems to be to continously improve and refine his creations until they he succeeds in creating a perfect creation. However, he also seems to acknowledge that Perfection Is Impossible, as he claims that the start of his quest for perfection was his first mistake.
- Pillar of Light: A rainbow-colored one appears when you use the completed Codebreaker to contact him.
- Punch-Clock Villain: He doesn't really care about Yharim's motivations and lacks any real malevolence, with his service to Yharim being purely motivated by his desire to direct his creative desires towards something. Even when confronted by the player, he doesn't particularly mind that they're trying to kill his former superior, merely wishing them luck on their journey.
- SkeleBot 9000: His body vaguely resembles a robotic skeleton - although it's mostly because of how thin he is.
- There Is No Kill Like Overkill: Attacking him after defeating the Exo Mechs will deal 56 times the attack's usual damage on top of forcing it to be a Critical Hit - if this somehow isn't enough to "kill" him, then the attack will additionally gain a flat damage increase of over 30,000, while Draedon has 16,000 HP. In short, there is no way he doesn't go down in a single hit when attacked in this state.
- Ultimate Blacksmith: Is more than capable of forging the most powerful weapons in the Calamity Mod. He has forged armor made of cosmic metal, has an entire line of weapons of his design, and helped create Yharim's Powered Armor as well. Aside from this, he's responsible for the Draedon's Forge, which is even more powerful than the cultists' Ancient Manipulator from the vanilla game and is required to make the strongest items in the game. And that isn't even getting into his work on the Exo Mechs and their components, which include prisms that can generate seemingly infinite energy and can be used by the player to create a psuedo-organic supermaterial that can transform at will.
- Villain Respect: He holds the player in great regard, seeing them as an anomaly that even he, for his all his genius, cannot understand. As you decrypt his schematics, he provides hints to the next task and gradually grows more impressed with you, until he finally deems you worthy of battling the Exo Mechs once you unlock the last part. Throughout his fight, he will continuously express approval of the player as they battle his creations; dying to his Mechs will also cause him to react with genuine disappointment that you weren't as capable as he thought.
- Weak, but Skilled: By his own, he is in reality one of the weakest of Yharim's subordinates. His technology, on the other hand, contributed greatly to Yharim's God-slaying crusade, and the Exo Mechs are proof that he can surpass the Gods themselves through technology alone. It's a relief that he has no intention of using it for himself, as even Yharim fears what would happen if he ever decided to go nuclear.Were he to lose his temper, if he even has one, all of life's hopes would be smothered in an instant, silenced by a torrent of silicon.
The Exo Mechs
Now, choose.
Draedon's ultimate creations, a quartet of nightmarish war machines each loosely based on a member of the original Mech Trio and capable of surpassing the Gods themselves through his technology alone - XF-09 Ares (Skeletron Prime), XM-05 Thanatos (Destroyer), XS-01 Artemis (Retinazer), and XS-03 Apollo (Spazmatism). Instead of fighting Draedon himself, he'll send these behemoths to test your strength once you prove yourself worthy by fully completing the Codebreaker and contacting him.note
The Exo Mechs will drop a number of weapons based on whichever Mech was killed last, but most importantly drop Exo Prisms, an endgame crafting material most notably used to create Miracle Matter for the Exo series of weapons, and Draedon's Forge, which allows for the crafting of the highest tier of items in the game.
As a whole:
- Artificial Brilliance:
- All three of them will predict player movement with the vast majority of their attacks, making them harder to throw off. They also have a few tricks like switching their attack orientations to fake out players, or purposely desyncing their attacks.
- In the early stages of their development, they were even planned to have machine learning that would let them adjust their attack patterns based on which attacks their target was better or worse at. This was ultimately scrapped.
- Call-Back: The letters in their model names correspond to the Souls that their original variants dropped. Their bestiary entries also allude to this.
- Conservation of Ninjutsu: A variant. Although each Mech doesn't actually get weaker, their individual attack patterns are most aggressive when they're alone and will become slower and more lenient as more Mechs join the fray. While all three of them are active at the same time, some of their more dangerous attacks won't even be used.
- Empathic Environment: The sky becomes engulfed in a dark thunderstorm while they're alive.
- Killer Robot: Unlike many of Draedon's other projects, which often had other intended functions besides combat, the Exo Mechs were designed specifically and solely to match the destructive ability of Yharim and the Gods.
- Leitmotif: Inferior Fabrications, which serves as a placeholder until the full theme Nightmare Fabrications is created by CDMusic.
- Light Is Not Good: Although their armor plating is made of dark metal, they prominently feature bright rainbow-colored parts, and both their drops and the Exo Prisms implied to power them are themed around prismatic light. They're also malevolent murder machines and some of the most dangerous foes in the entire mod.
- Lightning Bruiser: They have the durability and firepower to be expected of endgame bosses, and although it's not as evident for Ares and Thanatos, you will quickly find that all four of the Mechs can very easily keep up with you.
- Mechanical Monster: Massive, otherworldly death machines of dark metal and prismatic light, with monstrous forms and strength that surpasses Gods. Bonus points for being based off of the Mech Trio, who already fit this trope.
- Religious and Mythological Theme Naming: All four of them are named after deities from Greek mythology.
- Turns Red: When a mech is sufficiently damaged, the other two will tag out while the damaged mech gains new attacks and increased aggression. When two of them have been destroyed, the remaining Exo Mech will become much faster and far more aggressive.
- Upgraded Boss: Much more powerful versions of the Mech Trio. However, their battle plays out completely differently in comparison to their weaker versions.
- Wolfpack Boss: All four of them engage you simultaneously in a tag-team battle. In a unique twist on this trope, however, they don't always attack you at the same time; you start off fighting a single Mech of your choice (or two in the case of the Exo-Twins). When they are brought to 70% HP, they'll tag out with the the other Exos, and then rejoin when one of them is in turn brought to 70%. When one mech is brought to 40% HP, the other two will leave until they're defeated alone, upon which they'll return and repeat the pattern.
XS-01 Artemis / XS-03 Apollo

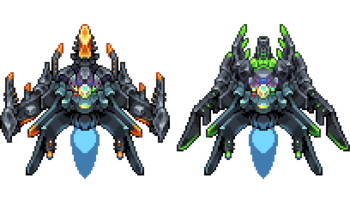
A pair of aerial war machines utilizing highly unstable but powerful energy reserves, trained extensively with advanced simulation technology and specialized for agility. Their designs are mostly similar, but Artemis (orange) is tuned for precision with its deadly laser cannon, while Apollo (green) utilizes an explosive plasma cannon and guided missiles.
- Beam Spam: Artemis' main form of attack. It upgrades to a Spread Shot when using its stronger attacks.
- Cool Plane: The two of them resemble high-tech fighter jets.
- The Dividual: Despite being two entities, they're technically considered one Exo Mech for the purpose of the fight, and neither of them can even exist apart from the other given that they share a health bar.
- Dual Boss: Well, it's a given considering they're based off of the Twins. Unlike the Twins, they're specifically designed to synergize with each other, although they'll start gradually desyncing their attack pattern once they enrage.
- Flash Step: Artemis can perform extremely fast telegraphed dashes in its first phase, with its speed bordering on teleportation. Apollo picks up on a variant of this ability during its second phase, charging in a zig-zagging pattern while leaving behind explosions of plasma.
- Force and Finesse: Apollo and Artemis, respectively. Apollo's attacks deal more damage and cover a wider area, while Artemis' attacks are faster and extremely predictive.
- Giant Eye of Doom: Although they still resemble eyes, they're more closely designed after futuristic space fighters with wings, thrusters, and curved tails made of energy. The whole "eye" thing gets completely lost when they they lose their lenses in their second phases.
- Lightning Bruiser: The most noticeable of the trio, given that they're constantly making evasive maneuvers and can dash faster than the player can blink. You'd think that they'd have lower HP, but not only do they have the same health as Ares (albeit with lower defenses), they have the advantage of being non-segmented entities, meaning you can't hit them multiple times with piercing attacks.
- Macross Missile Massacre: Apollo can fire clusters of plasma rockets which home in on players.
- Meaningful Name: In addition to being named after the twin deities from Greek myth, Retinazer, the twin specializing in long-ranged projectiles, is upgraded in the form of Artemis, who is named after the Greek archer goddess of the hunt. Meanwhile Spazmatism, whose abilities revolve around flame, is paralleled by a boss named after Apollo, the Greek god of the sun.
- Plasma Cannon: Apollo's main weapon is a plasma cannon, which fires superheated blasts that explode into smaller bolts after flying for long enough. Its heat allegedly matches Calamitas' flames.
- Shared Life-Meter: Unlike the Twins, health is shared between the two.
- Super Prototype: Artemis was the last of the Exo Mechs to be made and only went through a single revision as opposed to the implied 3-9 of the other models, but is still capable of matching its brethren. By the time Draedon made Artemis, he had refined his craft so much that he simply didn't need any more iteration.
- Surveillance Drone: Although significantly more heavily armed, they retain their old counterparts' utility as recon units, with impeccable vision and the ability to detect various wavelengths of light unknown to humans.
- Turns Red: Unlike the other Exo Mechs, they visually transform when they take enough damage. Both of them eject their lenses, with Artemis and Apollo replacing them with a crystalline laser cannon and cannon-armed jaw respectively.
- Wave-Motion Gun: In phase 2, Artemis can fire a massive laser and sweep it across the screen in a circular motion.
XM-05 Thanatos


A massive mechanical serpent Draedon designed with the intent of being completely invincible. Thanatos is armed with dozens of high-power pulse lasers and covered in impenetrable armor that deflects even the mightiest blows, only providing openings when the behemoth opens its vents to avoid overheating.
- Attack Its Weak Point: Its entire armored body is for the most part, completely impervious to attack, but any segments that fire will also have to open to vent heat, leaving them especially vulnerable to damage. These weak spots change location periodically as its different segments take turns opening fire. Its head segment does always open up and become vulnerable while using its Wave-Motion Gun.
- Armor of Invincibility: Draedon specifically designed Thanatos' armor to be this by revising the Devourer of Gods' Cosmilite plating, and it was a complete success. As if to indicate this, Thanatos' armor is noticeably darker colored compared to that of Ares and Artemis/Apollo, and makes a different, more solid sound when hit.
- Armored But Frail: It's totally immune to harm when its armor is closed, but Thanatos actually has the lowest HP out of the trio as well as its open segments taking increased damage instead of reduced. Combined with its segmented nature making it vulnerable to piercing weapons, hitting Thanatos with heavy firepower when it's exposed can practically tear through it.
- Beam Spam: One of the traits it retains from its predecessor, Thanatos is able to lay down practical curtains of pulse cannon fire that leads your movement, especially in its second phase when more of its laser cannons become active.
- Bullfight Boss: Partially, similarly to the Devourer of Gods. Thanatos alternates between trying to fly above or below players while raining fire onto them, and directly attempting to ram into them for massive contact damage.
- Call-Back: Its Bestiary mentions that its armor was modified from the Devourer's, which was responsible for much of its strength by massively reducing any damage except its weak points. Thanatos' improved version serves the same purpose, with the weak points changed to its open vents instead of the head and tail.
- Color-Coded for Your Convenience: Any segments that are vulnerable will turn bright red to indicate that you should target them.
- Crosshair Aware: A triangular crosshair will appear atop the player to signify its deathray locking on to them. The crosshair will grow wider or tighter to show how well Thanatos is tracking their position at the moment.
- Logical Weakness: Thanatos' armor is impenetrable and its vast arsenal of laser weaponry is extremely powerful, but it also generates so much internal heat as a result that it has to periodically cool itself off, giving itself a weak spot. If it didn't vent the heat, though, it would more likely than not destroy itself from the strain of merely firing its own weaponry. Its Bestiary entry mentions that Draedon managed to turn this into a strength by weaponizing its vents, letting it incinerate foes with its superheated internal temperatures - although it thankfully doesn't do this in-game.
- Names to Run Away from Really Fast: Comes with being named after the Greek god of death.
- Segmented Serpent: A massive, spined metallic worm just like its predecessor, and one even bigger than the Devourer of Gods to boot.note While piercing weapons do give you an advantage against it, they'll still do nothing if its armor isn't open.
- Super-Toughness: With its vents closed, it's completely indestructible. Even a weapon that deals hundreds of thousands of damage per hit will fail to even dent it. Of course, when Thanatos is defeated, its armor will still be torn to pieces as it explodes, although this could be justified as it being blown up from the inside out.
- Wave-Motion Gun: It has a powerful one that it can charge up when alone and at low health; not only does it track scarily well, it splits into perpendicular laser beams. Fortunately, its tracking can be thrown off by staying close to Thanatos' head when it fires, causing the worm to slow to a crawl while leaving its exposed head wide open.
XF-09 Ares

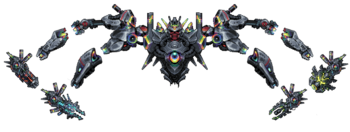
The first of the Exo Mechs to be created, Ares is an enormous armored colossus whose four independent superweapons each pose a different and serious threat, allowing it to devastate entire areas or unleash concentrated firepower.
- Chest Blaster: It can fire laser beams from the core on its chest in its second phase.
- Cognizant Limbs: Much like its predecessor, it has four independent superweapon-wielding arms that each use their own methods of attack. Each arm can be targeted individually, but all of them contribute to Ares' main health bar.
- Fantastic Nuke: Its Gauss Nuke periodically fires a homing warhead that detonates in a massive shockwave after a bit. Fortunately, the actual blast radius is indicated by a circle around the warhead.
- Hover Bot: Although it has a body and arms, it lacks any legs, instead opting to fly through an unknown method.
- Humongous Mecha: Unlike its predecessor, it has an enormous body which resembles a traditional mecha, complete with a helm that invokes Gundam vibes, as well as a core and shoulders that resemble those of Unit-01.
- Mighty Glacier: While it can constantly keep up with the player, Ares doesn't move much, is a huge target with multiple damageable parts, and attacks relatively infrequently. It instead compensates with a lot of bulk and some of the most dangerous attacks of the group, particularly the Gauss Nuke and Laser Cannon.
- Multi-Armed and Dangerous: Again, has four arms that carry heavy weaponry.
- Names to Run Away from Really Fast: A titanic engine of destruction named after the Greek god of war.
- Organic Technology: Its Gauss Nuke can be seen "regrowing" itself after a launch in a manner similar to a plant. When you destroy it, you can even see organic roots within the wreckage.
- Plasma Cannon: Wields one that fires plasma blasts which explode into smaller bolts.
- Power Glows: All of its weapons will glow brightly to warn you that they're about to fire.
- Shock and Awe: Its Tesla Cannon fires electric orbs which can connect to one another using arcs of electricity.
- SkeleBot 9000: Compared to Skeletron Prime, the only skeletal features it has left are its face, which is fashioned into the likeness of a skull. However, when destroyed, it is revealed that it actually has a robotic skeleton inside of its armor.
- Stationary Boss: Ares remains permanently locked to its position above you as it rains fire, giving it the impression of this (despite always moving to match your speed). It only ever breaks position when using its laser attack in its second phase, where it stops moving altogether.
- Turns Red: Attempting to run out of range of its final laser attack (which renders it nearly harmless) will literally cause it to turn red and start steaming, significantly boosting its attack rate and damage reduction until the next time it uses the attack. It even plays the sound of a train whistle when enraging!How foolish. You cannot escape.
- Wave-Motion Gun: Its Laser Cannon can fire one that sweeps either horizontally or vertically, although it can also use Beam Spam instead when Ares is using its special attack. When alone and at low health, its core can also fire a multi-spoked laser wheel that spins, with the laser wheel gaining more spokes in higher difficulties.


The famed Brimstone Witch, taken in by Yharim and Permafrost at a young age because of her unfathomable inherited power. Burning with wrath against the Gods and flames that could burn away all things, Calamitas served as Yharim's ace in his crusade against the Gods, but eventually fled due to her increasingly tyrannical lord and the guilt of her countless atrocities. Now, although Yharim has no desire to punish her, she still lives in fear of the Godseeker's wrath, and is willing to take drastic action to prevent another person like him from ever rising to power...
Summoned by sacrificing Ashes of Calamity (or using a Ceremonial Urn) at an Altar of the Accursed, she's meant to be fought alongside Draedon before taking on Yharim himself.
Calamitas drops Ashes of Annihilation and several powerful weapons, notably including Gael's Greatsword if beaten on Death. However, more importantly, she will join your side as an NPC after you defeat her in battle. As an NPC, she can Enchant your gear, giving them powerful and often game-changing new abilities at a price that often goes beyond just money...
- Always Someone Better: As powerful as she is, she says that she stands no chance against Yharim.
- Ambiguously Human: She has horns and an unnatural skin tone, but otherwise appears human.
- Anti-Regeneration: While she's alive, healing from dropped hearts is cut in half, limiting your healing.
- Art Evolution: Like her previous form, she went from a psuedo-resprite of Retinazer to a flaming, wood/metal eyeball like entity. A further update made her flames more polished, and added a more obvious tell when she's in phase 2. This was all replaced with a lore accurate humanoid form around the Draedon Update.
- Battle Aura: Manifests a pulsing magic circle around her when casting her Bullet Hell.
- Bad Future: Not regarding Calamitas herself, but the description of the Exhumed weapon Metastasis implies that the Devourer of Gods, if it continues with its hunger for power, may become something akin to the Sepulcher. Fittingly, Metastasis is the Exhumed version of the Staff of the Mechworm. The Gruesome Eminence's spirit congregation is also implied to be a hypothetical version of Polterghast if it was allowed to continue growing.
- Body of Bodies: The Sepulcher she summons is a literal "walking tomb" comprised of countless bodies and souls. After she's recruited, she even asks the player if they'd like theirs added to it when they eventually die.
- Bond One-Liner: "Please don't waste my time."
- Child Soldier: She was only a young child when she was first taken in by Yharim, and she's still only in her twenties in the present day, with the implication being that most of her acts of deicide and destruction were done when she was still a teenager, or even younger.
- Boss Banter: As powerful as she is, she's even more talkative than the Devourer of Gods.
- Boss Room: Enforces this by generating a box of unbreakable tiles around the player when she spawns, greatly limiting the amount of space they have to move. Trying to leave the box using something like the Rod of Discord will cause her to turn invincible and significantly boost her projectile speed until they return.
- Bragging Rights Reward: Killing her on Death Mode will give you the Levi item, which allows you to summon a mini Leviathan pet. This is a Shout-Out to the Youtuber Leviathan, who does numerous challenges involving the mod, including no-hit fights with all the bosses in Death Mode, including Calamitas herself.
- Bullet Hell: At fixed HP thresholds, she will turn invulnerable and spam a gridlike barrage of fireballs along with homing blasts that erupt into more bullets. As she loses HP, the bullet-hell phases become more and more hectic - adding more elements and hazards that force precise micrododging.
- Call-Back: Her theme incorporates parts of "The Step Below Hell" and her previous Leitmotif "Raw, Unfiltered Calamity" - the former because of her connection to the Brimstone Crags, and the latter because...well, it was her Clone's theme. More notably, it includes parts from Now Stop Asking Where, which was her previous placeholder theme.
- Comically Missing the Point: If you talk to her at night, she'll express disgust for the undead that roam the night. Not because they're undead monsters, but because she's appalled by the amateur necromancy that made them.
- Deflector Shields: The update that gave her her humanoid form also gave her a glowing red force field to keep her hitbox the same size. It transforms into a demonic jaw for her physical attacks, and will flicker and show damage as you beat her down. It being only destroyed at the end of the fight justifies how she survives her defeat for her Heel–Face Turn and any potential rematches.
- Defeat Means Friendship: She joins your side and becomes a friendly NPC after her defeat. Even her rematches point to this, showing that whatever animosity she had towards you is tempered, if not gone altogether.
- Dem Bones: Combined with Big Creepy-Crawlies, her Sepulcher minion after her visual update resembles a gigantic skeletal centipede that crawls towards targets with many pairs of bony arms.
- Destructive Savior: Battled the Brimstone Elemental who was terrorizing Azafure, only for their clash to result in the city's complete and utter annihilation, something she clearly still feels guilt about.
- Easily Forgiven: She's baffled that Amidias holds no animosity towards her despite her being responsible for the destruction of his entire kingdom. Similarly, Permafrost and Cirrus don't particularly hold her misdeeds against her.
- Empathic Environment: While she's alive, the background goes pitch-black, the screen becomes bathed in red light, and crimson embers will periodically drift across the screen.
- Empty Shell: The end result of anyone she tries to resurrect with her necromancy, a grotesque cariacture of the original who retains none of their former spirit.
- Evil Laugh: Lets one out when summoned and when entering her second phase.
- Face Death with Dignity: As constrasted to her Villainous Breakdown throughout the fight, she reacts to her defeat surprisingly well, resigning herself to her fate and offering her power to you.
- Flunky Boss: She can summon Supreme versions of her brothers to assist her at 45% HP, and can summon Soul Seekers to defend her at 20% HP. Twice throughout the fight, she can also summon a large worm boss called Sepulcher to help her out by spamming brimstone blasts.
- Glass Cannon: Her health is actually fairly low for the point where you fight her, with it being comparable to the Devourer of Gods, a boss two tiers below her. She compensates for this with her frequent invincibility times and very dense attacks that deal extremely high damage and unmitigatable debuffs.
- In the Hood: Wears a hood to obscure her face until you beat her for the first time.
- Invincible Minor Minion: At about 30% HP, she will summon several giant brimstone monsters that slowly chase the player. They're far from minor, however, since they'll likely be the thing limiting your mobility the most in the last stretch of the fight.
- Happily Adopted: Was raised by Permafrost and ended up treating him as her own father.
- Heel–Face Turn: As of the Draedon update, she can be recruited as a town NPC after defeating her. She provides Enchantments that can modify weapons, giving them new traits and mechanics.
- Horned Humanoid: Has a pair of small horns.
- Leitmotif: "Stained, Brutal Calamity," which is separated into 4 distinct parts that play during different segments of the battle:
- Grief, a grandiose yet oppressive theme which emphasizes her sheer power. The Ominous Latin Chanting lyrics are about her internal thoughts about the battle, including her questioning if fighting you is the right thing.
- Lament, which keeps up the upbeat and threatening nature of the song while adding in lyrics from DM DOKURO himself, which question the justifications of the player's rampage.
- Epiphany, which brings a sense of epic finality as it repeats the main melody of the song (which was previously heard in Raw, Unfiltered Calamity) in tandem with more Ominous Latin Chanting lyrics depicting the climax of her battle against the player.
- Acceptance, which suddenly drops all of the song's grandiosity and becomes outright somber, representing how Calamitas has accepted her defeat and conceded the fight.
- Mistreatment-Induced Betrayal: Implied in the current lore and played straight in the old lore:
- In the current lore, it is implied that Calamitas deciding to leave Yharim's side was catalysed by her discovering the existence of Draedon's attempts to clone her, as well as her being forced by Yharim to hunt down and kill her adoptive father and mentor Permafrost after Yharim discovered he had defected.
- In the old lore, Yharim feared that Calamitas would one day betray him, and so approved a project to create a clone with unwavering loyalty to him. Calamitas discovered this and was understandably enraged, so she loosed the Temple Golem on the labs housing her clone. The Golem was destroyed, but the unfinished clone escaped into the night and Yharim cursed Calamitas for her betrayal while lamenting the fact that his actions had incited it.
- Necromancer: Has the power to revive the dead as soulless husks, and can even manipulate corpses to create horrendous Undead Abominations like the Sepulcher.
- Only Known by Their Nickname: Calamitas is merely a title of sorts. Her real name is unknown.
- Orbiting Particle Shield: Creates one made of Supreme Soul Seekers at 20% HP. Made harder by the fact that the Soul Seekers can fire back as well.
- Our Witches Are Different: Titled the Brimstone Witch, she holds the power of both necromancy and unholy pyromancy, and was part of a mage clan in the mountains before it was wiped out.
- Person of Mass Destruction: Wields enough power to handily decimate civilizations and incinerate entire oceans. She was Yharim's ace in the hole against the Gods, with absolutely nothing being able to withstand her wrath.
- Pint-Sized Powerhouse: Is only 5'4" (160 cm) tall lore-wise and the only boss even shorter than the player, but that doesn't stop her from being one of Yharim's top dogs and the potential penultimate boss in the main game.
- Playing with Fire: Has absolute mastery over brimstone flames to the point where she can burn away entire oceans. In battle, she launches Hellfire blasts and flaming missiles that explode and inflict the devastating Vulnerability Hex debuff.
- Power at a Price: Her enchantments can imbue weapons with extraordinarily powerful effects, but will always have some kind of downside to balance it out, ranging from conditional limitations to effects that can possibly harm or even kill you, all of which vary in severity depending on the weapon you chose to enchant.
- Aflame causes weapons to burn and slow the target on hit, but it also causes the player to take Damage Over Time while they're holding the weapon.
- Ephemeral gives the weapon an exhaustion meter that depletes with use and refills when it's not being used. The weapon's damage can range from above to below the normal depending on how exhausted it is.
- Withered causes the weapon to heal the player for a portion of the damage taken when taking a hit scaling with how much damage was dealt with it beforehand. After this, the weapon will gain a significant damage boost, but temporarily inflicts a damaging debuff that increases exponentially in severity the longer you hold the weapon for.
- Bloodthirsty weapons will deal increased damage to closer targets but less damage to farther ones, while Resentful weapons will have the opposite effect.
- Persecuted weapons will spawn demonic portals over time or when taking damage, which will spawn hostile kamikaze demons after a short time, but will instead spawn friendly ones if enough damage is dealt to them first. However, converting a portal while friendly demons are active will instantly turn them hostile.
- Lecherous weapons will spawn a harmless but tanky demon that follows your cursor, interfering with piercing and homing attacks. Killing the demon will drop several healing hearts before instantly respawning it.
- Tainted beam swords will no longer be able to fire projectiles, but will materialize two skeletal arms that swing identical copies of the sword alongside the player, dealing massively increased damage.
- Oblatory grants magic weapons significantly improved mana costs and damage, but has a one in four chance to drain a small amount of your HP every time the weapon consumes mana.
- Traitorous causes magic weapons to consume all remaining mana if used below 25% mana, summoning a monster which lunges at enemies before rebounding towards the player. Its damage to enemies scales with the amount of mana it consumed, but it can also deal flat damage to the player.
- Indignant summoner weapons will summon a demon each time the weapon is used. The demons are hostile to the player, but will also heal them if successfully slain.
- Hellbound summons will only last 40 seconds before exploding violently to damage nearby enemies. However, during this period, they will gain gradually increasing damage and periodically unleash smaller explosions.
- Exhumed completely transforms certain items into totally new variants which are significantly stronger but can come with potentially fatal side effects if used carelessly.
- Power Fist: Cataclysm attacks with projectiles that look like fists made of energy.
- Punch-Clock Villain: She follows Yharim out of fear, and does no more than what's necessary to complete her task. She even joins your side once bested in battle, entrusting you with whatever semblance of a future she has left.
- Rage Against the Heavens: During her time in Yharim's forces, she was seething with rage against the Gods and a desire to burn them all into nothingness. The actual reason for this is currently unknown.
- Red Baron: A number of the supplementary lore entries referred to her as "The Bloody Inferno". Certain item descriptions also simply refer to her as "The Witch".
- Redemption Demotion: Downplayed. Calamitas in her NPC form has a similar amount of HP to her boss incarnation (making it borderline impossible for her to die to enemies) and deals similarly massive damage when defending herself. However, she understandably doesn't use any of her more complex boss attacks, instead defending herself with simple fireballs. The player can rematch her in a duel after recruiting her, though, and she's just as strong as she was before.
- Red Eyes, Take Warning: Has red eyes and is an extraordinarily powerful witch. When you bring her to her second form before defeating her once, they even start glowing.
- Shielded Core Boss:
- Twice during her fight (at the start and at 8% HP), she summons the Sepulcher, a large centipede that sprays shots and blocks projectiles, which makes her invulnerable while alive; the Sepulcher in turn is invincible until the ten Brimstone Hearts alongside it are destroyed. note
- She can also summon her brothers and Supreme Soul Seekers to defend her at certain health intervals, becoming invincible while they're alive. She'll become passive while the brothers are alive, but not so much for the Seekers.
- Shout-Out:
- Her dialogue used to be more or less a blatant Expy of Sans.
- Whenever the player died to her former hit cap, she would give one to Leviathan, A Fandom VIP YouTuber best known for Self-Imposed Challenges involving Calamity Mod, especially defeating every boss in Deathmode without getting hit at all, including Calamitas. This serves as a Foreshadowing that she drops the Leviathan pet once defeated in Deathmode, which not only serves as the pet version of the Leviathan boss' old sprite, but also a Shout-Out to this YouTuber as well.
- Status Effects: Her attacks and those of her minions apply her exclusive debuff Vulnerability Hex, which deals damage over time, reduces defense and damage reduction, and inflicts penalties to vision and wing time.
- Straw Nihilist: She wholeheartedly believes that there is nobody who can stop Yharim, and constantly laments that both her and the player have given up their futures by opposing him. She can't even bring herself to despise him or you, due to simply being too tired from everything she's gone through.
- Superpowered Evil Side: She can give the Exhumed enchantment to completely transform several specific items, which will massively upgrade them but also make give them new penalties potentially devastating for an unaware player. Currently, she can Exhume the Burning Sea, Entropy's Vigil, Ghastly Visage, Staff of the Mechworm, and The Community into the Rancor, Cinders of Lament, Gruesome Eminence, Metastasis, and Shattered Community respectively.
- Sword Beam: Catastrophe attacks with projectiles that look like sword slashes.
- Title Drop: Her accessory drop is an accessory simply named Calamity. When equipped, it ignites your cursor, causing any enemies merely in its radius to take massive damage and be inflicted with Vulnerability Hex.
- Turns Red: Exiting her arena with something like the Rod of Discord will cause her to enrage, massively boosting her projectile speed and making her take Scratch Damage from all attacks.
- Villainous Breakdown: As you slowly overpower her in her fight, she'll retort with disbelief and rage before sinking into despair as she realizes she's about to be defeated.
- Villain Respect:
- When she's fought in subsequent rematches after beating her once, the battle becomes more of a sparring match, and as such she loses all of her animosity. She even outright praises you when you're doing well.
- If the lyrics to Stained, Brutal Calamity are any indication, she acknowledges the power of the player and is secretly wondering whether she should even bother fighting with someone who could possibly save mankind from the Jungle Tyrant.
- White Hair, Black Heart: She has white/very light hair, but is unstable at best and murderously vengeful at worst. Averted once you beat her; although she's still quite morbid and unstable, all animosity toward the player is dropped, even if you fight her again.
Minibosses and Other Enemies

A massive clam miniboss found in the Sunken Sea. If Amidias isn't present in the world, he'll fall out of the Clam once it's killed (assuming you've killed the Desert Scourge). When Hardmode rolls around, the Clam gets massive stat buffs, as well as several new attacks. Drops an accessory in pre-Hardmode, along with another on Revengeance+. In Hardmode, it starts to drop a number of aquatic weapons, as well as Mollusk Husks.
- Death from Above: In Hardmode, it gets the ability to summon a row of energized pearls that fall down on players from above.
- Enemy Summoner: When it becomes aggressive, it will inflict the Clamity debuff on players, which massively boosts Clam spawn rates and makes them aggressive as well. However, it makes all other enemies unable to spawn.
- Flunky Boss: In addition to increasing Clam spawn rates, it can directly spawn Clams to help it.
- Gemstone Assault: In Hardmode, it can fire bursts of psychic pearls for its new attacks. These are either summoned in falling rows or directly fired in radial/aimed bursts.
- Gentle Giant: It's huge, but it won't attack unless struck five times.
- Ground Pound: Can teleport above the player and attempt to perform this.
- Mind over Matter: Wields psychic powers that it not only uses to attack, but also to call Clams to its aid. Even Draedon considers the development of its powers to be inexplicable, although he muses about whether it's the first sign of a higher life form or an evolutionary fluke that would get them all killed were they not in a peaceful habitat.
- Stationary Boss: Outside of occasional teleportation, it doesn't move.
- Took a Level in Badass: When Hardmode begins, it gains huge stat increases and revamped attacks.

- Art Evolution: She was originally a lot more blue, with less large eyes. Her hair also looked more akin to a tornado than cumulus clouds. Her third resprite gives her a new set of armor and a somewhat slimmer form.
- Blow You Away: Attacks the player by summoning tornadoes.
- Cute Monster Girl: A curvy woman made of clouds.
- Elemental Embodiment: Of wind.
- Fog Feet: Well, it is the literal embodiment of wind.
- Flunky Boss: Can summon up to ten Angry Nimbuses to assist her.
- God Needs Prayers Badly: In the same boat as the other Elementals. She's implied to have grown vengeful from being abandoned by her followers.
- High-Heel–Face Turn: She's a summonable minion through the Eye of the Storm accessory.
- How the Mighty Have Fallen: Given that she's one of the Elementals.
- Leg Focus: Her old sprites tended to emphasize her large legs. Not so much anymore, since she no longer has any.
- Mighty Glacier: Somewhat slow, but pretty tanky and can hit hard with her tornado attacks.
- Ramming Always Works: One of her attacks in her second phase.
- Shock and Awe: She holds a lightning bolt in her hand, and she can summon thunderclouds to rain down lightning.
- Underground Monkey: More or less one to the Sand Elemental, given that she shares the same attack, is a Hardmode miniboss and has near identical stats.

- Armor Is Useless: Despite being visually covered in battle armor, it has the lowest HP of all the Elementals.
- Art Evolution: Arguably the most drastic one, from a winged, two legged horse to a massive, humanoid set of armor.
- Blade Below the Shoulder: Its arms are gigantic stone axes.
- Bullfight Boss: Its primary attack beyond flying into the player is to charge at them.
- By the Lights of Their Eyes: Only one of its eyes is visible as its only possible facial feature.
- Cute Monster Girl: Defied. It's a monstrous humanoid made of stone.
- Dishing Out Dirt: Can fire bursts of explosive rocks along with its physical attacks.
- Elemental Embodiment: Of earth.
- Gladiator Games: Its overall design resembles a gladiator's set of armor. This may coincide with its previous design being a horse.
- Glass Cannon: Less defenses and health than the Cloud Elemental, but hits harder.
- Glowing Eyes of Doom: Shows a single glowing eye through its helmet.
- Guys Smash, Girls Shoot: It is this given the other Elementals are female and focus more on ranged attacks, while the Earth Elemental mostly uses physical rams and only uses projectiles as a secondary attack.
- Fragile Speedster: Surprisingly quick given its size and can deal good damage, but doesn't have exceptionally high health.
- Heel–Face Turn: Averted. It lacks a summoning item that would make it a minion like the other Elementals.
- Jump Scare: Its ability to phase through the ground can cause these.
- No-Sell: Immune to knockback.
- Ramming Always Works: It tries to attack the player by flying at them.

An unmaintained mechanical worm formerly used by Draedon to mine and excavate caves for lab construction, which starts spawning underground after Plantera is slain. Drops Demonic Bone Ash, material for Draedon's Arsenal, and Draedon's Remote.
- Anti-Frustration Features: If you leave the underground biome to escape it, the Armored Digger will immediately flee and despawn shortly after.
- Achilles' Heel: Despite its high stats, it's still a worm, and it lacks the piercing resistance that most Calamity worm bosses have. This makes it highly vulnerable to piercing weapons like spears.
- An Ice Person: Although it has no ice-related abilities, direct contact with it will inflict Chilled.
- Art Evolution: Used to be silver-and purple, looking more like a miniature Devourer of Gods. Now, it's a detailed, red-and-silver worm resembling the Destroyer.
- Boss in Mook Clothing: It's way tougher than pretty much any enemy that can show up at that point of the game, for sure. In addition, an awakening message will pop up when it spawns, which is normally reserved for full-fledged bosses.
- Lightning Bruiser: The thing is massive, packs a ton of HP, and hits fairly hard, all while being deceptively agile and capable of attacking from multiple angles. Worse still, the caves where it spawns are usually quite tight, making avoiding the worm difficult.
- Segmented Serpent: For a mere miniboss, the Armored Digger is massive.
- Shock and Awe: Can occasionally discharge a large amount of electrified debris from its body as its sole ranged attack. These will linger on the ground for some time before dissipating. In addition, direct contact with the worm will inflict Electrified.
- Took a Level in Badass: Was promoted from a common post-Plantera enemy to a relatively tough, full-fledged miniboss.

- Dishing Out Dirt: Every time it leaps out of the sand, it can send up a shower of damaging sand blasts.
- Flunky Boss: Can start summoning Sand Sharks when below 50% HP. On Expert and above, it'll start spawning them at 75% HP instead.
- King Mook: Of the Sand Sharks and its variations from the vanilla game. It'll even show up if you kill 20 of the Sand Sharks in a sandstorm.
- Land Shark: Swims through the sand, waiting for unsuspecting prey.
- Lightning Bruiser: For how agile it is and how hard it hits, it's quite bulky with 8,000 HP at minimum.
- Ramming Always Works: Its only attacks are various ramming moves. It can perform both horizontal and vertical leaps, and can even redirect itself in midair for a surprise attack.
- Sand Is Water: Swims through sand with no resistance whatsoever.
- Scary Teeth: Huge and sharp ones.
- Threatening Shark: A land shark at that.
- Underground Monkey: Averted. There are no Corruption, Crimson or Hallowed versions of it like the normal Sand Sharks.
- You Will Not Evade Me: If you stray too far from it, it'll charge straight towards you at top speed until it returns to your vicinity.

- Boss in Mook Clothing: A surprisingly tough miniboss, formerly the hardest one to fight before the Abyss was introduce.
- Bee Afraid: Not only was it a former Queen Bee, who themselves qualify, but it's also been mechanically empowered by cybernetics and infected by virulent nanomachines.
- Degraded Boss: Inverted. They're weaker versions of the Plaguebringer Goliath that appear before the boss itself. In fact, it is required to kill infected enemies like the regular Plaguebringers in order to craft the summoning item for the Plaguebringer Goliath.
- Flunky Boss: Can summon small groups of Plague Chargers to assist it in battle.
- Lightning Bruiser: Like the Plaguebringer Goliath, it is fast, relatively sturdy and can strike the player with tough blows, both from its rams and its ranged rocket/stinger attacks.
- Macross Missile Massacre: While not as extreme as its boss variant, it can still fire off quite a storm of ordnance.
- Names to Run Away from Really Fast
- Plague Master: They're infamous for this, spreading it wherever they go.
- Poisonous Person: By extension of the above trope.
- Sickly Green Glow: The recurring theme for Plaguebringers, present even in their coloration.
- Warm-Up Boss: More or less served as this for the actual Plaguebringer Goliath, who fights similarly to the standard units.
Cragmaw Mire


A gelatinous creature with a rocky shell, actually two monsters living in a symbiotic relationshop. Spawns in the second tier of the Acid Rain and gets a significant power upgrade in the final tier of the event. It drops a Rogue weapon and a Summoner accessory at a guaranteed rate when initially fought.
- Ground Pound: Can teleport above the player and slam down on them, creating a huge explosion.
- Spike Shooter: Fires rings of spikes.
- Stationary Boss: It can teleport to reposition, but lacks any other means of moving.
- Turns Red: It gets a second phase post-Polterghast.
- You Will Not Evade Me: In the final stage of the Acid Rain, it gains the ability to grab the player with a barbed tether and drag them towards itself. This hook is actually a seperate creature.
- Wave-Motion Gun: Can drop below the player and fire one of these upwards, which produces additional acid droplets.
Nuclear Terror

A radioactive crustacean miniboss, mutated over time into a monster that only knows survival. Spawns in the Acid Rain event post-Polterghast, and drops a Summoner and Melee weapon.
- Big Creepy-Crawlies: One with very unusual proportions, at that.
- Boss in Mook Clothing: On par with the Abyssal Minibosses, packing massive HP and threatening with lightning-quick strikes as well as projectiles.
- Nuclear Mutant: It's right in the name.
- Shout-Out: It's an upscaled version of the Horror.
- Taking You with Me: It explodes into a blast of nuclear bullets upon death.
- Teleport Spam: Can do this if the player stays too far away from it.
Mauler
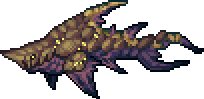
- Bullfight Boss: Likes to repeatedly charge at lightning speeds.
- Art Evolution: Got a more polished sprite that gives it a more jagged appearance.
- Boss in Mook Clothing: On par with the Abyssal Minibosses, it has more health than the Aquatic Scourge, which is the actual boss of the biome.
- Lightning Bruiser: It has HP on par with a fully fledged boss, can deliver lethal blows instantly, and swims incredibly fast. It can even take massive leaps out of the water to surprise unwary players.
- Poisonous Person: Spits acid bubbles to attack from range, and can fire storms of acidic droplets that home in on the player after a delay.
- Threatening Shark: An acid shark.
A number of the creatures that lurk in the deepest regions of the Abyss are strong enough to be considered Minibosses on their own. Most of them will only retaliate if attacked or approached, and most of them drop unique items in addition to the standard Post-Plantera Abyss drops of Depth Cells and Lumenyl.
- Boss in Mook Clothing: All of them. They pack stats comparable to endgame bosses.
- Leitmotif: They were meant to have Threats of the Ocean Floor until the theme got scrapped, and later repurposed for the Primordial Wyrm.
- Sea Monster
- Wolfpack Boss: Not only do they have a tendency to spawn together, they can and will gang up on you given half the chance.
Colossal Squid

- Anti-Frustration Features: If you have a Colossal Squid latched onto you, it will reduce your Aggro stat by so much that it becomes virtually impossible for anything else to target you during this time.
- Giant Squid: Specifically, a Colossal Squid. The actual Giant Squids in the Abyss are far more benign.
- Grenade Spam: Fires balls of ink which explode into lingering ink clouds.
- Interface Screw: Can latch onto the player and greatly reduce their field of vision while dealing constant damage.
- Lightning Bruiser: The thing packs a ton of HP and is surprisingly fast for its bulk, all the while hitting like a runaway freight train.
Reaper Shark

The apex predators of the deepest layers of the Abyss, capable of hunting even the other behemoths of the depths. Reaper Sharks will remain invisible until provoked, upon which it will aggressively ram into players. Always drops a Cloaking Gland to make Anechoic Coating, and can drop Reaper Teeth used for certain equipment. Post-Polterghast, it will begin dropping a deadly throwing weapon as well.
- Always a Bigger Fish: It hunts and eats Colossal Squids and juvenile Eidolon Wyrms.
- Art Evolution: Mere days after its release one was made for it, looking considerably more muscular and brutish.
- Blade Below the Shoulder: There are evident elbow blades on the Reaper Shark's arms.
- Expy: While it's not evident in as many ways as the Eidolon Wyrm, it does bring the Reaper Leviathans from Subnautica to mind, especially with its incredibly aggressive behavior and Lightning Bruiser nature.
- Extra Eyes: Has four eyes.
- Hell Is That Noise: They will emit a low, echoing roar if it draws too close to you or if you attack it.
- Invisibility: It has the ability to cloak itself, with it only uncloaking if enraged.
- Lightning Bruiser: It's decently fast, deceptively bulky and can easily shave off massive chunks of HP with each strike.
- Meaningful Name: Its tail, which can be looted from it as a weapon named "Valediction", looks like a sickle, which is the signature weapon of The Grim Reaper.
- Sea Monster: A vicious, shark-like predator with invisibility powers.
- Turns Red: When at half HP, it will begin to use constant, rapid charges like Duke Fishron.
- Signature Roar: A deep, watery rumble that is one of the only ways to detect it before it attacks you.
- Threatening Shark: One with fists to boot.
Eidolon Wyrm

Massive, ghastly sea serpents that spawn in the third and fourth layers of the Abyss, actually one of the few remaining descendants of the original Auric Dragons who escaped into hiding during the purges. They will only attack if struck first. They will drop a number of items post-Polterghast, most notably an extremely dangerous magic gun and sword.
- Animalistic Abomination: They resemble deep sea creatures, but they're actually surviving offshoots of a species of divine beings beyond human reckoning.
- Art Evolution: Twice, the first resprite having the Juveniles and the Adults (later Primordial Wyrm) getting their separate sprites while making them look less like Ghost Leviathans, then another resprite that gave them a more intricate and detailed look.
- Attack Its Weak Point: Attacks will phase right through them unless they hit its head. On the flip side, an Eidolon Wyrm's head is the only part of its body that can deal contact damage to you.
- Expy: They're essentially Ghost Leviathans from Subnautica, except with unexplained magical powers, two of which are similar to the Lunatic Cultist's for whatever reason.note Their resprites made the resemblance less obvious, but it's still quite evident.
- Gentle Giant: Despite their enormous size and deadly combat abilities, Eidolon Wyrms are completely harmless until you attack them first - which stands out since most Abyss enemies will attack you if you draw too close. The only exception to this rule is the Primordial Wyrm spawned by using the Rod of Discord in the Abyss, which is always aggressive.
- Hell Is That Noise: The Juveniles' horrific, almost human-like shrieking isn't the nicest thing to hear in the depths of the Abyss. The Eidolic Wail weapon they drop allows you to turn this on your enemies by using their shrieks as sonic weaponry.
- Lightning Bruiser: They're surprisingly fast for their size and can hit you for enough damage to severely injure anyone even with endgame armor.
- Sea Monster: Massive and terrifying sea serpents that possess strange, incredibly lethal powers.
- Segmented Serpent: As worms, this comes with the territory, however unlike most worms its head is the only part that can deal damage and be damaged.
- Signature Roar: A horrific echoing screech for the Juvenile.
- Was Once a Man: If the Eidolists and the Wyrms dropping Cultist Clothes are any indication, they're implied to be former cultists who managed to fully transform themselves into sea monsters.

An impossibly ancient beast from the early Draconic Era, first of the Wyrms, and one of the closest living descendants to the Auric Dragons, directly blessed by Silva herself to give it powers beyond reckoning. It holds a deep grudge against the usurper of Primordial Light, and will mercilessly attack all who provoke it or try to reclaim the Terminus at the bottom of the Abyss.
It spawns if the Rod of Discord or any Chaos State inflicting item is used in the Abyss. Although it is completely optional to face, the Wyrm is a post Calamitas/Draedon boss fought in Layer 4 of the Abyss, who will drop the elusive Halibut Cannon if slain.
- An Ice Person: Can hurl clusters of homing ice balls which fire ice spikes around them.
- Animalistic Abomination: Even moreso than the Juveniles; it's so ancient and powerful that it's less a giant monster and more a living example of the full potential of nature.
- Beef Gate: Its main purpose is to punish players who try to use the Rod of Discord to skip parts of the Abyss' navigation, as it can swiftly kill even endgame players if they aren't ready. However, unlike the Dungeon Guardian, killing the Wyrm will not allow you to use the Rod of Discord in the Abyss, as it will just spawn another one.
- Expy: In terms of their behavior and purpose, the Primordial Wyrm was designed to resemble the Dungeon Guardian from the first game - seemingly unstoppable entities with obscene defense, blocking you from performing a task (entering the Dungeon early for the former, using the Rod of Discord in the Abyss for the latter) and punishing you with a world of pain if you attempt it anyways. However, the Wyrm is leagues more powerful than the Dungeon Guardian due to its higher damage, wider variety of attacks and massively increased health.
- Flunky Boss: Can summon Juvenile Eidolon Wyrms and Eidolists to assist it. It will stop summoning them once you beat it down enough.
- Leitmotif: Threats of the Ocean Floor.
- Light 'em Up / Casting a Shadow: Can use both light and darkness blasts to bombard players, in addition to summoning Ancient Dooms that explode into sprays of shots.
- Lightning Bruiser: With titanic health, sturdy damage reduction, very fast movement, and a myriad of devastating magical attacks, the Primordial Wyrm isn't going down without significant effort on the player's part.
- Scare Chord: If you aggro the Primordial Wyrm with the Rod of Discord, it will play a shrill sound before its boss music kicks in.
- Shock and Awe: Can call down storms of lightning from above, later also engulfing itself in lightning when it charges.
- Signature Roar: A deep, echoing bellow evocative of an ancient beast.
- Stronger with Age: A fully grown Eidolon Wyrm compared to the Juveniles you normally fight. Instead of a miniboss like the latter, its strength eclipses both Calamitas and the Exo Mechs.
- Superboss: The Wyrm isn't required for progression and has no bearing on the storyline outside of providing some worldbuilding, and at no point in the game does the game ever indicate that it's meant to be slain - in fact, it's not even considered a true boss outside of it having a health bar and Boss Zen, and it's possible to go through the whole game without ever encountering it. If you choose to fight it, its strength surpasses everything else before the actual Final Boss, but it will drop an elusive weapon that is just as powerful.
- Time Abyss: They've existed from as far back as the early Draconic Era, making them from an era totally unknown to present life, and older than pretty much every other being currently on the planet.
- Teleport Spam: Its main form of attack, warping to positions around the player and attacking them from out of the darkness of the Abyss.
- Turns Red: If you take it out of Layer 4 of the Abyss, it will enrage, becoming massively more aggressive and allowing it to use a devastating Mind over Matter attack that pulls you towards it for a fatal blow.
Planned Bosses

The planned Final Boss of the mod, who will await at the summit of the Dragon's Aerie once you've defeated all of his most powerful allies.
- Affably Evil: Despite his history of bloodshed and warfare, the Lore items indicate that Yharim is cordial and well-mannered in regular conversation, and he even has genuine respect for the player and their progress, gladly accepting their challenge once they've defeated both Draedon and Calamitas.
- Always Someone Better:
- To the player once the Auric Tesla armor is acquired. His official appearance shows him clad in what appears to be a mechanically augmented version of the armor, fueled by his Stims. Not only that, his armor still resembles the old Master of All version of the armor that combined almost all the perks of the current variants into one set.
- Because he's directly attuned to an Auric Dragon instead of forcibly using Auric Soul Fragments as an substitute, the Auric Tesla metal of the armor itself is also far more powerful than the metal the player can make.
- Anime Hair: If artist's interpretations are to be taken as canon, the plume on his helmet is his actual hair.
- Badass Cape: Wears a long blue-and-gold one that borders on All-Encompassing Mantle.
- Berserk Button: Forcing people or creatures to fight against their will. Although he readily admits his horrific actions later in his war, slavery is where he draws the line, as he believes that it's no better than what the Gods did to their followers. Draedon's Plaguebringer project enraged Yharim to the point where he immediately cut contact with the scientist after he discovered it.
- Big Bad: He's the reason why the world of Terraria Calamity is the way it is, and taking him down is the goal of your quest.
- Bling of War: Much like the Auric Tesla Armor it's based off of, his Powered Armor is golden.
- Broken Ace: An immeasurably powerful fighter and charismatic war hero who has fallen into depression from the weight of his actions and duties.
- Cool Helmet: A golden, mechanical one with a vertical-slitted visor. It's nearly identical to the older Auric Tesla Helmet, which was back when the armor was a full-fledged Master of All set.
- Cool Sword: Wields a massive, flaming broadsword◊ which bears a striking resemblance to the True Tyrant's Ultisword you can make in-game. It's even stated to be able to extend at will.
- Death Seeker: The lyrics of specific songs, and some of the Lore Items from his perspective, suggest that he has become this due to his depression and remorse over his past as the Godseeker. Implications are that Yharim allowing and even encouraging the Player to destroy his legacy and overpower his former subordinates and creations is him grooming them to become strong enough to be the one to finally kill him.
- Defector from Decadence: He was slated to become a God-King, but refused out of disgust upon realizing all at once what becoming a God entails and has entailed the entire time.
- Despair Event Horizon: His fall from grace and the length of his war has caused him to crash into this hard, to the point where he may have purposely let the player become a being of godlike power just to watch them lay waste to his legacy and empire.
- Even Evil Has Loved Ones: Yharim has - or at least had - a genuine love for his people, and was willing to fight the Gods partially in the name of their liberation. Even after his fall, he still genuinely cares about Yharon.
- Even Evil Has Standards:
- He considered Draedon's Plaguebringer project so morally reprehensible that he immediately cut ties with him, showing that there's a certain line regarding enslavement that even he won't cross. In general, Draedon's complete and utter apathy towards anything besides research disgusts him.
- The lore items written from his perspective show that for all of his wrath, he can still feel pity and respect, as well as regret for his past actions. In particular, he specifically asks the player to show Calamitas the respect that he failed to show her before.
- Fallen Hero: Yharim started his crusade as a noble hero fighting against the tyranny of the Gods in the name of justice for the Auric Dragons, and was a beloved figure of hope and valor. Now, it's clear that he's nowhere near the hero he used to be, something that he readily and mournfully admits.
- Final Boss: The last non-superboss you'll face, and the strongest enemy in the main story.
- I Need You Stronger: The implied reason why Yharim guides the player into fighting his underlings instead of immediately obliterating them from the get-go is to help the player grow stronger into a proper challenge for him.
- Kill The Gods: His ultimate goal, according to him at least, was to slay the Gods as vengeance for the Dragons, since gods required Auric souls from them to ascend and drove the dragons to extinction in the process.
- Lean and Mean: Nine feet tall and has the ideal slim body for the job.
- Light Is Not Good: A cruel tyrant decked out in his own version of the Auric Tesla armor, which was already golden in coloration.
- Longevity Treatment: He's clocking in at about 130 years old in the present due to Draedon's life-extending enhancements, and he's just as powerful as he was in his prime.
- Mirror Character: In a way, the the player's journey mirrors that of Yharim, something that both he and other characters acknowledge - a relative nobody who conquered and brought the entire world to its knees to fulfill a personal goal. While Yharim once fought to overthrow the Gods and take revenge for the Dragons, the player character's motivation is deliberately left up to the player themselves to decide. In fact, the reason Calamitas even attacks the player in the first place is due to acknowledging this similarity and the possibility that the player will just become another Yharim.
- My God, What Have I Done?: Realizing the full ramifications of his actions led to him regarding his past self with dour contempt, with him even beseeching the player to never repeat his mistakes.
- Orcus on His Throne: Downplayed. Yharim is nowhere to be seen for the entire game, but it's implied that he's simply been attending to other matters instead of just waiting for the player to reach him.
- Powered Armor: Wears a mechanized version of the Auric Tesla armor, which is not only directly attuned to Yharon instead of being an ersatz attunement, but is also loaded with additional features to further bolster his strength.
- Rage Against the Heavens: He already had a grudge against the Gods to begin with, but upon learning about how the Gods were usurpers who killed the entire Draconic race, Yharim swore vengeance upon them and started a crusade against the Gods that lasted many decades. This didn't only extend to the Gods, though - Yharim also turned his wrath against all who worshipped them.
- Unreliable Narrator: Although the lore items are written by him, Yharim doesn't know everything nor does he claim to, meaning that his recounts of the game's story are biased and likely missing some major details.
- Well-Intentioned Extremist: Yharim believes his crusade to be for the betterment of the world by freeing the people from the Gods while avenging the Dragons, which is given credence by nearly all of the Gods being depicted as abusive and controlling at best and complicit in the genocide of an entire race for their divinity. Whether this justifies all of the horrific atrocities he performed in said crusade, however...
- World's Strongest Man: Yharim wields strength surpassing even the mightiest Gods despite being an empowered mortal man, and is both tough and skilled enough to be ranked above multiple Gods and God-slaying monsters.
- Worthy Opponent:
- Seems to find the Terrarian to be this, to the point where he's highly implied to be watching and guiding their growth in anticipation of them challenging him. The moment that Calamitas and Draedon are defeated is when he becomes absolutely certain that they are the challenge he's been looking for, upon which he praises their strength and tells them that he will eagerly await their inevitable battle.
- He also seemed to see Braelor as one, given how highly he speaks of him despite Braelor being his enemy, putting him on a pedestal of valor equal to himself and Calamitas.
- Eldritch Abomination: An unknowable and unfathomably powerful entity from an Eldritch Location, with equally unknowable but most definitely malevolent goals.
- Expy: Of Ozma from Final Fantasy IX. Both are spherical Optional Bosses that are around as powerful as the other Superbosses. And then there was his former name, Goozma. This is entirely intentional, as
 Word of God confirmed Ozma was the direct inspiration. However, with Noxus being completely rewritten, it is uncertain how much of this still holds weight.
 - Fluffy the Terrible: The powerful Superboss whose old name led to memetic levels of referencing Guzma within the Calamity Mod community, and even DM DOKURO himself decided to join in on it in one of his Coffee Break videos.
- Greater-Scope Villain: If the notions that it's manipulating the Devourer of Gods and other natives of the Distortion can be taken at face value, at least.
- Meaningful Rename: From Goozma to Noxus, marking its Retcon from an ascended Slime God to a dark god of chaos and eventually a Distortion entity.
- Optional Boss: A Superboss out of two planned ones.
- Reality Warper: Potentially even being a Dimension Lord.
- The Spook: Almost nothing is known about it or what it wants, outside of vague mentions about the origins of the Distortion and the of the Devourer of Gods. In fact, its name hasn't even been properly mentioned anywhere in the game yet.
Slated to be the second and final Superboss, and therefore the strongest enemy in the entire mod. He is also the original owner of the Terminus and will challenge you with the Boss Rush if you find it, recreating your past foes with Primordial Light to test your worth for an unknown purpose.
- Affably Evil: Assuming he really is evil, although his Boss Rush dialogue makes it clear that the player is still not worthy in his eyes, he still speaks respectfully while describing the player's strength in glowing terms, and is willing to both offer them his personal keepsake as a consolation prize and entertain the possibility that they have the potential to eventually meet his standards.
- Ambiguously Evil: Although he's regarded as a traitor by many and his actions kick-start both the end of the Draconic Era and almost all of the conflict in the present, it's not actually clear what his motivations are. Notably, since nobody knows exactly what happened on the day of Xeroc's ascension, it's left ambigous whether his consumption of Zeratros' soul was actually out of power-hungry malice, or if it was for some other reason yet unknown. The only current recount of his past comes from Yharim (who is heavily biased by his own admission), and although Yharon regards him as enough of a traitor to kick-start Yharim's crusade by telling him his story, Xeroc himself refers to Yharon as an old friend.
- From Nobody to Nightmare: From a mere monk to an almighty God who is indirectly responsible for nearly all the suffering that occurs in Calamity's story.
- Light Is Not Good: They're a divine being who wields the power of Primordial Light, but they stole that power from a dying, benevolent deity out of seemingly selfish desire, and have been callous at best regarding the fallout of their actions.
- Kick Them While They Are Down: Instead of helping the dying Zeratros or even easing his passing, Xeroc instead opted to devour his soul to attain Godhood.
- Physical God: They're the first of the Deific Era's Gods, and by devouring Zeratros and obtaining power over the Primordial Light, they're a God among Gods and the most powerful known being on the planet.
- True Final Boss: Planned to be the ultimate boss of the entire mod, although Yharim will still be the official Final Boss.
Town NPCs

The king of the underwater kingdom of Ilmeris. Presumed to be a pious man who revered the Gods, which put him in Yharim's crosshairs and eventually led to the incineration of his homeland. The Sunken Sea is one of the scant few remains of his lost empire, and it now serves as Amidias' final sanctuary.
He can be found as an NPC after killing the Giant Clam miniboss in the Sunken Sea, upon which he will join the player. In addition to selling weapons, clicking his Help option will grant the player a potent buff that grants unlimited underwater breathing until the player is hit or the duration runs out, even in the Abyss.
- Clam Trap: Throws Snap Clams at enemies, which latch onto them for constant damage.
- Fish People: A variant; he's an anthropomorphic leafy seadragon.
- Mr. Exposition: Talking to him for long enough reveals a lot about the world's lore, as well as countless hints and notes about the bosses themselves.
- Mister Seahorse: Naturally, because he's an actual seahorse."How odd it is, that your people leave the care of those yet to be born to the females. Our males carry the eggs until they hatch."
- The Sleepless: Not needing sleep is part of his nature.
- Would Hurt a Child:
- He really dislikes the Angler, to the point he seems eager to throw him into the Sulphurous Sea."Meet me at [Name of Angler]'s house at night. We're going to throw him to the Trashers."
- This is made even funnier with Calamity's changes to the Angler, where actually feeding him to the Trashers in Hardmode as per Amidias' suggestion gives you the Golden Fishing Rod.
- He really dislikes

- Bullying a Dragon: She has attempted to steal from Storm Weaver, Draedon and Providence. Most of her attempts do not end well.
- Did You Just Flip Off Cthulhu?: Somehow went up against Providence and the Storm Weaver - even the Devourer of Gods when trying to steal from the latter - and actually lived to tell the tale.
- Everyone Has Standards: She refuses to steal from the Princess due to thinking of her as cute.
- Shout-Out:
- One of the possible names for her is Indiana.
- In addition, one of her quotes may bring to mind Marisa Kirisame.

- Ambiguously Human: She appears human in all ways. However, her dialog implies she may be a unicorn, and a player using a certain item causes her to transform into the Alicorn mount.
- Author Avatar: She is the self-insert of the lead developer, Fabsol, who has been known to get drunk a lot on several occasions.
- Booze-Based Buff: Vanilla Terraria already has one as the trope page's image, but she sells more kinds of alcohols which add even more of these buffs. To make things even better, each alcohol gives a different type of buff that's exclusive to that alcohol.
- Breaking the Fourth Wall: She offhandedly refers to things like the wiki, coding, and bugs. She's also aware of how many times you've died.
- Dark and Troubled Past: Her past traumatized her to the point where it's implied her personality as The Alcoholic was developed as a coping mechanism. From supplementary information, it's revealed that she killed her abusive father in a fit of rage before becoming deeply disturbed by her own actions.
- D-Cup Distress: She'll be happy to tell you that her "assets" cause back pain.
- Double Entendre: Her quotes consist of a lot of sexual lines and innuendos. Fitting, since she's usually found drunk.
- Easter Egg: If you talk to her during a blood moon, there's a chance that she will randomly damage you for half your max HP. In fact, if you die to this, she will provide a particularly amusing Non-Standard Game Over.[Player] was slapped too hard.
- Energy Weapon: When threatened, she'll defend herself with ricocheting rays of light that strike enemies and continue damaging them for a short duration afterwards. This attack bears a striking resemblance to the beams used by the Fabstaff weapon, which is likely intentional.
- Hidden Badass: While she seems almost like a joke character and has no known relevance to the story, her HP value (20,000) puts her at the same power level as Permafrost, and she's capable of holding her own just as well when forced into combat.
- Exaggerated in the "get fixed boi" world seed, where she can be fought as a more difficult version of Supreme Witch, Calamitas, with all the power that intails. She summons the Slime Queen, the Empress of Light, Dragonfollies, Providence, and the Devourer of Gods as mere minions!
- Jerkass: The amount of times that she isn't being snarky, abrasive, rude, or outright hostile can be counted on one hand.
- O.O.C. Is Serious Business: In contrast to her usual volatile self, she will be practically stunned if Calamitas is present, almost somberly lamenting the amount of abuse she went through over her life.
- Power at a Price:
- Her Alcohols in a nutshell. They can provide a variety of benefits that no other consumable can provide, but will always have some kind of penalty that comes with it, most commonly reduced life regeneration.
- Drinking more than two Alcohols will also give the player alcohol poisoning, which drains their HP rapidly, the rate of which increases the more Alcohols over two the player has ingested.
- The Odd Mushroom. While it boosts all damage by a whopping 50%, it also has some...bizarre effects on the player's vision. To be specific, it causes all bosses, minions, and projectiles to get the Expert Brain of Cthulhu's hallucination effect, bathes all entities in warping rainbow-colored light, and produces a heat distortion effect over the entire screen.
- Her Alcohols in a nutshell. They can provide a variety of benefits that no other consumable can provide, but will always have some kind of penalty that comes with it, most commonly reduced life regeneration.
- Status Buff: She sells four different types of candles (Weightless, Vigorous, Resilient, Spiteful) for a hefty price. Said candles provide potent and exclusive buffs to anyone standing near them.
- The Many Deaths of You: She'll tell you how many times you've died in the world when asked, alongside a snarky comment if you've died a certain number of times.
- Voluntary Shapeshifting: Her quotes reveal that the Alicorn summoned by Fabsol's Vodka is actually her in a different form.
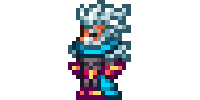
One of the most prodigious mages in the entire land and a former advisor of Yharim, Permafrost guided and aided the Godseeker in his early conquests, while also raising Calamitas as his own daughter. However, as Yharim's ambitions became increasingly violent and tyrannical, he eventually left his side, with Calamitas following shortly after. He was thought to be slain by the Witch, but was in fact sealed inside Cryogen until the player released him.
He moves in after you defeat Cryogen and free him. Sells a number of ice-related weapons and items.
- The Archmage: His countless advancements in magic led many to see him as the greatest wizard to exist. Bonus points for having "Archmage" as a title too.
- An Ice Person: The archmage of ice who sells ice-related items, and uses ice blasts to defend himself.
- And I Must Scream: Was sealed inside Cryogen for many years.
- Death Faked for You: When the increasingly tyrannical Yharim discovered that Permafrost had defected from his side, he ordered Calamitas to find the Archmage and kill him. Unwilling to kill her former mentor, Calamitas instead sealed him in Cryogen after a tearful confrontation with Permafrost.
- Defector from Decadence: Abandoned Yharim's forces after seeing how Yharim was becoming more unstable and violent.
- Parental Substitute: Served as one to Calamitas during their stay at Yharim's side.
Story Characters
- La Résistance: He led one against Yharim in the name of the Gods.
- Precursor Heroes: Was one of them before the player, alongside Statis.
- Super-Strength: Had enough strength and skill to match Yharim in single combat.
- Red Oni, Blue Oni: The Red to Statis's Blue. He's implied to be more of a classically chivalrous and heroic fighter compared to Statis's pragmatism.
- Word of Gay: At least until he appears in the mod. The lead writers have confirmed him to be in a romantic relationship with Statis.
- Battle Couple: With Statis. The two of them are stated to have been in each other's company on the battlefield, presumably on a regular basis.
- Combat Pragmatist: Befitting his ronin/ninja motif, Statis seemed to prefer stealth and subterfuge as opposed to Braelor's chivalry. He nearly manged to kill Yharim by striking him while he was distracted by Braelor.
- Deal with the Devil: Yharim presumes that he managed to escape the Distortion by making a deal with Signus. The extent of this deal is currently unknown.
- Precursor Heroes: Was one of them before the player, alongside Braelor.
- Long-Haired Pretty Boy: His concept art portrays him as having long (at least waist-length) dark bluish-purple hair in a side ponytail.
- Red Oni, Blue Oni: The Blue to Braelor's Red.
- Word of Gay: See Braelor.
- Battle Couple: With Braelor.
- And I Must Scream: What remains of her soul is trapped in the Abyss, furiously lashing out in a futile attempt to revive herself.
- Determinator: Naturally, as the Goddess of Life, she refuses to fully die even after being torn apart and cast into the Abyss, with her remains constantly growing plants around her and fighting for survival.
- Green Thumb: She was the first nature spirit, after all.
- Nature Spirit
- Physical Goddess: A Goddess of Life.
- Posthumous Character: Well, less dead and more having her soul trapped in the Abyss without any hope of reforming.
- Light 'em Up: He wielded the power of the Primordial Light, an unknown and nebulous power from beyond Terraria itself. He is presumed to be the most powerful of the Auric Dragons as a result; fittingly, Xeroc became the strongest of the Gods after devouring his soul.
- Posthumous Character: Has long since been dead due to Xeroc consuming his soul, kick-starting the plot.