Main Cast | Monsters (Enemies | Bosses | Final Bosses)
The massive variety of strong monsters faced throughout the game.
Mini-Bosses
The Seven Deadly Sins/Seven Super Deadly Sins
The physical embodiment of the Seven Deadly Sins, which can be encountered as mini-bosses on any floor barring the Chest and Dark Room. Stronger variants known as the Seven Super Deadly Sins can sometimes replace the normal sins.
- Ambiguously Human: It's not clear if they are humans under the effect of various itemsnote , humanoid monsters from the start, or the actual Sins themselves given physical embodiment. The implication that every character is an alternate Isaac as he only imagined the events of the gameplay just complicates things further.
- Anthropomorphic Personification: They're humanoid personifications of their respective sins.
- Degraded Boss: Zig-zagged. The sins, along with their Super variants, can be encountered as mini-boss enemies following the Womb, but it's still possible to encounter them as a mini-boss in a floor.
- King Mook: The "Super" variants introduced in Wrath of the Lamb, as well as Ultra Greed in Afterbirth.
- Inescapable Ambush: Unless you hold certain items, they won't show up on the map at all until you run into them, and you cannot leave unless you carry a teleportation item. Their rooms also have metal bars around the doors so that you cannot even bomb your way out as you could with normal enemy rooms.
- Quirky Miniboss Squad: They fight you individually, but in any of the levels following the fourth chapter, you may encounter up to three different Sins to fight in the same room.
Envy/Super Envy

- Asteroids Monster: When defeated, he splits into two heads, which each split into two smaller heads, which finally each split into two tiny heads. Super Envy splits into threes instead of twos, except for the smallest heads.
- Damage-Sponge Boss: To make up for the fact that he is easily the least dangerous Sin in either form, he has more aggregate health than the other Sins.
- Kaizo Trap: The last Super Envy head killed can drop a Troll Bomb.
- Slasher Smile: The usually amusing trollface turns into a more terrifying one when it belongs to something vibrating and hovering ominously towards you.
- Shout-Out: Envy's main expression resembles a trollface, while the smallest variant resembles a pokerface.
- Villainous Breakdown: While most sizes of Envy's heads are smiling, the second-smallest is actually grimacing angrily. The smallest size just doesn't know what to think anymore.
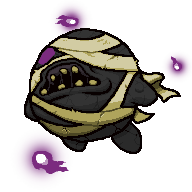
Gluttony/Super Gluttony

- Blood from the Mouth: A non-lethal example with Super Gluttony, who has blood emitting from his mouth.
- Does This Remind You of Anything?: If you stand above Gluttony (and, to a lesser extent, Super Gluttony) when they shoot upwards, it looks disturbingly like they're flashing you. Which, like Vis, they kinda are. To the viewer's utter chagrin.
- Fat Bastard: Both of them try to kill you and, par for the course for Gluttony personifications, they're also overweight.
- High-Pressure Blood: He shoots Brimstone lasers from his belly, like a Vis. Super Gluttony fires out his back, too, like a Double Vis.
- King Mook: He's basically a Vis with a head, with Super Gluttony being a Double Vis with a head.
- Visual Pun: A very disturbing one. His chest has been slashed open right where his heart would be, there is blood around his mouth (mainly as Super Gluttony), and (as Gluttony) he frequently drops <3 on defeat. The implication? He literally ate his heart out.
Greed/Super Greed

- Bandit Mook: His shots (and mere contact with him) take away a couple of pennies from you, while making you drop a variable amount on the floor that you can try to retrieve. Just be careful while doing so, if you don't want to be killed in the process. His mook-look-alikes have the same ability as him.
- Breakout Character: He's the most memorable and ubiquitous of The Seven Deadly Sins mini-bosses, and Wrath of the Lamb cemented his status by adding a quite a few new versions of him. And Afterbirth makes Ultra Greed the final boss of Greed Mode.
- Character Blog: The Afterbirth Alternate Reality Game gave him a Twitter
 . On the other hand, most of the entries were made by the players, who completed the ARG by logging into the account and posting tweets.
 - Chest Monster: Replaces shops and secret rooms. He's more likely to appear as you go further in the game.
- Degraded Boss: While several sins appear as enemies in the Womb onward, Super Greed can be encountered as a mini-boss enemy as early as The Depths.
- Expy: He shares some traits with Spelunky's Shopkeeper, including his multi-shot ability, potential to turn hostile on the player without previous warning, and overall dickishness.
- King Mook: Wrath of the Lamb added Super Greed, who is bigger, meaner, scarier, and can spawn Keepers, who are essentially Greed heads. They can also appear in the Depths, the Catacombs, and the Necropolis. Also, the final boss of Afterbirth's Greed Mode is Ultra Greed.
- Mirror Boss: Fighting him as Keeper invokes this trope.
- Mook Maker: Normal Greed summons Hoppers, while Super Greed summons Keepers (which are Greed heads).
- Money for Nothing: Invoked; he gives a lot of money when defeated, but his battle has a tendency to replace a shop where there would be one. There's also a chance he might appear in Secret Rooms, making for a bit of a subversion.
- Mook Promotion: Inverted. The game's standard version features him as a mini-boss, but the expansion added mook-versions of him that share some of his most aggravating attributes.note
- Noose Necktie: A prominent fixture of his design.
- Pre-Final Boss: A pack of Greeds or Super Greed are possibilities for the last fight before Ultra Greed in Greed Mode.
- Upgraded Boss: Unlike other Super Sins, which can replace a normal sin regardless if their normal variant has been encountered, Super Greed can only appear as a mini-boss once normal Greed has been killed.
- Took a Level in Badass: He's pretty unimpressive as a mini-boss even in his super form, then comes his Ultra Greed form.
- Wingding Eyes: Super Greed either has cent signs for eyes or actual coins jammed in his eye holes.
Lust/Super Lust

- Abhorrent Admirer: Possibly due to being the personification of Lust and not exactly in the good-looking department, and her only attack is chasing after the player at great speed and causing Collision Damage.
- Badass Normal: Pride can spawn bombs from nowhere and has Super-Scream or can stretch out tentacles. Greed can sap money away from Isaac through collision or even bullet contact and can spawn monsters. Lust, however, just seems to be a fast girl with a harmful virus. Super Lust averts this by having a trail of harmful blood that doesn't damage her, which is not "normal" by any standard.
- Blood from the Mouth: Super Lust seems to have blood leaking from her mouth, though not as much as Super Gluttony.
- Bloody Horror: Lust seems to be affected with some sort of blood disease (likely HIV) and her Super variation bleeds from the face and leaves a trail of blood everywhere she goes.
- Bullfight Boss: She does nothing but charge at you. Thankfully, she can't turn on a dime and there are plenty of rocks around to kill her momentum.
- Does This Remind You of Anything?: Lust and Super Lust's diseased appearance bear reference to sexually transmitted diseases, and Super Lust's battered and bleeding face implies a rough or violent sexual act.
- Facial Horror: Both of them have deformed faces, especially Super Lust.
- Fragile Speedster: Not really that tough of a battle compared to the other Deadly Sins since her only gimmick is just running really fast, and she can be brought down rather quickly even with no special tear upgrades. What would make her dangerous, though, is if you had a very poor speed stat.
- Pink Means Feminine: Both Lust and her super form are pink, and she's the only Sin who is female.
- The Smurfette Principle: The only one of the Sins/Super Sins that have been identified as female.
Pride/Super Pride

- Calling Your Attacks: Pride's expression indicates which attack he's going to do; a forever alone face means he's going to do his shout attack, while a trollface means he's going to spawn bombs.
- Mad Bomber: Occasionally, Pride randomly spawns Troll Bombs in an attempt to catch you in the blast.
- Palette Swap: In Wrath of the Lamb, Super Pride's appearance was just that of Pride, but larger and pink instead of grey. In Rebirth, the face is slightly different, but he still resembles a giant, pink Pride.
- Shout-Out: Makes a trollface or a forever alone face before attacking.
- Super-Scream: One of his attacks consists of him screaming. The attack is represented by zigzagging lines forming an X-shaped cross around him. His super variant will fire six projectiles while shouting.
Sloth/Super Sloth

- Green and Mean: His skin is sickly green since he's quite literally rotten.
- Green Around the Gills: He's permanently green and he vomits out Ipecac shots for one of his attacks.
- Last-Name Basis: Sloth is his last name, according to
 Word of God. His first name is Bob, as in the one referenced by items related to poison bombs like Bob's Rotten Head.
 - Mad Bomber: He'll belch out green spit bombs.
- Mook Maker: He'll spawn Chargers on occasion, while his Super variant will spit out two spiders.
- Palette Swap: Of the Globin. See below.
- Stealth Pun: Unlike the other sins, Sloth is a Palette Swap of an existing enemy, in this case the Globin. Sloth has a lazy character design.
Wrath/Super Wrath

- Alien Blood: While the normal Wrath averts this via having red blood, Super Wrath instead bleeds grey.
- Ash Face: Super Wrath's face is sooty and blasted, implying at a bomb-handling attempt that went awry.
- Cartoon Bomb: His bombs are identical to yours, skull marking and all.
- Expy: Of Bomberman, as they both look like him (though it's more prominent with Wrath) and fight using bombs. Both of their rooms also often have hard blocks making them into a grid shape, like in classic Bomberman games.
- Mad Bomber: Throws bomb after bomb at you. Since he's Wrath, this doubles as a Stealth Pun.
- Tactical Suicide Boss: Probably the finest example in the game, as he has exactly one attack which can easily blow up in his face. This can result in hilarious situations where, if you have the Bobby-Bomb collectible, every bomb the boss drops proceeds to walk back toward him. Less so with Super Wrath, as he throws Mega Troll Bombs, which follow the player around and cannot be pushed. However, these can potentially be lured into him.
- Wrong Genre Savvy: He seems to think he's in a Bomberman game. This doesn't work out too well for him, since Isaac can just push his bombs back at him with tears.
Ultra Pride

- Alien Blood: Has green blood.
- Creator Cameo: He's a stylized representation of artist Edmund McMillen, while his familiar is one for programmer Florian Himsl. Hence why he's named Ultra Pride.
- Death by Cameo: You do fight them, after all.
- Dual Boss: He comes with his familiar, and both have to be defeated. Sometimes, two Edmunds or two Florians can appear instead of one.
- Meaningful Name: The creators are ultra proud of their product. Additionally, putting yourself as a cameo in your own game is usually a show of pride, because why would you put yourself in your own game if you aren't proud of it?
- Mythology Gag: As of Repentance, if you defeat Edmund first, Florian has a small chance to drop an Eternal D6 if you've unlocked it, which is a reference to Eternal Edition, which Florian made.
- Palette Swap: He's basically Sloth with different moves, while the familiar is a graphically altered Baby with a different shot type.
- Power at a Price: Both of the items you can get from them:
- The Left Hand is a Trinket that replaces every chest that spawns with a red one. While you can score some pretty good items out of them without the need for keys, you can also just spawn Spiders or Troll Bombs.
- The Eternal D6, being gained if you beat Edmund first, acts exactly like the extremely powerful D6 with a faster recharge time… but has a 30% chance of straight-up deleting the item you tried to reroll.
- Zombie Puke Attack: Instead of spawning Chargers, he has an attack where he pukes out green creep.
Others
Krampus

A demon that can occasionally appear in a Devil Room as a mini-boss. It possesses similar attacks to The Fallen.
- Bad Santa: Most often drops a Lump of Coal, which increases the damage of your tears based on how far they travel and gives Isaac an Ash Face.Item Description: My XMas present.
- Chest Monster: Randomly appears in Devil Rooms. He's more likely to appear if you have already entered a Devil room, even more so if you've made a deal.
- Early-Bird Cameo: He can be fought in Greed mode, even if he hasn't been unlocked yet.
- High-Pressure Blood: Just like the Fallen, but he'll do it if you pass by him in any direction rather than after a charge. Afterbirth adds in a chance of him rotating his beams, and Afterbirth† adds in a chance of him firing them off diagonally.
- The Krampus: It's in the name, after all.
- Mini-Boss: By virtue of being a weaker version of the Fallen, not to mention he has the same kind of entrance as the Seven Deadly Sins. Though unlike the Sins, he only appears in Devil Rooms and is the only mini-boss that Delirium can turn into.
- Moveset Clone: He was initially one of The Fallen, except he doesn't split into two and lacks the chase portion, just taking the cardinal lasers and projectile spray. DLC for Rebirth diversified his attacks, adding occasional rotating lasers in Afterbirth and the ability to fire diagonally in Afterbirth†.
- Nerf: His rotating laser was given a tell in Afterbirth†, where he'll do a short lunge towards the center of the room first (this also prevents undodgeable lasers when he starts the attack against a wall). It also nerfed the Head of Krampus item though, removing the occasional rotating lasers it would do.
Uriel & Gabriel

Secret bosses in Rebirth, a fight with one of two Angels is initiated by bombing the statue in an angel room at any point throughout the game. Beating one unlocks a piece of a key each time, and beating both and combining the keys allows the player to unlock the true final boss of the game.
- The Blank: Even when not in statue form, they lack faces.
- Bolt of Divine Retribution: They shoot coherent beams of holy light, which functionally behave like Brimstone lasers.
- Color-Coded for Your Convenience: Uriel wears silver or blue, Gabriel wears red.
- Degraded Boss: Two Fallen Angels attack you as Mega Satan's flunkies, and to get to that point, you're almost required to have already killed the normal ones in this run. One interpretation of this is that they kept the pieces of the Golden Key safe, failed when Isaac took the pieces, and were subsequently punished for it. Incidentally, the degraded versions are actually stronger than the originals.
- Dismantled MacGuffin: They each hold a piece of the key required to open the Gold Gate.
- Dual Boss: Afterbirth† gave Angel Rooms a chance to contain two angel statues, letting you fight both at once if you are so inclined (or are short on bombs, or used Mama Mega on the same floor). However, before Repentance fixed it, fighting both at once will only spawn one Key Piece, making it better to fight them in sequence.
- Early-Bird Boss: Though Gabriel is the stronger of the two, they spawn in random order, making it possible to fight him rather than Uriel on an early floor.
- Guide Dang It!: Bomb the angel statue in an Angel Room to provoke it into a fight. Less aggravating than other examples since there are more in-game clues and it is often next to blue fires, which can be bombed for soul hearts, so the player might figure this out by mistake if nothing else.
- Hidden in Plain Sight: Those statues in the Angel Room aren't just there for decoration. A fight can be initiated at any point in the game, provided you have beaten either ??? or The Lamb and a spare bomb.
- Our Angels Are Different: They are much larger than Isaac and have no faces. They're also hostile and attack Isaac like every other boss in the game (though Isaac has to pick a fight with them, rather than the other way around).
- Palette Swap: Their main distinction is the color of their scarves. Uriel wears a pale blue one, while Gabriel's is red. Delirium makes note of this when he mimics either of them.
- Personal Space Invader: Unlike Uriel, Gabriel likes to fly directly at Isaac to deal contact damage.
- Winged Humanoid: They have wings and are human-like, although they're also faceless.
Mother's Shadow

After grabbing Knife Piece 2 in a subarea of the second floor of the Mines or Ashpit, an invincible ghostly being of Mom's face will chase after the player until they leave the subarea.
- Advancing Boss of Doom: There's literally no way to fight her once she appears. All you can do is run away and hope to escape back into the Mines/Ashpit with your life.
- Collapsing Lair: Zig-zagged. When Mother's Shadow awakens and begins the chase, the whole area starts to shake with rubble falling down, indicating it will collapse and kill you if you don't get out in time. However, barring Mother's Shadow draining your health with Collision Damage, there's no risk of taking your time getting to the end.
- Dungeon Bypass: The main difficulty of the encounter involves having to bomb your way to escape, due to rocks being in your way and single tile-wide gaps needing to be filled in with those rocks being blown up. However, characters with built-in flight (Azazel, The Lost, etc) can just fly straight to the exit without needing to bother with all of that.
- Eldritch Abomination: Just what the hell is this thing? It's obviously related to Mom, but there's no foreshadowing of its existence apart from how Mom looks on the box art of Repentance. It borders on Giant Space Flea from Nowhere.
- Evil Sounds Deep: Mom's voice is pitched down to the point it sounds far more ethereal and nightmarish.
- Implacable Woman: The Mother's Shadow is invincible and will continue to chase after Isaac until he reaches the end of Knife Piece 2's area. And by "invincible", we mean she's immune to everything that could possibly hurt her. Not even the fabled Chaos Card works on her!
- Moveset Clone: It isn't apparent at first, but her attacks mirror that of Dark Esau, only without the One-Hit Kill Collision Damage. She even has a similar if not identical Hitbox, despite being a lot larger.
- Nightmare Face: Whatever Mom originally looked like in reality has been twisted and warped into a terrifying visage, where only her mouth and eyes are discerned from the dark shadowy body. Her mouth is filled to the brim with Scary Teeth, and her eyes are a crimson red.
- No-Gear Level: Her area takes away all non-"story" items the player has obtained up to that point, forcing them to avoid her with base stats and no items to help. Flying characters can still just fly to the end.
- Nothing Is Scarier: The Classic variation. Before her encounter, the player needs to go through a series of empty and quiet rooms first, with no monsters on sight. Then after getting the Knife Piece at the very end, she appears and chases the player down.
- Red and Black and Evil All Over: She is entirely red and black and one of the most threatening obstacles in the game. When she appears, all the torches light red, and the empty pits are filled with a strange red glow.
- Unstoppable Rage: Mom is apparently so incensed by Isaac putting the Knife Pieces together that she manifests as this dark monstrosity in an effort to kill him on the spot.
Bosses
Chapter 1
Monstro

A disembodied head with a cleft lip that attacks Isaac by either trying to crush him or spewing a barrage of blood particles.
- Asteroids Monster: His Eternal form in the Eternal Edition splits as it takes damage. The smaller forms shoot less bullets, though.
- Body Horror: He's some kind of deformed head, lacking a nose and most of his teeth, and features a prominent cleft lip.
- Clipped-Wing Angel: The Grey Champion version is bigger with more health and uses his bullet spray attack more frequently, but he can't use the leap attack of the normal version, making it far easier to circle around and shoot with no risk to yourself. Even in pairs, he's much less of a threat.
- Degraded Boss: After the game is beaten six times, he'll start showing up as a boss enemy in The Depths onwards.
- Dual Boss: The Red Champion version is two smaller Monstros with less health but the same attack pattern.
- Double Trouble boss rooms can contain Monstro paired with another Monstro, The Duke of Flies, Larry Jr, or Fistula.
- Flunky Boss: Monstro can occasionally appear with several enemies, such as Flies, Gapers, Hoppers, Mulligans, or Ministros.
- Easter Egg: One Active item, Monstro's Tooth, calls in the aforementioned boss to body-slam enemies. On the chance that you end up getting it as one of your first items, guess which boss you can't use it against.
- Heel–Face Turn: The Monstro's Tooth item lets you summon him to crush your enemies. Just make sure there's actually something for him to hit, or else…
- King Mook: To the Ministros added in Afterbirth+.
- Pre-Final Boss: Oddly enough, Monstro will occasionally appear before an Ultra Greed battle.
- Unskilled, but Strong: His Gray Champion version trades his high jump for being bigger, tougher, and having the ability to shoot his bullets faster.
- Warm-Up Boss: One of the less complicated bosses and one of the most likely to run into first. Many prefer getting zero-damage boss battles on Monstro to increase the likelihood of Devil Deals spawning.
Larry Jr.

A blood-soaked segmented worm that wander around its room, splitting into shorter individual variants if any of its segments are destroyed.
- Asteroids Monster: Not so much as other bosses, but if the middle section is killed first in a 5-segment one, it will split into two more versions with just two segments. This happens much more easily with his Eternal counterpart in the Eternal Edition, where a broken-off segment can last as just a head and can regenerate segments.
- The Cameo: A smaller version of Larrie's Lament.
- Degraded Boss: One of the earliest boss enemies to be encountered, appearing as early as The Caves.
- Dual Boss: Easily the most common one; his standard fight in the Basement is always two of him. Afterbirth occasionally mixes things up with a single very long Larry Jr., but he'll likely be splitting into multiple Larries over the course of the fight anyway because of how the boss works.
- Double Trouble boss rooms can contain a Larry Jr. paired with Monstro, Pin, or Sisters Vis.
- Dung Fu: Will randomly spawn poop while moving, which serves as an obstacle.
- Fluffy the Terrible: Larry Jr. is a blood-coated demonic giant maggot, yet has one of the most cutesy-sounding names in the game.
- King Mook: As of Wrath of the Lamb, smaller enemies similar to it appear.
- Segmented Serpent: Larry Jr. is composed of several body segments that have individual HP bars and can be destroyed separately. Killing a segment in the middle of its body can cause it to split into two individual worms, but a segment cannot survive if it isn't attached to another.
- Upgraded Boss: Blue Champion Larry Jr. has more health and is larger, but cannot spawn any poop. Green Champion Larry Jr. will occasionally fire a projectile in the direction that its facing.
- Warm-Up Boss: Shares this with Monstro. He's a common early-game boss who can't even shoot at you (except for the Green Champion version), but his movement patterns can be erratic thanks to the poop he leaves behind.
The Duke of Flies

A bloated corpse filled to the brim with flies, floating diagonally across his room while coughing up flies.
- Body Horror: It's safe to assume that the only reason he can move around is because of the flies that have infested his bloated body. He also lacks eyes of any kind.
- Degraded Boss: After unlocking "Everything's Terrible!", he can appear as a boss enemy in The Depths onwards.
- Dual Boss: Double Trouble boss rooms can contain The Duke of Flies paired with another Duke of Flies, Monstro, or Rag Man.
- Fat Bastard: He's evil and fat-looking.
- Flunky Boss: "Attacks" by creating tons of flies, which act as both defense and offense.
- Meaningful Name: His name is a reference to Beelzebub, a demon often referred to as the "Lord of Flies".
- Mook Maker: As his name implies, he creates flies.
- King Mook: To the Dukies.
- Taking the Bullet: Spawned flies circle the Duke until he commands them to attack you, letting them soak up your shots.
- Upgraded Boss: Green Champion Duke of Flies spawns Moters instead of large Attack Flies and fires 8 projectiles when spreadind his flies. Orange Champion Duke of Flies is larger, has more health, and spawns Suckers instead of large Attack Flies.
Gemini (Contusion & Suture)

Two twins connected by an umbilical cord, the larger twin chasing after Isaac and the smaller twin firing projectiles at him. If Contusion is killed, Suture Turns Red and charges at Isaac relentlessly.
- All There in the Manual: Their actual names aren't mentioned in-game at all. They come from Gish, which they were originally designed as a boss for but never got implemented; the larger twin is Contusion while the smaller twin is Suture.
- Big Guy, Little Guy: Contusion is the big twin, Suture is the little one.
- Brains and Brawn: Suture is the Brains while Contusion is the Brawn.
- Bullfight Boss: Contusion can tire out after a few moments of charging the player. If he is killed first, Suture will turn red, give chase, and never tire out.
- Conjoined Twins: Suture is an underdeveloped parasitic twin.
- Degraded Boss: Begins appearing as a boss enemy in the Womb onwards.
- Dual Boss: Contusion, who walks towards the player and charges at them periodically, and Suture, who shoots bullets.
- Double Trouble boss rooms can contain Gemini paired with another Gemini or Rag Man.
- Fetus Terrible: Both of them seem to represent fetuses, even having an umbilical cord attached to each other. Suture even moreso.
- Game-Breaking Bug: Not necessarily game-breaking, but fairly annoying. The game will not count Gemini kills if you kill Contusion first (which happens 99% of the time). To unlock the Cellar, you need to have killed every Basement boss at least once, which this bug makes very difficult.
- Heel–Face Turn: The Gemini zodiac sign item gives you a friendly copy of Suture who attacks your enemies.
- Polar Opposite Twins: Contusion is aggressive and chases you; Suture looks calm and makes ranged attacks until you kill his brother, at which point it charges at you.
- Turns Red: What Suture does when Contusion dies, chasing after Isaac in a blind fury.
- Upgraded Boss: Blue Champion Gemini will have Suture firing homing shots, while Green Champion Gemini will have the twins already separated.
- Villainous Breakdown: If you kill Contusion, Suture snaps.
Steven

A time traveler with a smaller version of himself attached to his head, which can occasionally replace Gemini as an alternate boss.
- The Cameo: Steven is from Time Fcuk.
- Conjoined Twins: Averted, despite the splash art. Little Steven is never actually attached to the main Steven, and instead just floats near him. However, the Steven item does give Isaac a conjoined twin on his head.
- Deliberately Monochrome: He's a pure black and white contrast, like his entire home game. He even overrides Delirium's colour scheme!
- Degraded Boss: Appears as a boss enemy only in Sheol.
- Dual Boss: More or less the same fight as Gemini, except Little Steven will begin chasing the player while big Steven is still alive once his health gets low enough.
- Heel–Face Turn: The Little Steven item summons a friendly version of Steven who shoots at enemies, and is almost always dropped by this boss (except when it drops the "Steven" item instead, which is just a damage upgrade).
- Last Ditch Move: Both parts of Steven shoot bullets in all directions when they die.
- Time Travel: Described as "Something from the future" in his achievement, so it's very likely he did this.
- Turns Red: When their aggregate health reaches 1/3, the small one detaches and turns red just like Gemini's.
- Villainous Breakdown: The small one starts freaking out upon Turning Red.
Widow

A spider-human head hybrid that attacks by leaping at Isaac and occasionally spawning Spiders and Sacks.
- Abusive Mom: Stomps on the eggs that she spawns.
- Bad Boss: She has no issue stepping on her own minions.
- Body Horror: She's made out of a head with four eyes, leg bones, and toes.
- Confusion Fu: The Black Champion version fires a six-bullet spread at random orientations.
- Dark Is Evil: The Black Champion version spawns big spiders with half health instead of sacks, and shoots 6 bullets instead of spiders.
- Degraded Boss: Begins appearing as a boss enemy in Necropolis onwards.
- Fragile Speedster: Relatively low HP for a boss, but moves fast and unpredictably and spits out the equally unpredictable spiders, making her harder to beat without taking any damage than most bosses early on. Her Pink Champion version emphasizes this a bit more: she jumps faster, but is smaller and weaker.
- Giant Spider: She's a larger version of the Trites, which are spider-like. Considering that those are already the size of Isaac, it can make for an intimidating boss fight!
- Mook Maker: Not only does she spawn spiders directly, but she can also spawn Sacks. And that's not even getting into the ones that can spawn bigger Asteroids Monster spiders or other kinds of Boils.
- King Mook: To the spider enemies, particularly the Trites.
- Pink Means Feminine: One of her champion colors is pink, and she's one of the few female bosses.
- Red Eyes, Take Warning: As of Repentance, Black Champion Widow possesses dark red eyes and is slightly tougher.
- Rush Boss: She's a fragile boss, but if you don't kill her quickly, you'll get overwhelmed by the spiders she summons and the speed she moves at.
- Stealth Pun: One of her champion colours is black. A Black Widow spider.
Pin

A large worm that burrows in its arena and jumps out to attack.
- Degraded Boss: Appears as a boss enemy in The Depths onward.
- Dual Boss: Double Trouble boss rooms can contain Pin paired with another Pin, Mega Fatty, Larry Jr., Chub, or Blighted Ovum.
- King Mook: To the Needles added in Repentance.
- Perpetual Frowner: The only expression Pin has is a sad frown. It even looks like the ":C" Emoticon.
- Sand Worm: A Sand Tapeworm at that, but nevertheless, it's a giant worm creature that attacks by burrowing through the earth and diving out of the ground.
- Segmented Serpent: Like Larry Jr., Pin has multiple body segments that take damage separately. However, what separates Pin is that each segment does not have a separate health bar, which will cause it to take significantly more damage from piercing and explosive attacks. Amusingly, attacking Pin while it's petrified or throwing a Chaos Card at it will destroy its segments, shortening its body significantly.
- Tactical Suicide Boss: It is not immune to its exploding Ipecac projectiles, and due to a quirk in hit detection, can actually damage itself with them when it begins to bury underground. The dark grey one averts it, replacing the bombs with bullets.
- Warm-Up Boss: Competing with Larry Jr. and Monstro for the easiest boss in the game; telatively low health, a large hitbox, extremely predictable and avoidable attacks, and he's not immune to his own projectiles. Many players feel silly if they take any damage to this boss at all, let alone die to him.
Blighted Ovum

The posthumous version of Germini, with Contusion being stripped of almost all his skin and now leaving red creep wherever he goes, and Suture now an invincible ghost that fires Brimstone lasers.
- Body Horror: Contusion has a gash on his head where his eye once was, lacks a lower jaw, and is either covered in blood or has no skin on his lower body.
- Bullfight Boss: Contusion, much like his living counterpart, except he never tires, gets progressively faster, and leaves a trail of red creep behind him.
- Degraded Boss: Appears as a boss enemy in Cathedral & Sheol onward.
- Dual Boss: Two Blighted Ovums can appear in a Double Trouble boss room in Necropolis.
- Invincible Minor Minion: Suture's ghost can't be harmed; the only way to get rid of him is to get rid of his brother.
- Nerf: In the original game, both parts of the Blighted Ovum would fire bullets in all directions upon death. This ability was removed in Rebirth and given to Steven.
- Removed Achilles' Heel: As a result of being undead, Contusion no longer tires out when running.
- Undead Counterpart: Contusion is now a zombie, and is accompanied by the ghost of his (formerly) conjoined brother, Suture.
- Wave-Motion Gun: The ghostly Suture fires Brimstone if you stand to the left or right of it.
Gurglings/Turdlings


Afterbirth (Turdlings)
Young Gurdys that wander around the room, charging towards Isaac should they see them. A corny-poop variant known as Turdlings can replace Gurglings and leave brown creep when charging.
- Adorable Evil Minions: Ridiculously cute balls of organs.
- Badass Family: Can spawn alongside Gurdy in the Depths, and with Gurdy and Gurdy Jr. in the Womb.
- Bullfight Boss: They'll charge you if you get in their line of sight.
- Creepy Twins: When fought as a pair. Identical and dangerous.
- Degraded Boss: They appear as regular enemies as early as the Caves, and don't even get a health bar. On the other hand, they constantly leave behind damaging trails of creep (as opposed to only doing so when charging) and shoot six-way blood bursts rather than spawning flies, making them actually slightly more dangerous than the boss version.
- Dual Boss: They always appear as a pair. Yellow Champion Gurglings have three faster ones appear, but they don't leave creep behind or spawn flies.
- Double Trouble boss rooms can contain Gurglings paired with other Gurglings, Turdlings, Chub, C.H.A.D., The Stain, Gurdy Jr., and Gurdy.
- Dung Fu: Turdlings leave behind brown creep when they charge.
- Enfant Terrible: They seem to be even younger versions of Gurdy Jr.
- Mad Bomber: Black Champion Gurglings will leave Troll Bombs where they charge instead of red creep.
- Metamorphosis Monster: Appears to be the infantile stage of the Gurdy line.
- Mook Maker: Gurglings spawn several Flies after their charge attack, while Turdlings spawn Brownie Corns instead.
- Underground Monkey: Turdlings are a rare poop-themed version of the Gurglings, possessing similar attacks.
Dingle/Dangle


Afterbirth (Dangle)
A living pile poop that will either fire projectiles at Isaac or charge at him. A corn-poop variant known as Dangle can sometimes replace him.
- Adorable Evil Minions: His Dips.
- Bullfight Boss: One of his attacks is to charge at you three times in succession, occasionally leaving a pile of poop on the first charge. He scrunches up just before the charge and gets pooped (heh) after the third charge, allowing you to get damage in. The Red Champion version charges four times but slower and shorter, the Black Champion version charges only once at much greater speed, and Dangle charges twice and leaves slippery brown creep.
- Degraded Boss: Can appear as a boss enemy in the Depths onwards. Brownie always becomes a Dangle after he dies.
- Dual Boss: Double Trouble boss rooms can contain Dingle paired with another Dingle, Mega Maw, or Brownie. Dangle can appear paired with either Brownie or Turdlings. If encountered as a boss in the Womb, both Dingles will always be their Black Champion variants.
- Dung Fu: Besides being made of poop, he will also frequently summon Dips or leave more poop laying around depending on the variation.
- Face of an Angel, Mind of a Demon: He's probably the cutest boss in the game, and not in an "ugly-cute" way. But just like every other boss, he still wants you dead.
- Flunky Boss: Dingle can sometimes be fought alongside two Dart Flies. If encountered as a Dual Boss in the Womb, they will always appear alongside two Squirts and one Dinga.
- King Mook: To the Dips and other poop enemies.
- Meaningful Name: Dingle's name is a shortened version of dingleberry, often used to refer to poop that gets stuck on butt hair.
- Mook Maker: Will spawn Dips every now and then.
- Moveset Clone: Dangle is one of Dingle, possessing the same attacks but with slightly different properties. He's essentially a Champion variation with his own title screen.
- Not-So-Innocent Whistle: He occasionally will whistle innocently (complete with a music note hovering above his head), before one to three Dips appear beside him to fight. This is immediately followed by a bullet spread attack.
- One-Hit Kill: Like with all poop-themed bosses, using Flush! will kill both Dingle and Dangle instantly.
- Tactical Suicide Boss: Dangle can spawn Corn Mines, the detonations of which can poison him. He leaves damaging green creep while poisoned, but it also tears away at his health.
- Toilet Humor: It's a giant adorable poop. Dangle takes it a step further by shooting corn at you.
The Haunt

A ghost that sends out three Lil' Haunts at Isaac before peeling back his face and attacking more directly.
- Adorable Evil Minions: The Lil' Haunts that surround him are this.
- Bedsheet Ghost: What's underneath his sheet is quite a bit scarier, however.
- Degraded Boss: Appears as a boss enemy in The Depths onwards.
- Dual Boss: Two Haunts can appear in a Double Trouble boss room in The Depths.
- Flying Face: That rips itself open to reveal a skull when his minions are dealt with.
- Flunky Boss: He is surrounded by three Lil Haunts which attack before he does. First one attacks, then the other two do. He's invulnerable until they're dead and he moves to the top of the room.
- Expy: Very closely resembles a Boo.
- Heel–Face Turn: The Lil' Haunt item gives you a friendly Lil' Haunt who chases your enemies and gives them the fear status effect.
- Intangibility: Until his minions are dead, the Haunt is untouchable.
- King Mook: To the Lil' Haunts.
- Mook Maker: Black Champion Haunt will spawn spiders instead of shooting Brimstone lasers.
- Nightmare Face: Once you kill his minions, he rips off his face to reveal his skeleton.
- No Fair Cheating: He normally paces from side to side along the top edge of the screen, shooting downwards. If you try to move to the top where he can't shoot you, he'll immediately charge at you to cause damage. Which hurts greatly.
- One-Hit Kill: Like with all ghost bosses, using Vade Retro when he's at 50% or less health will kill him instantly.
- Our Ghosts Are Different: This one has a skeleton. Which he'll gladly show to you.
- The Pawns Go First: Sends his Lil' Haunt minions to attack you while he himself remains intangible. When they go down, then he fights you.
- Pink Means Feminine: As of Repentance, Pink Champion Haunt has small eyelashes below her eyes.
- Wave-Motion Gun: In his second phase, he'll fire Brimstone downwards as he strafes along the top of the screen. It has minimal telegraphing compared to most Brimstone attacks, so stay on your toes. The Red Champion version fires it at an angle that bounces around the room, leaving the only sure safe spot directly in front of his face.
Rag Man

An undead humanoid wrapped in rags that fires psychic tears at Isaac while reviving the Rag Man's Raglings that he spawns from his head.
- Alien Blood: His blood is purple.
- Degraded Boss: Can appear as a boss enemy in Cathedral & Sheol onward on the main path, and Mausoleum on the alternate path. He's also the only boss enemy that can appear in an I AM ERROR room.
- Dual Boss: Can appear alongside Lil Horn in a Double Trouble room in The Depths.
- Healing Boss: Aside from regrowing his head, Rag Man heals himself for a small amount whenever he resurrects a Ragling. The Black Champion version can't revive anything, but instead spams the healing effect.
- Losing Your Head: Detaching his head doesn't seem to bother him too much, especially since it turns into a Ragling and he can simply grow a new one.
- Mook Maker: If his head isn't destroyed quickly, it'll turn into a Rag Man's Ragling. The Black Champion version's head turns into spiders instead.
- Mummy: A bandaged, undead humanoid.
- Psychic Powers: His primary attacks are homing psychic blasts.
- Reviving Enemy: The special Raglings that he spawns will leave behind a bundle of bandages whenever they die. If Rag Man walks near one of these bundles, he'll create a purple beam that causes any Raglings near him to come back to life. Red Champion Rag Man takes this a step further by only spawning and reviving Rag Man's Raglings.
Little Horn

A mischievous baby imp that attacks Isaac by using pitfalls, Dark Balls, and Troll Bombs.
- Degraded Boss: Fittingly, he can be encountered as a boss enemy in Sheol onwards and the Chest.
- Dual Boss: Double Trouble boss rooms can contain Little Horn paired with Rag Man, Loki, The Fallen, or Big Horn.
- Enfant Terrible: Appears to be a baby version of Big Horn.
- "Get Back Here!" Boss: Spends a lot of the fight teleporting away from the player, often leaving a Troll Bomb behind. He also flees from the player if approached.
- Homing Projectile: He fires large homing projectiles that will track you forever until you destroy them with your own attacks.
- Playing with Fire: Orange Champion Little Horn spits out burning Troll Bombs instead of the black homing projectiles, which deal contact damage and leave behind a damaging fire upon detonation.
- Portable Hole: Can make these to teleport himself around the room, teleport Troll Bombs around the room, or to send straight at you so that you will fall in and take damage.
- Red Eyes, Take Warning: Despite appearing cute, his red eyes are a hint that he wants to play with Isaac violently.
- Screw This, I'm Outta Here: When his health gets depleted, instead of dying, he retreats into one of his portable holes.
- Tactical Suicide Boss: Has a tendency of teleporting into his own Troll Bombs that can shave off half of his health bar until the 1.7.8a patch of Repentance, after which they do much less damage to Little Horn. The boss room also tends to have fires, which Little Horn will run into and burn himself to a crisp if you herd him in that direction.
- Thinking Up Portals: Can open up two holes that are linked to each other, either to teleport itself around the room or as a lead-up to the following trope.
- Throw Down the Bomblet: Attacks with Troll Bombs by opening a pair of portals between his location and the player and throwing one in.
- Too Dumb to Live: Just to reiterate — Little Horn has a tendency to deploy Troll Bombs that blow up in his face. But that can be chalked up to recklessness rather than complete stupidity, since the bombs are haphazardly scattered around the room. What really cements this trope is Little Horn being so committed to keeping his distance that he can be tricked into bumbling into a fireplace and burning himself to death.
Baby Plum

A giant fly that bounces around playfully while firing loads of projectiles against Isaac, but will reward him if spared.
- Ascended Glitch: Patch 1.7.9 introduced a new death animation for Baby Plum as part of the G-Fuel themed daily challenge, where a poorly-cropped missile will fly down and blow her up when defeated. However, this death animation was accidently set to trigger outside of the daily challenge. In the subsequent 1.7.9a patch, this death animation was changed to have a 0.0001% chance of occurring during normal gameplay.
- Big Creepy-Crawlies: She's a giant fly.
- Bullet Hell: Very mild compared to most examples in the game (especially the final bosses), but she shoots a lot of projectiles for a boss you can fight on the first floor.
- Degraded Boss: Appears as a boss enemy in Cathedral onwards.
- Kaizo Trap: Fires a ring of 10 projectiles after being killed.
- King Mook: Of various flies, most notably the Red Boom Flies.
- Sheathe Your Sword: If you don't attack her and survive her attacks, she'll happily fly off after waving and drop the Plum Flute, an active item which summons her for help. Doing this at least once and then picking up the Plum Flute is required for the Dead God achievement.
Chapter 1 Alt Path (Downpour and Dross)
Lil Blub


A drowned version of the Duke of Flies that coughs up swarms of small leeches and butt-stomps the water to hit Isaac.
- Adaptation Name Change: Formerly known as Beelzeblub in Antibirth.
- Ground Pound: It can jump on the ground, sending up a splash of tears and a few leeches.
- Mook Maker: Just like the original Duke of Flies, but with small leeches instead of flies.
- Non-Indicative Name: He is in no way "lil". Almost as if he's trying to be Mister Big.
- Palette Swap: Gets a new green coloration when fought in Dross.
- Underground Monkey: A drowned, but still animate, variant of the Duke of Flies.
Wormwood


A massive leech that tunnels out of the ground, tearing its boss room apart in the process.
- Boss Arena Urgency: It can punch holes in the floor with its tail. Given the way pits work in this game, this won't kill you, but it does make it more difficult to dodge Wormwood's attacks and gives it more places to ambush you from.
- Deadly Lunge: Gains a very fast one when it's at low health.
- Feed It a Bomb: Place a bomb while it's chasing you and it will swallow the bomb, taking huge damage from the explosion.
- Flunky Boss: Two small leeches
- King Mook: To the leech enemies found throughout the game, but especially the Small Leeches in Downpour.
- Making a Splash: Its projectiles appear to be water, as opposed to the standard blood projectiles.
- Meaningful Name: Named after the biblical Wormwood, a star which will fall and turn a third of Earth's waters bitter and deadly.
- Palette Swap: Just like Lil Blub, it has a green variant which can be fought in Dross.
- Turns Red: It becomes much more aggressive and will start making holes in the ground at low health.
- Underground Monkey: A water-based variant of Pin.
The Rainmaker

A ghost that attacks by manipulating water with flamenco dancing.
- Battle in the Rain: The battle against him is accompanied by a constant downpour that stops when he's defeated.
- Dance Battler: His movements in battle borrow heavily from the flamenco.
- Making a Splash: Rainmaker's attacks all have him levitating balls of water to hurl at the player.
- One-Hit Kill: Like with all ghost bosses, using Vade Retro when he's at 50% or less health will kill him instantly.
- Our Ghosts Are Different: This ghost has water-based powers and dances the flamenco.
- Something about a Rose: He carries a rose in his mouth in the Versus Character Splash. In the fight itself, it's mostly absent except when he pulls it out after one of his attacks.
Min-Min

A flame ghost possessing the body of the Husk, who commands a swarm of Willos. After the Husk's body is destroyed, she dives underwater and comes up only to attack.
- Demonic Possession: She's a small flame ghost possessing the body of the Husk.
- Foil: To Lil Blub. Lil Blub is basically the Duke of Flies, still alive, but drowned and bloated and still using attacks similar to his first form, with the addition of jumping up and down to spray water bullets everywhere. Min-Min, by comparison, just uses the Husk's body to protect itself while summoning flies in ways that are different from the Duke and the Husk, and once the body takes enough damage, she quickly dumps it in exchange for using the water to hide herself.
- "Get Back Here!" Boss: In her second phase, she constantly ducks underwater and summons Willos for Isaac to dodge.
- King Mook: To the Willo Flies found in the Downpour.
- Meaningful Name: Named after the Min Min lights, a phenomenon in Australia where unexplained lights are reported to follow people at night.
- Mook Maker: Her first phase involves surrounding herself with Willos that you need to clear away. Her second phase also has her summon mass numbers of Willos, but only to shoot once before disappearing.
- Sequential Boss: First you fight her Husk shell. Once that's destroyed, you have to kill the ghost herself.
- Underground Monkey: Zig-zagged. As a Willo-like boss using the Husk's body, you'd think she'd use the Husk's attacks too. While she does summon flies, said flies are used in ways the Husk never did, Min-Min always approaches Isaac instead of bouncing everywhere, and getting Min-Min down to half health makes her ditch the body entirely.
- Wreathed in Flames: Strangely for the boss of a water-themed level. She's meant to be a Will-o'-the-Wisp, so the fire makes some sense.
Clog

A gigantic poop that creates minions and walls of poop, and spins Isaac around.
- Attack of the 50-Foot Whatever: Ir's huge, perhaps even bigger than Brownie!
- Deployable Cover: It can make walls of poop that block movement until you clear it out.
- Fartillery: How it deploys its walls.
- King Mook: To the Splurts and Drips encountered in Dross.
- One-Hit Kill: Like with all poop-themed bosses, using Flush! will kill Clog instantly, leaving behind six Drips.
- Spectacular Spinning: One of its moves is to spin and create a mini whirlpool, causing Isaac to get spun with him. Naturally, this means frequently crashing into Drips that it summons.
- Toilet Humor: It's a clogged pile of poop that you defeat by flushing.
Colostomia

A living colostomy bag who slides around the room, filling it with gas that she can detonate. Once her bag is destroyed, she instead swims around to cough out farts and Butt Bombs.
- Fartillery: An attack in both phases involves leaving fart clouds, then detonating them with bombs.
- Farts on Fire: She can blow up her own fart clouds, damaging you if you're caught in the blast.
- I'm Melting!: She melts on death, turning the water brown.
- Sequential Boss: She's in the bag for the first phase and slides around. Once you break the bag, she dives under"water" and pops up only to attack.
- Throw Down the Bomblet: Can attack by throwing butt bombs around the place.
- Toilet Humor: She's a living colostomy bag with a human butt that attacks by farting. Hard to get grosser than that.
Turdlet

A worm made of turds that flings itself around the room, splitting into two smaller versions after taking enough damage.
- Asteroids Monster: After taking enough damage, it splits into two smaller versions.
- Bullfight Boss: Its only attack method is curling up in a ball and flinging itself at you.
- Segmented Serpent: It's essentially a poop-themed Larry Jr., so this is to be expected.
- Toilet Humor: A turd worm that slithers around the room, leaving behind Brown Creep.
- Underground Monkey: A poop-themed variant of Larry Jr.
Chapter 2
Fistula

A floating tumour that bounces around the room and breaks into smaller chunks as it dies, with the smallest chunks breaking into Chargers instead.
- Asteroids Monster: It has three distinct sizes. Large Fistula splits into four medium Fistulae (three for the champion version) on death, each of which splits into two small Fistulae. Small Fistula either spawns a Charger or a Boom Fly, depending on the version fought.
- Body Horror: It's named for a real-life chunk of Body Horror in which organs try to absorb each other.
- Degraded Boss: Smaller chunks of it can appear as early as The Caves, with the full version appearing as a Boss Enemy in the Womb onwards and Corpse.
- Fistula is one of four bosses that can be spawned by It Lives.
- Mook Maker: Each small chunk will spawn a Charger once defeated.
- Nerf: In Rebirth, Fistula was demoted to a Chapter One boss, before eventually being repromoted as a Chapter Two boss in Repentance.
- Upgraded Boss: Black Champion Fistula is slower but larger, has more health, and its smaller chunks spawn Boom Flies.
Gurdy

A stationary lump of guts with a human face that spits blood at Isaac and spawns flies and Boils.
- Body Horror: She's what can only be described as a mountain of flesh and organs, with hands and a humanoid head near the top, with the latter missing an eye.
- Damage-Sponge Boss: The bulkiest boss in the Caves, having more health than some of the later bosses.
- Degraded Boss: Appears as a boss enemy in the Chest.
- Dual Boss: Two Gurdys can appear in a Double Trouble boss room in the Womb, Utero, and Scarred Womb.
- Enemy Posturing: She starts mocking Isaac if she hits him in Repentance.
- Meaningful Name: Her name appears to be a pronunciation of GERD, or Gastroesophageal Reflux Disease, also known as acid reflux.
- Metamorphosis Monster: Appears to be the third stage of the Gurdy line, right after Gurdy Jr.
- Mook Maker: Spawns Flies and Boils to assist her. Her Green Champion version only spawns enemies and never fires at you.
- Stationary Boss: She always stays in the middle of the room. If you push her away with a fear effect in the original game, she'll move back into position when it wears off, and in Rebirth, she can't be moved by anything.
- Wake-Up Call Boss: When it comes to the pre-Wrath of the Lamb bosses who gave new players trouble, Gurdy is the most infamous.
Peep

A fat baby-like monster that jumps around and attacks by peeing at Isaac. As he takes damage, his eyeballs will pop out of his head and bounce around the room, which can hurt Isaac.
- Ambiguously Human: He's the most human-looking of the monsters, save for the fact that his eyes pop out and his urine-based powers.
- Eye Scream: It detaches its eyeballs when its HP starts getting low. They block your shots and will inflict Collision Damage on you if you touch them. Oh! And they're indestructible until you kill their original owner (unless you use Chaos Card or have the Little Horn, Euthanasia, or God's Flesh passive items).
- Degraded Boss: Becomes a boss enemy in the Womb onwards.
- Dual Boss: Two Peeps can appear in a Double Trouble boss room in the Depths.
- Detachment Combat: His eyes will fly off as he takes damage, becoming wall-bouncing obstacles.
- Extra Eyes: His Eternal counterpart in the Eternal Edition has six eyes. Yes, they can all detach, but they're also destructible.
- Fat Bastard: Obese, and one of the game's bosses.
- Heel–Face Turn: Not the boss itself, but The Peeper item gives you a floating eyeball familiar that moves the same way as Peep's eyes.
- Kev Lard: A Fat Bastard with good HP.
- Meaningful Name: His name, Peep, could be a reference to several things.
- Pronounce the second "p" as though you were saying the letter "p". He can also attack you with pee-pee.
- There's also the fact that "peep" can mean to look at something, and he attacks you with his eyes. It could also be reference to the term "peeper" which is an informal term for an eye.
- Psychopathic Manchild: He gives some of these vibes. While Peep seems to be an adult, he sorta acts like a Cheerful Child during his boss fight and he throws a fit after being defeated.
- Turns Red: When he loses 2/3rd of his HP, one of his eyes detaches and it begins acting as an obstacle. His other one does the same when he's left at 1/3rd of health. Averted with his Cyan Champion variant, who starts the fight with both of his peepers detached.
- Upgraded Boss: Yellow Champion Peep is smaller, moves much faster, and leaves Yellow Creep wherever he goes.
- Urine Trouble: His main form of attack is peeing, either as a spread of bullets or damaging creep he releases around him. His Yellow Champion version constantly leaves a puddle of pee.
Chub

A giant grub that spawns Chargers and tries to charge at Isaac if he gets in her sights.
- Big Creepy-Crawlies: A giant grub.
- Bullfight Boss: Her main form of attack is to charge at Isaac with her jaws wide open.
- Cute Creature, Creepy Mouth: Chub has a rather goofy look with her beady eyes and small grin… until she charges and reveals a mouth full of oddly-human incisors.
- Degraded Boss: A common boss enemy to find in the Depths onwards. She's also one of four bosses that can be spawned by It Lives.
- Dual Boss: Double Trouble boss rooms can contain Chub paired with Pin, Gurglings, or another Chub.
- Feed It a Bomb: Has the exact same weakness as Dodongo of The Legend of Zelda fame, though she can also be beaten by regular attacks.
- Heel–Face Turn: The Little Chub item gives you a friendly one that charges at your enemies.
- King Mook: To the maggots.
- Mook Maker: Chub will occasionally spawn Maggots from her behind. However, if Chub somehow spawns without her last segment, she will be unable to spawn Maggots.
- One-Hit Kill: If you try to use Meat Cleaver to split her into two, you will instead outright kill her in one hit.
- Tears of Blood: During her death animation, she starts crying bloody tears.
- Upgraded Boss: Blue Champion Chub is larger but slower, has more health, and spawn orange-colored boils instead of maggots. Orange Champion Chub has less health but is smaller, faster, and spawns Spitties.
C.H.A.D.

An alternate version of Chub that possesses similar attacks but gets smaller and faster as his health gets lower.
- Bullfight Boss: During his boss fight, he charges at Isaac.
- The Cameo: C.H.A.D. is a boss from Super Meat Boy. Dropping the item Little C.H.A.D. on defeat references his post-fight cutscene from the above.
- Degraded Boss: Appears as a boss enemy only in the Chest.
- Feed It a Bomb: Like with Chub, C.H.A.D. can also be fed a bomb to deal significant damage.
- Heel–Face Turn: The Little C.H.A.D item he always drops gives you a friendly C.H.A.D. who "gives kisses" (half red hearts) every few rooms.
- Mook Maker: Occasionally spawns 1-2 Suckers.
- Obliviously Evil: C.H.A.D. charges at Isaac not because he wants to kill him, but because he wants a hug.
- Shout-Out: His name is a reference to the 1984 horror movie C.H.U.D..
- Tears of Blood: He sheds bloody tears before dying.
- Turns Red: As C.H.A.D. takes damage, he gets smaller and faster but no less dangerous.
Gurdy Jr.

A smaller Gurdy that charges at Isaac, bouncing off the walls wildly afterwards.
- Achilles' Heel: Slow effects will kill Gurdy Jr.'s momentum and stop her charge attack in its tracks.
- Bullfight Boss: Her main attack is charging at the player, bouncing off of anything she happens to hit. It's more egregious when she loses half health as it becomes the only attack she uses.
- Degraded Boss: Appears as a boss enemy in the Womb onwards.
- Dual Boss: The Blue Champion variant is two smaller Gurdy Jr.'s, who only attack by charging.
- Two Gurdy Jr.'s can appear in a Double Trouble boss room in the Depths.
- Heel–Face Turn: The Lil' Gurdy item gives you an even smaller version of this boss, who uses her charging attack.
- Metamorphosis Monster: She appears to be the second stage of the Gurdy line.
- Missing Secret: Before '"Wrath of the Lamb'' version 1.2, she would only appear as a Degraded Boss due to a bug.
- Mook Maker: She can summon a Pooter during her boss battle.
- Nerf: In Rebirth, Gurdy Jr. was moved from the Cellar to the Caves due to being much harder than other Chapter 1 bosses. She effectively traded places with Fistula.
- Shed Armor, Gain Speed: Being smaller than the standard Gurdy means that she's able to actually move, albeit by oozing so much viscera that she can slide around with her momentum.
- Upgraded Boss: Yellow Champion Gurdy Jr. is larger, has more health, and spawns Super Pooters, but does not fire projectiles.
The Husk

The posthumous form of the Duke of Flies, who now spits out spiders alongside his fly army.
- Degraded Boss: Appears as a boss enemy in Utero onwards and Corpse.
- Dual Boss: Two Husks can appear in a Double Trouble boss room in the Depths and Necropolis.
- Mook Maker: Spawns even more flies than the Duke does, with some spiders thrown in for good measure. The Black Champion version spits out Boom Flies instead and spawn 1-2 Boom Flies when killed.
- Rush Boss: Like his weaker counterpart, he has low health. Unlike his weaker counterpart, he can overwhelm you with flies if he has the chance.
- Undead Counterpart: The Duke of Flies' rotting corpse.
- Upgraded Boss: Red Champion Husk only shoots bullets, is smaller and moves faster, and spawns 1-2 Red Boom Flies when killed.
The Hollow

A posthumous Larry Jr. that behaves similarly but moves diagonally and is now capable of flying.
- Asteroids Monster: As with Larry Jr., The Hollow's body segments can be destroyed separately and can cause it to split into multiple individuals.
- Degraded Boss: Similar to Larry Jr., they appear as a boss enemy as early as the Catacombs.
- Hollows are the only regular bosses that can be spawned by Mega Satan.
- Dual Boss: Two Hollows can appear in a Double Trouble boss room in the Depths.
- Mook Maker: Black Champion and Green Champion Hollows spawn Boom Flies and Chargers, respectively, when a segment is destroyed.
- Money Spider: The Gold Champion variant not only appears to be made out of gold but will also drop coins when its segments are destroyed.
- Power Floats: The Hollow is capable of flying… somehow.
- Undead Counterpart: Larry Jr. devoid of blood and with swollen eyes.
- Upgraded Boss: Black Champion Hollows are slower but larger and have more health, while Green Champion Hollows will occasionally fire three bullets from its head.
The Wretched

The Widow with her mouth stitched shut, who attacks more aggressively than before.
- Body Horror: More so than Widow, with her disfigured mouth and several bumps covering her head.
- Degraded Boss: Appears as a boss enemy in Utero onwards.
- Dual Boss: Two Wretched's can appear in a Double Trouble boss room in the Depths, Necropolis, or Dank Depths.
- Giant Spider: Like her living counterpart.
- Mook Maker: While she still coughs out Spiders, she can also cough out a Big Spider or a Trite.
- Mouth Stitched Shut: Her top mouth has been stitched shut, with a second mouth opened below her eyes. Doesn't stop her from opening her stitched mouth to cough out spiders.
- No Name Given: Prior to Wrath of the Lamb version 1.2, The Wretched could appear in Cellar with no name in her boss intro screen.
- Rush Boss: Like her living counterpart, she has relatively low health, but is very fast and aggressive.
- Undead Counterpart: Widow, drenched in blood and with her top mouth sewn shut and a more spider-like mouth in the "top" of the skull.
Carrion Queen

The undead version of Chub. She spawns red poops instead of Chargers, and is impervious to damage except to her fleshy butt.
- Attack Its Weak Point: Can only be hit from behind, except when exploiting her other weak point (see Feed It a Bomb below).
- Dem Bones: Reduced to a skeleton, mostly, apart from the organic bit on her rear.
- Degraded Boss: Appears as a boss enemy in the Chest, Dark Room, and Corpse.
- Dung Fu: Randomly produces Red Poop that damages you if you touch it and always regenerates when it's destroyed. Also can bounce off the poop as if it's a wall.
- Feed It a Bomb: Same as Chub, though it becomes impossible once she starts moving diagonally, as she no longer charges with her mouth open.
- Mook Maker: Pink Champion Carrion Queens spawns Hearts instead of Red Poop, which can be killed to deal 40 damage to her.
- One-Hit Kill: Like with her living version, you can kill her in one hit with the Meat Cleaver.
- Turns Red: Will bounce aimlessly around the room once her health is down to half.
- Tears of Blood: Like her alive version (Chub), Carrion Queen cries bloody tears in her death animation.
- Undead Counterpart: A mostly-skeletal Chub.
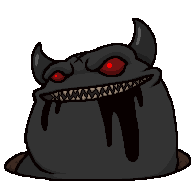
Dark One

A demon that blackens the screen before charging and fires a Brimstone beam if Isaac stands directly below him.
- Blackout Basement: One of his attacks is to make the entire screen dark and hide in the shadows.
- Breath Weapon: Will shoot Brimstone straight down if you stand below him.
- Bullfight Boss: He has a charge attack where he travels from one side of the screen to the other towards the player, similar to the charge attacks of Famine and War but harder to dodge.
- Dark Is Evil: Obviously; he can darken the room, has "Dark" in his name, has black horns, and is a villain.
- Degraded Boss: Fittingly appears as a boss enemy in Sheol onwards, the Chest, and Gehenna.
- Evil Counterpart: Has a similar moveset to Azazel, but is firmly against you.
- Offscreen Teleportation: He can dash past the edges of the screen like the Harbingers.
- Red and Black and Evil All Over: He's got red eyes, black horns, and skin of a similar color.
- Red Eyes, Take Warning: He has red eyes and is a boss.
Mega Fatty

A big Fat Bastard that mostly stands still while he farts and vomits on Isaac, but will occasionally jump into the air and quickly land where Isaac was standing.
- Acrofatic: Normally slow and fat, but he has a leap attack which is executed in under a second.
- Ambiguously Human: Like Peep, he's mostly human-looking, but is impossibly obese, bleeding from the mouth and eyes, and has superhuman abilities such as leaping into the sky.
- Blood from the Mouth: Blood is leaking from his mouth, though it's clearly a non-lethal example.
- Damage-Sponge Boss: Noticeably soaks up more punishment than most normal bosses.
- Degraded Boss: Can appear as a boss enemy in the Depths onwards.
- Dishing Out Dirt: Brown Champion Mega Fatty sends out rock waves whenever he lands after his super jump.
- Dual Boss: Double Trouble boss rooms can contain Mega Fatty paired with another Mega Fatty or Pin.
- Dung Fu: His fart attack can either produce Dips or send out a large wave of poop similar to his vomit attack. Red Champion Mega Fatty will fart Red Poop instead.
- Fat Bastard: Obviously, as he's the King Mook to the Fatty class of enemies.
- Gasshole: Like normal Fatties, he has a fart attack, but it shoots out feces.
- Kev Lard: He's a tanky Fat Bastard.
- King Mook: Of the regular Fatty enemy.
- Tactical Suicide Boss: If you have a power-up that causes tears to suspend in the air (like Pop!), Mega Fatty's vacuum attack will suck in those tears, dealing massive damage to himself.
- Vacuum Mouth: One of his attacks is to suck everything in the room toward him, mimicking the effect of the item Magneto.
- Vomit Indiscretion Shot: After the vacuum attack, he vomits up a barrage of projectiles that cover a portion of the screen. Red Champion Mega Fatty's vomit attack has such high tear height it's almost comically impossible to get hit by it.
Mega Maw

A Stationary Boss that performs various complicated bullet patterns.
- Bullet Hell: Its purple fire attacks are reminiscent of basic Bullet Hell circular attacks. Red Champion Mega Maw's attacks are nothing but rapid sprays of blood bullets in various patterns.
- Degraded Boss: Appears as a boss enemy in the Womb onwards.
- Eyeless Face: Had no eyes, only bleeding eye sockets. Red Champion Mega Maw subverts this by having eyes, albeit very tiny red ones.
- King Mook: A giant version of the Maws.
- Mook Maker: Will spit out Hoppers occasionally. Black Champion Mega Maw will spit out spiders instead.
- Non-Indicative Name: Despite being called "Mega Maw", he looks and behaves more like a Horf.
- Playing with Fire: One of its attacks is to shoot flames in a circle around him.
- Stationary Boss: Is always stays at the top center of the screen, no matter what.
Polycephalus

A many-headed creature that tunnels underground, emerging only briefly to attack.
- Body Horror: A cluster of eyeless, screaming heads on one body.
- Degraded Boss: Appears as a boss enemy in the Depths onwards. It is also one of four bosses that can be spawned by It Lives.
- Dual Boss: Pink Champion Polycephalus splits the boss into two, smaller versions each with half health.
- Two Polycephalus can appear in a Double Trouble boss room in the Catacombs.
- "Get Back Here!" Boss: Goes underground often, popping out only to attack.
- Glass Cannon: It has lower health than most bosses, but makes up for this by staying underground until it's right in front of you, making its shots harder to dodge.
- Mook Maker: Rarely spawns a Round Worm. Red Champion Polycephalus will spawn Para-Bites instead while Pink Champion Polycephalus spawns no enemies.
- Multiple Head Case: Polycephaly is the condition of having more than one head.
- Nightmare Face: This boss has a perpetual one, appearing to be constantly screaming in agony.
The Stain

Polycephalus, now stripped of most of its flesh. It tries to strike Isaac with its nerve endings or does a huge Bullet Hell attack.
- Body Horror: Even more-so than Polycephalus. What is left of it has now become a mound of viscera and skeleton.
- Bullet Hell: Fires a barrage of bullets in all directions around itself, often several times in succession.
- Combat Tentacles: Has a pair of exposed blood vessels poking out from its sides, which it uses as such.
- Degraded Boss: Appears as a boss enemy in Sheol onwards, the Chest and Corpse.
- Mook Maker: Occasionally spawns a pair of Chargers. The Black Champion version instead summons Round Worms.
- Nightmare Face: Not that it wasn't already nightmarish to begin with, but when it unleashes its Bullet Hell attack, it opens a mouth really wide and distorts its body.
- Undead Counterpart: Polycephalus reduced to skulls conjoined with bits of connective tissue, all on top of a mound of flesh. Strangely enough, The Stain can be found on the same floor as his living version (similar to the Blighted Ovum above).
The Frail

The rotting husk of Pin. Its first phase is identical to Pin's boss fight, but once its skeleton is exposed it attacks with a rotating Brimstone laser.
- Artistic License – Biology: Tapeworms don't normally have skeletons. Of course, this makes about as much sense as anything else in the game.
- Degraded Boss: Appears as a boss enemy only in Corpse.
- Glowing Eyes of Doom: While charging and firing its Brimstone beam in its second form.
- King Mook: To the Pasties added in Repentance.
- Rush Boss: Even with multiple health bars, the Frail goes down quickly, but once it enters its second form, it can deal quite a bit of damage with its split shots and Brimstone lasers.
- Sequential Boss: One of the few bosses in the game with multiple health bars, and the only one that isn't a Final Boss.
- Took a Level in Badass: In life, Pin was one of the easiest bosses in the game. As the Frail, it's surprisingly tough.
- Turns Red: Once its health is depleted the first time, it instantly undergoes an Adrenaline Makeover, gains a new health bar, becomes faster, more aggressive, and gains several Brimstone attacks. Its Black Champion version skips the first phase and starts in skeletal form.
- Undead Counterpart: Pin has been reduced to a rotting undead corpse. And once you kill that, you have to deal with Dem Bones.
The Forsaken

The "posthumous" form of The Haunt, now stripped of all his ectoplasm. He alternates between summoning Bony flunkies and becoming intangible or firing three rotating Brimstone beams.
- The Coats Are Off: The Haunt has taken off his cloak/skin/ectoplasm/whatever, showing his full skeletal form instead of only his skull.
- Dem Bones: Ever wanted to know what a Bedsheet Ghost's skeleton looked like?
- Degraded Boss: Appears as a boss enemy only in the Chest and Dark Room.
- Energy Weapon: Can fire Brimstone beams in three directions, and he can rotate the beams. Before doing this, he will always turn intangible and run away from you, so make sure you herd him towards the middle of the room, or else this attack may be impossible to dodge.
- Glowing Eyes of Doom: While firing his Brimstone attack.
- Intangibility: Will use this to flee from you so that he can fire his Brimstone attack.
- Mook Maker: Spawns Bonies during the fight, and just like his previous incarnation, he'll go intangible if he has any minions to fight in his place.
- Black Champion Forsaken attacks by only spawning enemies: he first summons a Black Bony, and then summons four Dank Death's Heads.
- One-Hit Kill: Like with all ghost bosses, using Vade Retro when he's at 50% or less health will kill him instantly.
- Undead Counterpart: Technically, the Haunt already was dead, being a ghost and all. So whatever state you put him in when you won his boss battle, he's back from it.
Rag Mega
A bloated, flying Rag Man that can shield himself from damage and has three indestructible orbs floating around him. As he takes damage, the orbs break off and chase Isaac.
- Composite Character: He's a combination of The Duke of Flies and Rag Man, with a bit of The Haunt and Mega Maw thrown in for good measure.
- Degraded Boss: Appears as a boss enemy in Sheol onwards, the Chest, and Mausoleum.
- Detachment Combat: His orbitals will break off and attempt to chase you when his health gets low.
- Energy Weapon: Fires 3 purple beams from his orbitals.
- Glass Cannon: He has relatively low health, but his orbitals block shots and can hurt you, he can shield himself inside his rags, and he has a projectile version of Rag Man's resurrection move. You'll spend most of the fight just trying to land a hit.
- Mook Maker: Spawns Rag Man's Raglings throughout the fight.
Big Horn

Little Horn's big brother, who pops out of portable holes to chuck Troll Bombs at Isaac or try and smack him with his claws.
- Art Evolution: He received a significant visual redesign for Repentance.
- Big Brother Instinct: He rather fiercely protects his younger kin, Little Horn. The eponymous passive item causes Big Horn to extend this protection to Isaac as well.
- Damage-Sponge Boss: Not as tanky as Mega Fatty, but still on the high end. His constant teleporting doesn't help.
- Degraded Boss: Appears as a boss enemy in The Chest and Dark Room.
- Even Evil Has Standards: When Dark Esau runs out of health, Big Horn's hand is what drags him back to Hell, regardless of if Tainted Jacob has the Little Horn item or not. Evidently, Dark Esau is so dangerous that even demons like Big Horn try to keep him contained.
- Feed It a Bomb: When his mouth opens, you can kick a bomb into it. This will stun him for a bit and cause him to take 20% more damage for the duration of the stun.
- Flunky Boss: A downplayed example. During Big Horn's boss fight, he occasionally summons Little Horn as a Degraded Boss, not that he summons anyone else.
- "Get Back Here!" Boss: Ducks underground constantly, then reappears somewhere else in the room.
- Heel–Face Turn: The "Little Horn" passive item has Big Horn assist Isaac, by sticking his hand out to crush or slap enemies.
- Mini-Boss: In Afterbirth†, he can summon a significantly weaker version of Little Horn during the fight. Repentance changed this to instead have Little Horn sitting on one of his hands to spit out a few Dark Balls and leave. If Big Horn runs out of health and retreats during this, however, Little Horn will jump down and fight with a tiny health bar.
- Portable Hole: He creates two or three holes around the room as his main attack, which either expands to become pitfalls or his hands will stick out and either throw bombs or chase the player. His head is also sticking out of one.
- Roar Before Beating: Can be heard growling in his versus screen.
- Screw This, I'm Outta Here: Once defeated, he retreats into his hole.
- Sibling Team: Becomes this with Little Horn in Repentance, which makes it clear that Big Horn is supposed to be an older brother to Little Horn. Rather than summoning Little Horn to fight, Big Horn keeps him protected so he can fire out Dark Balls, though Little Horn will join the battle if Big Horn falls during this. The item named Little Horn, which gives the player a single horn similar to the ones Little Horn has, causes Big Horn to assist them by crushing enemies.
- In Double Trouble rooms in the Depths and Scarred Womb, it's possible to fight both Big Horn and Lil Horn together.
- Throw Down the Bomblet: One of his attacks has him throw several bombs at the player. These can be a few troll bombs, a hot bomb, or even a mega troll bomb.
Bumbino

A homeless baby that lives in the trash. Bumbino will wildly swing at Isaac to beat the coins out of him, and can also smash the ground for a rock wave or charge at Isaac directly.
- Bandit Mook: If you get hit with his swipe attack, you'll drop coins and he'll steal any of them which are still on the ground. Doubles as a Continuity Nod, since Bum-bo's entire quest was to get his coin back.
- Bullfight Boss: He occasionally charges at Isaac. If he crashes into a wall, it stuns him for a bit.
- Death by Materialism: If a sticky nickel happens to appear in his boss room, he will continuously attempt to pick it up but be unable to, effectively rendering him stuck and allowing Isaac to defeat him with no trouble.
- Degraded Boss: Appears as a boss enemy only in Cathedral.
- Evil Counterpart: It is essentially a glorified Boss version of the Bumbo familiar.
- Helpful Mook: If he gets enough coins during his boss fight, he'll just leave entirely and give you an item.
- Money Fetish: He loves coins, and will instantly ignore Isaac to pick up any coins on the ground.
- Punny Name: With a mix of Bilingual Bonus. "Bambino" is Italian for child, so Bumbino is a child Bum-bo.
- Shout-Out: In a weird recursive way to The Legend of Bum-bo, which is technically a prequel to The Binding of Isaac based on a Breakout Character... Regardless, all of his attacks, animations, and sound effects are based on the Bum-bo game more than the actual Bumbo item.
- Sore Loser: When defeated, he starts crying and throws a mini-tantrum.
Chapter 2 Alt Path (Mines and Ashpit)
Hornfel

A little devil that rides around in a minecart, travelling between doors while throwing bombs at Isaac. Once his health has been depleted, he drops out of his cart and Isaac has a chance to kill him for extra bombs or an item.
- Big Red Devil: He only has one horn, but otherwise he looks like a stereotypical demon.
- Blowing a Raspberry: Will occasionally stick his tongue out at you instead of attacking.
- Booby Trap: His decoys are trapped to burst into troll bombs if destroyed.
- Bratty Half-Pint: He's meant to come off this way. His initial working name was even "Little Shit".
- Cartoon Bomb: Most of his bombs resemble the typical grey ball with a fuse, but his Brimstone bombs have a different, more "high tech" design.
- Centrifugal Farce: In one of his attacks he rides around the same section of track in a loop, until he makes himself dizzy and throws up.
- Cheshire Cat Grin: He wears a mischeivous grin up until the point where you destroy his minecart.
- Combat Pragmatist: He deliberately tries to trick and distract you, uses attacks that deal twice as much damage as most other bosses, and when he's beaten, he tries to escape rather than just letting himself be killed.
- Confusion Fu: Hornfel's attacks are erratic and unpredictable, especially when combined with other factors like the decoys and enemies arriving on carts. Beating him requires less rote memorization of attack patterns and more of an ability to react to a quickly changing environment.
- Dreary Half-Lidded Eyes: His eyes are somewhere between this and Tsurime Eyes.
- Enemy Posturing: He'll sometimes stop attacking just to stick his tongue out at you.
- Enfant Terrible: An implied example. While his age isn't confirmed, his immaturity and small size makes him come across as quite young. Regardless of his age, however, he still clearly wants you dead.
- Evil Is Burning Hot: He can shoot incendiary bombs or Fireballs at you.
- Fangs Are Evil: Has prominent fangs which are visible at nearly all times.
- Fireballs: In one of his attacks, he pukes up a fireball that spreads across the floor in a cross-pattern.
- Flunky Boss: Sometimes appears with a couple of fly bombs. Other enemies in carts also appear randomly throughout the fight.
- Fragile Speedster: He only has 240 HP, less than some Basement bosses. But his minecart makes him move very quickly and erratically, and so he still takes a while to kill.
- "Get Back Here!" Boss: In his second phase, he stops attacking and runs for the exit. You don't have to kill him to win the fight, but you get some extra bombs if you do.
- Glass Cannon: His HP is lownote , but most of his attacks do a full heart of damage.
- Green Around the Gills: He briefly turns green when nauseous.
- Hoist by His Own Petard: One of his attacks has him riding around and around the same section of track, making him sick and vulnerable to attack.
- Horns of Villainy: Well, only one horn.
- Inelegant Blubbering: A downplayed example, but he does some crying when you destroy his mine cart.
- Ironic Name: He's named after a type of rock known for being tough and durable, so you'd expect him to be a Stone Wall rather than a Fragile Speedster.
- Know When to Fold 'Em: After you break his minecart, he realizes that he can't beat you and runs for the exit.
- Laughably Evil: Hornfel displays a lot more personality than most bosses. In particular, his tendency to do silly things like taunting you, accidentally making himself sick, and bursting into tears when defeated makes him quite engaging.
- Mad Bomber: His main modus operandi is to ride around on his minecart, chucking various bombs at you.
- Made of Incendium: Why exactly his vomit explodes is a mystery.
- Minecart Madness: Inverted. He's the one on the minecart, but you're still the one doing the dodging.
- Outfit Decoy: Can send out decoys in carts that burst into troll bombs when hit.
- Pint-Sized Powerhouse: He's much smaller than most bosses, being about the same size as Isaac. However, he's just as dangerous (if not more so) than many bosses that are at least five times larger than he is.
- Playing with Fire: Can spit fireballs and sometimes uses incendiary bombs.
- Prone to Vomiting: He seems to get motion sick easily. Both on his own and as part of The Horny Boys, he ends up throwing up from moving too fast.
- Scooby-Dooby Doors: His boss room is lined with them, and Hornfel can emerge from any one at any time. However, the player can't use them.
- Screw This, I'm Outta Here: Depleting Hornfel's health destroys his minecart, at which point Hornfel will run for the nearest door. This makes Hornfel one of only three bosses that can be defeated non-lethallynote , but you do get a few bomb pickups or even a bomb-based item, as well as unlocking an item, if you can kill him before he escapes.
- Sequential Boss: Technically has two phases with separate health bars, though the second phase just consists of him running away.
- Sheathe Your Sword: He can be defeated non-lethally by letting him escape during his second phase. Unlike Baby Plum and Bumbino, you're rewarded for killing him rather than letting him go.
- Shout-Out: The Brimstone bombs he uses are visually based on the grenades launched by the Iron Bomber, an unlockable weapon in Team Fortress 2 which was originally designed and submitted to the Steam Workshop by Kilburn (one of Antibirth's creators).
- Super Spit: His main non-bomb attack has him continually speeding up on his minecart, only to end up going so fast that he gets sick and projectile vomits in your general direction. The puke, of course, explodes.
- Throw Down the Bomblet: All of his attacks bar one are bomb-based. Even his vomit explodes into fire.
- Trick Bomb: Hornfel's bombs use several different modifiers: he can throw Hot Bombs which leave damaging fire behind, Rock Bombs which send rock waves in the cardinal directions, and a unique Brimstone bomb that explodes into a four-way Brimstone laser.
- Tsurime Eyes: Has these to highlight his cocky attitude, but they change to circular once his cart breaks and he starts panicking.
- Turns Red: Inverted. In his second phase, he stops attacking completely and just tries to run away. His contact damage is also reduced from a full heart to half a heart.
- Wave-Motion Gun: His Brimstone bombs fire beams in the cardinal directions.
- Vehicular Assault: Attacks from a minecart which you have to destroy to defeat him.
- Villainous Breakdown: He begins freaking out once Isaac destroys his minecart.
- Vomit Indiscretion Shot: One of his attacks has him vomit up a fireball that explodes in the cardinal directions.
Great Gideon

A King Mook to the Grimace enemies, who isn't fought directly. Instead, Isaac has to fight six waves of enemies while dodging occasional attacks from Gideon himself.
- Added Alliterative Appeal: Great Gideon.
- All Your Powers Combined: Combines the abilities of all Grimace varieties in Rebirth and the new Quake Grimace in Repentance.
- Easter Egg: Throwing a Chaos Card at him will instantly kill him, as well as open a hidden crawl space that holds several items and chests.
- Fire-Breathing Weapon: One of Gideon's attacks has it spewing fiery bullets down the middle of the room, which will leave lingering fires on the ground. It also exploits this by summoning a number of enemies that become more powerful when lit on fire.
- King Mook: To the Grimaces, using a mix of different skills from quite a few of them.
- Mook Maker: Summons six waves of enemies to attack you in addition to shooting at you himself. Defeating all of the minions ends the fight.
- Multi-Mook Melee: You have to fight 6 waves worth of enemies before the fight is finished.
- Named After Somebody Famous: Shares his name with a prophet and military leader from the Old Testament who is said to have defeated an overwhelming army of Midianites with only 300 Israelite soldiers.
- Nigh-Invulnerable: Like the enemies he's based on, Great Gideon is immune to everything that's not a Chaos Card, and you defeat him (without actually killing him) by killing all of the other monsters in the room.
- Non-Lethal K.O.: Instead of exploding into gore like most bosses, he turns off after you defeat his Multi-Mook Melee. You can subvert this using the Chaos Card, which causes him to explode into pebbles.
- Vacuum Mouth: One of his attacks, taken from the Gaping Maw enemy. Only he'll also suck in rocks from the walls which you have to dodge.
Tuff Twins

A pair of rocky Larry Jr.-type creatures that roam around and spit out Inks. Their shells are totally impervious to damage but can be blown off with explosions, and Isaac has access to unlimited red bombs to throw at them.
- Boss-Arena Idiocy: The Tuff Twins start out covered in a rock shell that makes them impervious to attack and must be broken with explosions. Their boss room always happens to contain a number of Bomb Grimaces that provide free bombs to chuck at them, and occasionally a couple of TNT barrels as well.
- Broken Armor Boss Battle: Their hard shells must be destroyed with explosions before your tears are able to damage them.
- Mook Maker: They spawn Inks (which release four bullets in the diagonal directions on death along with a puddle of slowing creep) to harass the player throughout the fight. If their head is exposed, they switch to Suckers instead.
- Shed Armor, Gain Speed: They become faster as you blow up their stone armor.
- Theme Naming: Named after tuffs, a type of rock made from volcanic ash.
The Shell

The posthumous form of the Tuff Twins, now reduced to a floating husk. Their shells once again can only be broken by explosions, but their innards are considerably more disturbing and dangerous this time around.
- Body Horror: Inside of their shells, they're just mashed up bits of flesh held together by tendons.
- Boss-Arena Idiocy: Just like their living counterpart, they can only be damaged by bombs and yet hang out in a room with infinite red bombs to throw at them.
- Broken Armor Boss Battle: Like with the Tuff Twins, they can only be hurt once their rocky shells are removed.
- Power Floats: Just like the Hollow, they somehow float.
- Shed Armor, Gain Speed: Inverted. They're much slower once you break their armor, due to their undead body parts now dragging on the floor. However, they gain much more dangerous attacks while their flesh is exposed.
- Undead Counterpart: It's the Tuff Twins, reduced to a floating husk similar to the Hollow.
Singe

A humanoid that attacks with explosions, farts, and exploding farts. He's always accompanied by a few indestructible spike balls that he can knock around to hurt Isaac.
- Ash Face: One of his attacks has him propel himself into the sky with an explosion. When he lands, he's covered in ashes.
- Boss Arena Urgency: His blasts can destroy parts of the floor.
- Defeat Equals Explosion: He explodes when defeated, which can damage Isaac.
- Extreme Omnivore: According to Edmund, he eats farts.
- Fartillery: Attacks by farting at you.
- Farts on Fire: He can light his gas clouds on fire with bombs, or hold a match in front of his butt for a flamethrower.
- Gasshole: All of his attacks involve farting in some way.
- Having a Blast: He can cause explosions around him.
- Perpetual Smiler: He constantly smiles during his battle, only stopping when defeated.
- "X" Marks the Hero: Inverted, he has an x-shaped scar on his forehead despite being a bad guy.
Clutch

A ghost that fights alongside three Clickety Clacks. He can possess any of his minions, granting them enhanced attacks until it's destroyed, but destroying all three leaves him defenseless. In his second phase, he turns his minions into a shield and switches to a new attack pattern.
- Art Shift: Clutch has a notably scratchier art-style than anything else, implying that he's some sort of outside force possessing his way into the game.
- Bad Boss: For his second phase, he destroys all of his minions and converts them into a shield.
- Ballistic Bone: He launches bones in eight directions upon taking over a Clickety Clack's body.
- Black Eyes of Crazy: His eyes are completely black save for two small purple pupils.
- Demonic Possession: In its first phase, Clutch will possess one of the three Clickety Clacks in the room to perform attacks, randomly switching to another Clickety Clack at times. He can't be hurt while possessing a body, but destroying all three will render him temporarily helpless.
- Evil Counterpart: To the Soul, with the Clickety Clacks standing in for the Forgotten.
- King Mook: To the Clickety Clacks that appear in the Ashpit.
- Orbiting Particle Shield: He destroys his Clickety Clacks upon entering phase two, using their remains as a shield similar to Book of the Dead's effect. Interestingly, if you can destroy all the skeleton piles with an instant-kill effect, he won't have this shield.
- Playing with Fire: In his second phase, Clutch spews waves of purple fire around the room.
- Sequential Boss: In the first phase, Clutch bounces between three bodies and only becomes damageable briefly each time all three are knocked down. Once he's at about a third HP, he destroys the skeletons and switches to a new attack pattern.
- If Isaac had used Eraser on the Clickety Clacks prior to fighting Clutch, he will instead start in his second phase.
- Tombstone Teeth: Can be seen prominently in his boss portrait.
- Transformation of the Possessed: Possessed Clickety Clacks gain a unique appearance with Clutch's smile instead of their usual blank expression and purple eyes.
Chapters 2 & 3
Reap Creep

A giant Wall Creep that moves across the top of the arena. He has three faces that he rotates to as he takes damage, each based on the different Wall Creeps from Rebirth.
- All Your Powers Combined: Reap Creep combines the abilities of all three varieties of Wall Creep in the vanilla game and turns them up to eleven.
- Beam Spam: Its third phase can fire a spray of four sweeping Brimstone beams.
- Death from Above: In its third phase, it will slam the wall to cause several rocks and spiders to fall from the ceiling.
- Degraded Boss: Appears as a boss enemy only in the Chest.
- Giant Spider: It's a giant Wall Creep around the size of Widow.
- King Mook: Of the wall creeps.
- Mook Maker: Spawns a lot of creeps to harass the player. It can also shake spiders loose from the ceiling.
- Sequential Boss: Has three phases, each imitating a different Wall Creep, all with different attacks. Its first phase primarily fires long chains of bullets aimed at the player, its second phase shoots wide spreads, and its third phase attacks with Brimstone lasers.
The Pile

An undeader version of Polycephalus, now just a pile of bones. The Pile burrows underneath the ground then quickly pops up to spray bones at Isaac, and can create a 4-way row of spikes on the floor.
- The Artifact: The Pile was made for Antibirth back when Polycephalus didn't have an Upgraded Boss variant in the official game. This was rectified in Afterbirth with the Stain, but the Pile still got added into Repentance, making Polychephalus one of two bosses (the other being the Haunt) with two undead versions. As fights, however, the Stain and the Pile are different enough from each other to both fit in.
- Ballistic Bone: It can launch sprays of bone projectiles.
- Bullfight Boss: Will occasionally charge at Isaac before slamming into a wall, creating two diagonal rock waves and launching several bone projectiles.
- Dem Bones: A fully skeletal version of Polycephalus.
- Degraded Boss: Appears as a boss enemy in Sheol onwards, the Chest, and Corpse.
- Fast Tunnelling: One of its attacks is to duck underground then instantly pop up behind you.
- "Get Back Here!" Boss: Like always, it pops up to attack and pulls away to hide.
- Mook Maker: Will occasionally summon Bonies.
- Spikes of Doom: One of its attacks involves summoning spikes that move from the edges of the room towards itself.
- Undead Counterpart: It's an even more undead version of Polycephalus and The Stain, having been stripped of any form of skin other than bones.
Chapter 3
Loki

A little four-armed devil that teleports around, does a pattern of alternating cardinal and ordinal shots, or spawns a Boom Fly.
- Big Red Devil: Or Little Red Devil in his case. Loki has the stereotypical red devil appearance, but he appears to be smaller than other bosses.
- Degraded Boss: Appears as a boss enemy in the Womb onwards.
- Dual Boss: Two Lokis can appear in a Double Trouble boss room in Utero.
- Easter Egg: If you use Meat Cleaver on Loki, you'll end up creating Lokii instead of two Lokis.
- Fangs Are Evil: He has long, brown fangs.
- Flunky Boss: Can be accompanied by a Poky or four Stone Grimaces.
- Horns of Villainy: As part of his Big Red Devil look.
- Heel–Face Turn: The Little Loki item gives you a friendly Loki who uses its four-way-bullet attack. It isn't dropped by the Loki boss, though.
- Mook Maker: Summons Boom Flies periodically.
- Named After Somebody Famous: Shares his name after the Trickster God of Norse Mythology.
- Number of the Beast: He has three sixes plastered on his forehead.
- Perpetual Smiler: Constantly smiles during his boss fight.
- Tactical Suicide Boss: If you can kill his Boom Flies as soon as they spawn, they will blow up on him.
- Teleport Spam: Frequently teleports away during the battle.
Monstro II

Monstro, reduced to almost nothing but a skull. He spawns clumps of Suckers, and can destroy them all at once by either crushing them as he tries to jump on Isaac or by firing a Brimstone beam.
- A.I. Breaker: In the original game, Monstro II could be locked into his Brimstone attack by standing beside him to trigger the attack, then moving to his other side to make him shoot Brimstone in the other direction, and repeating the process as necessary. It's no longer possible with his Rebirth incarnation.
- The Artifact: Was the first and only posthumous boss in the original game before more were added in Wrath of the Lamb onwards.
- Bad Boss: He's got no issue with squashing his minions or shooting his Brimstone if they happen to be in the way.
- Body Horror: He's three-fourths skeleton, and the one-fourth of him left isn't looking much better.
- Breath Weapon: Replaces his shower of bloody tears with a Brimstone attack. He'll only fire it if you're standing directly to his left or right, though.
- Damage-Sponge Boss: Much bulkier than the other Depths bosses.
- Degraded Boss: In Cathedral and Sheol onwards and Corpse.
- Flunky Boss: Can sometimes be fought alongside Clotties.
- Fragile Speedster: Red Champion Monstro II moves around much faster, but is smaller and has less HP.
- Mook Maker: Summons Suckers on his second jump attack.
- Odd Name Out: He's the only posthumous boss who's name isn't different from his living counterpart's name.
- Undead Counterpart: He is the zombified husk of Monstro.
Gish

A blob made of tar who possesses similar attacks to Monstro II. He spawns Clots and leaves oil on the ground, and the Brimstone beam is replaced with a single explosive shot.
- Blob Monster: A giant tar blob.
- The Cameo: From a game with the same name, Gish.
- Degraded Boss: Appears as a boss enemy only in the Dark Room.
- Early-Bird Cameo: It's possible to encounter Gish in the Void even before he's unlocked, as unlocking him requires beating Chapter 3 20 times while the Void can be unlocked much earlier.
- Flunky Boss: Can sometimes be fought alongside Clotties.
- Heel–Face Turn: The Little Gish item gives you a friendly version with slowing attacks, and is usually dropped by the boss.
- King Mook: To the Clots.
- Mook Maker: Spawns Clots on his second jump attack.
- Underground Monkey: An alternate version of Monstro II that can be encountered in the Depths and Dank Depths. This makes him the only alternate version of a posthumous boss as he was present in the original game alongside Monstro II.
Mask of Infamy

A heart that tries to flee from Isaac and an invulnerable mask that wanders around and attacks to ram into Isaac. Once the heart is killed, the mask becomes vulnerable to attacks from behind.
- All in the Manual: As stated in the bestiary, the heart is called Heart of Infamy.
- Attack Its Weak Point: The mask is invincible until you destroy her heart. Even after that, you need to hit her from behind.
- Cat-and-Mouse Boss: The first phase of the fight: you chase the heart, while the mask chases you.
- Chasing Your Tail: The second phase of the fight has you trying to attack the mask's vulnerable rear, while she continues to try and run you down.
- Degraded Boss: Appears as a boss enemy only in the Dark Room.
- Female Monster Surprise: The Mask is female, as confirmed by Edmund.
- Interface Screw: The only boss without a health bar in the original version, though fixed in Rebirth. The fact that it's not easy to land a shot in the last stage made the fight look depressingly long.
- King Mook: A beefed-up version of the Mask + Heart enemies also added in Wrath of the Lamb. Her second phase behaves much like a faster version of the Knight enemies.
- Meat Puppet: A face can be seen peering out from Mask of Infamy's back in her second phase.
- Shout-Out: Inspired by Carmilla's mask in Castlevania.
- Tears of Blood: Bleeds from her eye sockets in a manner that makes it look like she's crying.
- White Mask of Doom: She is a white mask. She's also a villainess.
- Upgraded Boss: Black Champion Mask of Infamy is larger with the heart having more health and firing homing shots.
The Adversary

The posthumous form of the Dark One, now wrapped in bandages that he can pull apart to spawn spiders. His Brimstone beam can now be fired in any direction and it curves to hit Isaac.
- Blackout Basement: Can turn the screen dark for his attacks.
- Body Horror: Noticeably downplayed compared to the other posthumous bosses. Whereas the other ones looked decidedly mangled, warped, or just plain ugly (or uglier), the Adversary… is just missing a horn and is covered in bandages. Even then, he's still recognizably intact. At least, until he starts opening his torso to reveal that basically his entire ribcage has been replaced with a nest of spiders, and the bandages are coiling around what remains of his innards.
- Breath Weapon: He can now shoot Brimstone in any cardinal direction, but don't think you're safe if you stand at a diagonal, because it curves towards you.
- The Comically Serious: Despite looking a bit sillier than the other posthumous bosses, it looks like he's taking things more seriously now than he did as Dark One.
- Degraded Boss: Appears as a boss enemy in Sheol onwards and the Chest.
- Dishing Out Dirt: He can jump up in the air and slam down, creating a circular wave of rocks around him.
- Evil Counterpart: Possibly one to Azazel; both are red-eyed demons with black skin who have a broken horn and use Brimstone attacks. However, while Azazel is a non-villainous Player Character, The Adversary is a boss.
- Let's Get Dangerous!: Its expressions in the first fight make it seem as if he was toying with you. Now that doing that has gotten him injured, he's decided to stop playing around with single-direction attacks.
- Meaningful Name: The Adversary is one of the ways Satan's name can be translated from Hebrew.
- Mood Whiplash: Compared to the other posthumous bosses, the Adversary is pretty goofy. The only comparable one is Lokii, and he at least comes from an already cartoony boss. And yes, the dark and edgy name only makes him funnier.
- Mook Maker: Occasionally spawns spiders from the hole in his chest.
- Red and Black and Evil All Over: His skin is black, he has darker horns, and his eyes are red.
- Red Eyes, Take Warning: He's a dangerous boss with red eyes.
- Undead Counterpart: He is the posthumous version of the Dark One, covered in bandages and with a shattered horn.
The Cage

A beheaded and stitched version of Mega Fatty. He rolls around the room chaotically, jumps and lands with a few unpredictable rock waves, and occasionally spawns a sickly Vis.
- Damage-Sponge Boss: Notably, he has more health than Mom.
- Dead Weight: He's the zombified version of Mega Fatty, so naturally he is morbidly obese.
- Degraded Boss: Appears as a boss enemy in Sheol onwards, the Chest, and Corpse.
- Dishing Out Dirt: His jumping attack now creates sharp rocks like the Adversary's, but he creates lines of them that travel outwards in several directions until they hit a wall.
- Dual Boss: The Pink Champion variant pits the player against two smaller Cages with half health that cannot jump.
- Double Trouble boss rooms can contain The Cage paired with another Cage in Womb and Utero.
- Giant Mook: He's basically been turned into a Vis, making him this.
- Mook Maker: He can spawn discoloured Vis that fire sickly grey Brimstone lasers.
- Poisonous Person: Green Champion Cage will leave green creep wherever he moves.
- Rolling Attack: He can curl up in a ball and roll around the floor in an attempt to hit Isaac.
- Undead Counterpart: He is a posthumous version of Mega Fatty, with his head being absent (assuming it got chopped off) and his body rotting, along with a new stitch across his stomach, making him resemble a giant Vis.
- Zombie Puke Attack: He manages to do this without a head.
The Gate

\\Mega Maw with all of its flesh melted off and a tiny man inside the skull. It spawns Leapers from its mouth then fires a Brimstone beam that chains between every Leaper, killing them to try and hit Isaac.
- Bullet Hell: Red Champion Gate has an alternate set of projectile attacks that are considerably much more difficult to dodge due to their unusual patterns.
- Degraded Boss: Appears as a boss enemy in Sheol onwards, the Chest, and Corpse.
- Dual Boss: Double Trouble boss rooms can contain The Gatepaired with another Gate in Womb, Utero, and Scarred Womb.
- King Mook: Oddly enough he resembles a giant Host, despite his living form being a giant Maw.
- Meat Puppet: A pair of eyes can be seen whenever The Gate opens his mouth. When defeated, something that looks like a tiny Isaac peeks outside a crack right before expiring. Red Champion Gate has a demon inside him that can be seen when he is killed.
- Mook Maker: Spawns a series of Leapers in order to set up his Brimstone attack.
- Reflecting Laser: One of his attacks is to spawn three Leapers and then fire a Brimstone laser that connects between the three and deals a whole heart of damage. Killing the Leapers before he fires it causes the beam to simply travel straight down instead. Interestingly, the effect isn't just limited to Leapers - if the Gate spawns with other enemies (e.g. Greed Mode and Boss Rush), the laser chains to those enemies as well and will most likely kill them for you.
- Stationary Boss: Just like its living counterpart.
- Undead Counterpart: He's a posthumous Mega Maw, as the flesh from his face leaks to the lower half of his head, his skull remains animated for the time it's alive.
- Upgraded Boss: Black Champion Gate has more health and spawns Big Spiders towards Isaac.
Brownie

A ginormous corny poop that creates hordes of Brownie Corns and lays Corn Mines. If it's caught in a Corn Mine's explosion, it's poisoned and leaves green creep. On death, it turns into a weakened Dangle.
- Abnormal Ammo: Corn.
- Bullet Hell: Tends to fire much larger volleys of projectiles than most bosses. Also drops Corn Mines that explode into even more projectiles.
- Company Cross References: Shares its name with a boss from Super Meat Boy, another Edmund McMillen game, who also happens to be made of poop with corn in them.
- Degraded Boss: Appears as a boss enemy only in the Chest and Dark Room.
- Early-Bird Cameo: It's possible to encounter Brownie in the Void even before it's unlocked, as unlocking it requires beating the Chest 3 times while the Void can be unlocked much earlier.
- Hopeless Boss Fight: Because Butt Bombs heal Brownie instead of damaging it, encountering it during the Beans! challenge will almost certainly end the run if Isaac has no other means of attacking. The same is true in Hot Potato if you were (un)lucky enough to find Butt Bombs.
- Immune to Bullets: Using Butt Bombs against Brownie will heal it instead of damaging it.
- Mook Maker: Spawns Brownie Corns in large numbers throughout the fight.
- One-Hit Kill: Using Flush! will instantly kill him and any Brownie Corns, without him turning into Dangle.
- Rush Boss: Although its attacks and minions can be difficult to dodge, Brownie doesn't have a particularly large health pool. The fact that one of its attacks is essentially Cast from Hit Points doesn't help its case.
- Tactical Suicide Boss: The exploding turds Brownie places down can not only damage it, they can also poison it. Zig-zagged in that Brownie also trails poisonous creep while poisoned.
- Toilet Humor: How else does one describe a giant ball of poo that shoots corn?
- Turns Red: Inverted. When its health drops low, it turns into a Dangle with much lower health than its normal counterpart.
- Upgraded Boss: Black Champion Brownie spawns Chargers instead of Brownie Corns, leaves black creep, and becomes two Dank Squirts when at low HP.
Chapter 3 Alt Path (Mausoleum and Gehenna)
The Siren

A charming demoness that steals Isaac's familiars with her singing and can summon a few familiars of her own. She also unleashes a pattern of bullets with a scream.
- Bad Boss: If you don't destroy them first, she hurls the familiars she summons at you after a set amount of time.
- Beat the Curse Out of Him: If she steals one of your familiars, you can get it back by shooting it.
- Bullet Hell: Like a number of other bosses, The Siren can unleash a dense array of bullets in all directions. Her shots actually curve in the air, making them harder to dodge.
- Charm Person: Her singing can lure your familiars over to her side.
- Evil Counterpart: To Lilith, as they are both female demons who specialize in summoning familiars to fight for them.
- Expy: Of, oddly enough, the Gorgun from Enter the Gungeon, having several similar attacks and a similar appearance.
- Not Quite Dead: In Antibirth, if she stole an extra life familiar like Dead Cat or 1up!, she would use it to bring herself back with 10% health and eat the extra life in the process. This feature was removed in Repentance.
- Number of the Beast: She has exactly 666 HP.
- Our Sirens Are Different: Rather than a traditional alluring fish woman or even a mythologically-accurate bird woman, this Siren is a demon. She's closer to a PG succubus than something you'd normally refer to as a siren.
- Power Parasite: Effectively copies the abilities of your familiars by charming them. Things can get very messy if she steals something like Dry Baby and Incubus.
- Stripped to the Bone: The Siren is rapidly reduced to an inert skeleton upon death. Destroying her skull unlocks a trinket, and thus is required for the Dead God achievement.
- Suddenly Voiced: Unlike in Antibirth, her singing and her scream attack come with voice samples.
- Super-Scream: One of her Bullet Hell attacks is launched by her emitting a rockstar-esque scream.
The Heretic

Another undead(er) form of The Haunt, summoned by an insane cult. It can disappear then reappear to bite Isaac several times in succession, launch a volley of fireballs, and light up the fire places in its room to shoot a laser that bounces between them all.
- The Artifact: Similar to the Pile, the Heretic was created to be a harder Undead Counterpart of the Haunt in the Antibirth mod. Thanks to the presence of the Forsaken in Afterbirth, The Haunt now has two very different undead(er) versions, all encounterable in separate chapters.
- Back from the Dead: Also like the Pile, the Heretic can be seen as the "third stage" in a sequence of decay from the original boss, considering how his skeleton looks.
- Came Back Strong: Being resurrected by a cult ritual has done wonders for the Haunt's combat effectiveness.
- In the Hood: He traded his ectoplasm skin for a black cloak.
- Kaizo Trap: After it dies, the fire in its eye falls to the ground and erupts into a four-way burst, possibly damaging you if you're not paying attention.
- Non-Human Undead: It's an undead ghost. Try to wrap your head around that.
- One-Hit Kill: Like with all ghost bosses, using Vade Retro when he's at 50% or less health will kill him instantly.
- Our Ghosts Are Different: And apparently more undead.
- The Pawns Go First: Just like the Haunt, the Heretic will send its minions after you first and only start fighting once they're all dead.
- Reflecting Laser: His boss room always comes with a number of extinguished fireplaces. One of his attacks lights them up, then fires a Brimstone beam that chains between them.
- Skull for a Head: And a broken, shattered one at that. When it uses its slam attack, it needs to readjust its jaw back into place.
- Ungrateful Bastard: It gets revived by cultists, and it thanks them by turning them into Mooks to send after you.
The Visage

The posthumous form of Mask of Infamy, now wrapped in chains. The mask and heart begin connected by a chain that must be destroyed. Once that's done, the rocky shell covering the heart is removed and it can be freely attacked.
- Adaptation Deviation: The Visage is the only boss from Antibirth to not appear in its original floor, the Mausoleum; instead only appearing in Gehenna. Its appearance has changed from purple flames to red flames to reflect this.
- Adaptation Dye-Job: In Antibirth, its flames and heart were purple to match the Mausoleum. Since it was moved to Gehenna, it was changed to red in Repentance.
- Attack Its Weak Point: Initially, it's the chain holding the two together; afterwards, the heart itself becomes the weak point, and the mask can be incapacitated by attacking it from behind.
- The Artifact: Still shoots purple Eye Beams despite its eyes being changed to red.
- Cat-and-Mouse Boss: As with Mask of Infamy, the heart flees while the mask tries to run you down. The difference is that the heart is fully capable of fighting back, and the mask doesn't like to stay dead.
- Dual Boss: As opposed to the original Mask of Infamy, which is taken down one part at a time, both parts of The Visage attack simultaneously, and even come with a number of Combination Attacks.
- Grappling-Hook Pistol: The Visage's heart can use chains to pull itself to nearby surfaces. Note that this includes the mask and Isaac.
- Turns Red: Twice. Once when the chain is destroyed and gives the two parts of the Visage free movement, and a second time when the heart's health drops low and it changes its attack patterns.
- Variable-Length Chain: The chain binding the heart and mask together in the initial phase, particularly noticeable when the mask charges and stretches the chain to around twice its usual length. During the second phase, the heart uses one in a number of its attacks.
The Horny Boys

Loki and Hornfel, having been stitched together. They can perform a wide variety of attacks that combine elements from both of their original boss fights.
- Big Red Devil: Two of them combined.
- Body Horror: It's Loki and Hornfel turned into Conjoined Twins by stitching their bodies together. They seem to be alright with it, though.
- Bullet Hell: One attack has Loki sending out a bullet pattern which is considerably more complex than the one he uses when he's by himself.
- Combination Attack: They're built for this, fusing mechanics from their separate boss encounters. For example, Loki can use his teleportation while Hornfel throws bombs. When Loki summons a Boom Fly, it'll have a few bombs orbiting it. When Loki does his Ground Pound bullet spray, he starts doing it faster and faster until Hornfel gets sick and coughs up incendiary bombs.
- Conjoined Twins: It's Hornfel and Loki literally mashed together.
- Double Entendre: Their title is The Horny Boys. While both of them do have horns, it's also incredibly suggestive of something else.
- Easter Egg: You can separate the two if you use Meat Cleaver on the two, leaving you with regular Loki and Hornfel without his minecart, causing him to run around crying.
- Fangs Are Evil: They're both trying to kill you and they both have fangs.
- Fireballs: Hornfel spits up three of these when he's sick.
- Flunky Boss: They can spawn Boom Flies which are orbited by Fly Bombs.
- Foolish Sibling, Responsible Sibling: Based on their facial expressions and attack patterns, Loki is the foolish one, and Hornfel is the responsible.
- Gleeful and Grumpy Pairing: Zigzagged: the splash art implies that Loki is the gleeful one and Hornfel is the grumpy one. However, during the actual fight, they both seem equally happy.
- Green Around the Gills: Hornfel gradually turns more and more green as the bullet attack progresses.
- Horns of Villainy: Loki has two horns while Hornfel just has one.
- Juggling Dangerously: One of their attacks involves juggling bombs before dropping them around Isaac.
- Laughably Evil: Two silly bosses combined to make an even sillier boss.
- Meaningful Look: Before Loki does his bullet attack, he shoots Hornfel an evil grin, to which Hornfel gives Loki a horrified glance, knowing exactly what's going to happen.
- Multi-Armed and Dangerous: They have a total of three arms, from the four-armed Loki being combined with the two-armed Hornfel.
- Multiple Head Case: Both of the boys retain their original personalities despite being merged.
- Power Floats: They constantly hover above the ground.
- Prone to Vomiting: As before, Hornfel seems to have a problem with motion sickness. He gets nauseous and throws up from the bullet spray attack while Loki is completely unaffected.
- Smoke Out: They can teleport rapidly around the room while dropping smoke bombs.
- Super Spit: Hornfel has incendiary vomit, though he only seems able to use it by accident.
- Tareme Eyes: Loki has these while Hornfel has Tsurime Eyes, tying into their differing personalities.
- Teleport Spam: Many of their attacks have them teleporting rapidly around the room.
- This Is Gonna Suck: When Loki decides to start using his bullet spray, Hornfel looks visibly distressed.
- Trick Bomb: The bombs they use can be Sad Bombs, Hot Bombs, or Hornfel's special Brimstone Bombs. One attack also has them creating a smokescreen with smoke bombs.
- Trickster Twins: Both of them clearly love working together in being as obstructive as possible with their combined skills.
- Troll: Judging by his expression, Loki seems to enjoy forcing Hornfel to use the bullet spray attack against his will.
- Vomit Indiscretion Shot: Once again used by Hornfel, although this time it's because Loki shook him around too much during his own attack.
Chapters 3 & 4
The Bloat

The bloated corpse of Peep. His eyeballs now begin the fight already out of his body. More dangerous than that, however, is the Brimstone beams he fires from his eyes, which he will do without warning if Isaac steps in front or to the side of him so long as he's not doing a different attack.
- Ascended Meme: His infamous reputation as a hated boss by the community is reflected in the Afterbirth† challenge Aprils Fool, where he's the boss on every floor.
- Body Horror: A blobby, rotting, bleeding pile of flesh with disembodied eyes that float right next to him.
- Combat Pragmatist: Since he fires his Brimstone lasers the moment you're to his side or in front, chances are he may well attack you the instant the battle starts.
- Dead Weight: He's a zombified version of the already obese Peep.
- Degraded Boss: Appears as a boss enemy in Cathedral onwards, Dark Room, and Corpse.
- Detachment Combat: Like Peep, except both his eyes are now detached from the beginning of the fight.
- Eye Beams: He'll fire dual Brimstone lasers from his eye sockets if you so much as put a toe in front of or beside him. This is one boss you'll always want to attack from the back, even more so than Mask of Infamynote .
- Eye Scream: His eyes are covered in red growths, and aren't attached to him.
- Fat Bastard: Infamously moreso than his living version.
- Hitbox Dissonance: The official wiki states that there is a glitch with The Bloat's floating eyes having the same collision radius as his main body, making the eyes harder to evade as the hitbox does not match up with the eyes' visual size. This may have been a contributing factor to his hated status before it was mercifully fixed in Repentance.
- Kev Lard: A Fat Bastard with a fairly high amount of HP.
- Meaningful Name: "Bloat" is the medical term for abdominal distention, and he is a Fat Bastard. Could also be attributed to the fact that he's the rotting corpse of Peep (i.e. "bloated corpse").
- Poisonous Person: Green Champion Bloat leaves green creep and fires Ipecac shots.
- Recurring Boss: You fight him on every floor in the Aprils Fool challenge.
- Undead Counterpart: What remains of Peep's bones are broken, and his eyes are swollen.
Sisters Vis

A pair of giant Vis. They roll around and occasionally stop to fire a gigantic Brimstone beam or bullet spray towards each other. When one sister dies, the other turns red and becomes much faster and more dangerous.
- The Cameo: Originally appeared as bosses in Edmund's earlier game, Gish.
- Distaff Counterpart: To The Cage. They're female and look almost identical to him, except they have heads. They were also supposed to debut in Afterbirth, but were cut and replaced with the pink Champion Cage (which is, of course, two Cages).
- Dual Boss: Sisters Vis spawns in pairs by default. Can come in as many as eight at once in Greedier Mode.
- Double Trouble boss rooms can contain a Sisters Vis paired with Larry Jr., The Husk, or Lokii.
- Early-Bird Cameo: It's possible to encounter Sisters Vis in the Void even before they're unlocked, as unlocking them requires beating The Chest with six different characters while the Void can be unlocked much earlier.
- Giant Mook: A pair of giant Vis, although they don't really look like them.
- Rolling Attack: Just like The Cage, with one of them leaving green creep and the other leaving brown creep.
- Turns Red: When one Sister is killed, the other will literally turn red and begin moving faster.
- Wave-Motion Gun: Much like the Vis enemies, their main attack is opening up their stomach and firing blood lasers similar to Mega Satan's blood laser. They usually do it facing towards each other, but if one does it alone (or the other one is dead), they will sweep it left to right.
Chapter 4
Blastocyst

A colossal zygote that hops around and sprays shots at Isaac. It splits into two smaller cells on death, which split in two again, then each leave a harmless Embryo on the ground.
- Asteroids Monster: As it gets damaged, it splits into smaller blobs. The smallest blob variety leaves behind the Embryo inside when destroyed.
- Blob Monster: Judging by the name, it's a gigantic, blob-like cell.
- Bullet Hell: Can happen if too many of them are left onscreen. Since they only fire in a set direction, however, it's pretty tame compared to most other examples in the game.
- Degraded Boss: The Embryo form can appear as early as the Basement, and the medium-sized form can be encountered in the Womb and Scarred Womb before the boss itself. Its full form appears as a proper boss enemy in Sheol onwards and the Chest.
- Fake Ultimate Mook: Amusingly enough, the helpless Embryos that spawn as regular enemies on early floors had mini-boss health bars in the original game, as the game counted them as Blastocyst.
- King Mook: To the Embryos found in early stages.
- Mega-Microbes: They're cells/developing embryos that are bigger than Isaac.
- Weaksauce Weakness: Poison, at least until Afterbirth†. Normally, a boss would only take a bit of damage from poison, as their health bars reach in the hundreds, but if Blastocyst is poisoned when it divides, it's instantly killed, ending a long boss fight within a few minutes. They got a Balance Buff in Afterbirth† that removed the insta-kill, but they still pass debuffs onto their smaller forms when splitting.
Scolex

A tunneling worm that pops out of the ground to dive, spit bullets from its mouth, or launch an explosive shot from its butt. It is completely immune to damage except for its tail.
- Attack Its Weak Point: You can only damage it by hitting it in the very back segment.
- Fragile Speedster: It has the lowest health of any boss in the game, but it makes up for this with its speed and only being vulnerable to damage in one hard-to-hit weak point. Rebirth gave Scolex a health buff (so it's at least beefier than most of the Chapter 1 and 2 bosses), but it still has notably lower HP than every other Womb boss.
- Meaningful Name: A scolex refers to the head of a tapeworm.
- Tactical Suicide Boss: One of its attacks has it poking its vulnerable tail out of the ground for a fairly lengthy period of time before firing three Ipecac shots, giving the player a perfect opportunity to take off a lot of its health.
- Underground Monkey: It's a much tougher version of Pin, but unlike the Undead Counterpart versions of other bosses, Scolex is noticeably different in appearance from its easier version (and was also in the game before Pin). There also isn't really anything about Scolex's appearance to suggest that it's undead or already maimed, whereas all of the Undead Counterpart bosses have some degree of death-and/or-injury-related Body Horror (such as rotting, missing body parts, being skeletons, being covered in blood, etc.).
- Upgraded Boss: Black Champion Scolex was larger and slower but had more health. This champion variant was removed in Repentance.

A Giant Spider that stomps on Isaac with its four legs and occasionally slams his head on him as well.
- Attack Its Weak Point: His head takes more damage than his legs, but he frequently pulls his head out of harm's way.
- Degraded Boss: Appears as a boss enemy in Cathedral onwards and Dark Room.
- Giant Foot of Stomping: Yes, this game has a spider that stomps you. No, it (most likely) does not take place in Soviet Russia.
- Giant Spider: Bigger than any other spider in the game, taking up more than the screen can show.
- Heel–Face Turn: The Daddy Long Legs item makes him periodically stomp on your enemies for you.
- Mook Maker: Occasionally spits out Spiders, which he can also stomp on.
- Off-Model: Despite seemingly having four legs, as evident by his stomping attacks, Daddy Long Legs is portrayed as having only three legs.
- Use Your Head: One of his attacks has him attempt to stomp Isaac with his legs before slamming his head down on him.

A variation of Daddy Long Legs that only has three legs to stomp with but also leaves slowing white creep while doing so.
- Ascended Glitch: In the first launch of Wrath of the Lamb, it was possible for Triachnid to replace Isaac as the boss of the Cathedral. While the bug was fixed, his unlock method in Rebirth, killing Isaac 10 times, is a reference to this. Daddy Long Legs, whom Triachnid replaces, can also be encountered as a Degraded Boss in Cathedral.
- The Cameo: Triachnid is a reference to a previous flash game by Edmund McMillen. Furthermore, Triachnid is an alternate of Daddy Long Legs; in his own game, Triachnid was finding a home for his young.
- Early-Bird Cameo: It's possible to encounter Triachnid in the Void even before it's unlocked, as unlocking it requires beating Cathedral 10 times while the Void can be unlocked much earlier.
- Giant Foot of Stomping: Shares Daddy Long Legs' stomp attacks, but while Daddy Long Legs has four legs to stomp you with, Triachnid only has three.
- Mook Maker: Occasionally spits a Trite towards Isaac, which he can also stomp on.
- Underground Monkey: Occasionally replaces Daddy Long Legs once unlocked.
- Use Your Head: Has a similar attack to Daddy Long Legs which has him slam his head down on Isaac, albeit also leaving white creep.
Lokii

Loki, now split into two equally mischievous halves. The fight is basically identical to fighting two Lokis at once, except they now spawn Red Boom Flies that can't be used to hurt them.
- The Artifact: With the "Double Trouble" mechanic in Rebirth, Lokii is kind of redundant; the fact that the halves summon Red Boom Flies instead of regular Boom Flies and that they're fought in a 1x1 room is the only way they're different from a Double Trouble Loki fight.
- Degraded Boss: Appears as a boss enemy in Sheol onwards and the Chest.
- Dual Boss: He's the equivalent of fighting two Lokis at once, only with Red Boom Flies.
- Half the Man He Used to Be: They're Loki after being split in half, and somehow they're completely fine.
- Made of Bologna: His in-game sprites prior to Repentance had the two halves cut off with solid red innards. Repentance averts this, with visible guts on the cut like his VS artwork.
- Mook Maker: Unlike standard Loki, they summon Red Boom Flies. This gives them an advantage because they won't be blasted in the face if their minions die near them.
- Teleport Spam: Just like normal Loki.
- Visual Pun: The last two "i"s of his name have a line crossed through them on the bottom, making them resemble part of the Roman numeral II.
- Undead Counterpart: Loki has been split in two, but both halves live on.
- Victor Gains Loser's Powers: Killing Lokii for the first time unlocks Loki's Horns, an item that lets you sometimes shoot 4-ways tears like Loki.
Teratoma

A horrific tumour that's crawling with spiders. It bursts into smaller tumours as it's destroyed, with the smallest ones breaking into spiders.
- Asteroids Monster: The same as Fistula, except now filled with spiders instead of Chargers. The biggest difference between them is that Teratoma's largest form splits into three, whereas Fistula splits into four.
- Body Horror: Like Fistula, it's named after a real-life phenomenon in which the body forms a growth containing all three germ layers, one of which can potentially manifest as bone shards and teeth!
- Degraded Boss:
- Teratoma's smaller forms can appear as early as Catacombs, while the full version appears as a boss in Sheol onwards, the Chest, and Corpse.
- Teratoma is one of four bosses that can be spawned by It Lives.
- Undead Counterpart: Kind of. It's the posthumous version of Fistula in mechanics, although given that both are different real-life tumors without any personality or even attack method, it's hard to to say how "posthumous" they can really be.
Mama Gurdy

The largest form of Gurdy, who now hangs outside the boss room. She spews orange vomit or blood at Isaac and makes spikes rise from the floor at her command.
- Emerging from the Shadows: The boss screen shows her arm doing this. She actually looks like this◊ in-game.
- "Get Back Here!" Boss: She can hide in the walls of the boss room, immune to damage.
- Metamorphosis: The fourth form of Gurdy to appear. This one is quite different than her predecessors — instead of a ball of guts with a human face, it's a (probably) humanoid creature that's misshapen and lumpy, that has evolved to living within the flesh of the room itself.
- Spikes of Doom: She is able to create spikes around the room.
- Super Spit: One of her moves has her spew orange vomit all over.
- Weaksauce Weakness: She never creates spikes directly under the player, so standing still during her spike attack will leave you safe and her defenseless.
Mr. Fred

A stationary harlequin baby that's fought in a 1x2 room and creates a huge line of creep straight down the center of the room, forcing Isaac to attack him from the sides with momentum.
- Flunky Boss: Starts the fight accompanied by four Homunculi whose bonds he can break at will.
- King Mook: A giant boss version of the enemy Fred that appears in Chapter Four.
- Mook Maker: Will spawn Freds throughout the fight.
- Stationary Boss: Never moves from the center of the room.
- Weaksauce Weakness: Mr. Fred's main gimmick is that he makes creep in the cardinal directions, forcing you to use momentum to hit him from the side. If you have flight or just good range, the creep is nullified and Mr. Fred is a sitting duck.
The Matriarch
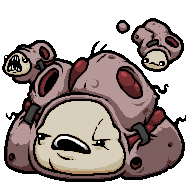
Chub, now wrapped in Fistula flesh and back for vengeance! Small Fistulas and Fistuloids break off of her as she loses health, and she can launch chubbers in 8 directions. Once her Fistula shell is broken, she becomes a (mostly) regular Chub.
- Body Horror: She is a giant maggot wrapped in a chunk of rotting flesh also infested with a bunch of smaller maggots. Is there any more to be said?
- Cast from Hit Points: Post-Repentance, she deals 30 damage to herself whenever she uses her chubber shot attack.
- Composite Character: She's Chub wrapped up in a Fistula, although the boss herself doesn't actually use any attack patterns from those two until she takes enough damage, upon which she'll essentially fall apart and become them.
- Degraded Boss: Appears as a boss enemy in Cathedral onwards.
- Dumbass No More: She no longer swallows bombs placed in her path, instead sending them right back at the player.
- Feed It a Bomb: On second thought, don't. Unlike regular Chub, the Chub that spawns when the Matriarch takes enough damage will spit the bomb back at you.
- Kaizo Trap: A rare boss example. Once Matriarch's HP is nearly gone, she destroys her Fistula armor and turns into a more intelligent Chub that deflects bombs back.
- King Mook: She is to the Fistuloid enemies what Chub is to the Chargers.
- Nerf: One of the few bosses that actually became easier in Repentance. Her attacks are a lot more telegraphed and she does them less rapidly now.
- Tears of Blood: She cries bloody tears once she runs out of HP.
- Took a Level in Badass: The boss is Chub character-wise (she turns into Chub after losing all her health as the Matriarch), but now clad in a Fistula mass of flesh and fought much later in the game.
- Turns Red: After being damaged enough, the Matriarch fires a wave of Fistulas that quickly break into maggots, and can do this attack at any time after that point.
Chapter 4 Alt Path (Corpse)
Chimera

A fusion of The Cage, Monstro, and Gurdy Jr. that uses an incredibly wide variety of attacks. After taking enough damage, its head falls off and it switches to yet a different attack pattern.
- Confusion Fu: Chimera has perhaps the widest range of attacks of any non-final boss in the game, which changes up in its second phase; as such, it can be a very unpredictable opponent.
- Dual Boss: Its head falls off in the second phase, making it a fight with it and the body.
- Fastball Special: In its first phase, it can throw Sick Boom Flies at the player. In the second phase, it throws its own head.
- Losing Your Head: Chimera's head detaches when it takes enough damage, turning it into a Dual Boss.
- Mix-and-Match Critters: It's The Cage with Monstro for a head that's surrounded in Gurdy Jr./Gurgling flesh.
- Sequential Boss: Once Chimera is at about 50%, it splits into both the head and body and gains totally different attacks.
- Your Size May Vary: The Cage that makes up its body is far smaller than an actual Cage.
The Scourge
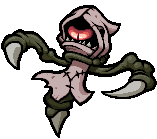
A massive Snapper that sucks a swirling pattern of shots from the wall to itself or whips its tentacles to create a mini-arena around Isaac.
- Bullet Hell: Particularly notable is that one of its attacks has it sucking in bullets from the walls of the room, forming a complex spiral pattern.
- Combat Tentacles: Has two of these tipped with sharp blades that it uses to lash out at you or confine you to a certain part of the room.
- Faceless Eye: Its "head" consists of a single eye and nothing else. During its death animation, it's easy to see that there's nothing supporting it.
- In the Hood: Like the Snapper enemies it's based on.
- King Mook: To the Whipper enemies encountered in Mausoleum.
- Meaningful Name: Named after a type of whip often used as a form of punishment.
Rotgut

A monster whose gullet is fused to the floor. Once the head is killed, it eats Isaac alive. There, the game switches to side-scrolling Crawl Space physics and Isaac must kill a maggot in its gut and an organ to finish Rotgut off.
- Adaptational Ugliness: While its original appearances as a giant leech-like mouth and a rotten heart weren't particularly attractive, its new appearances in Repentance are significantly more disturbing.
- All There in the Manual:
- The maggot fought in the second phase is named "Gus" according to the Antibirth devs.
- According to one of the developers, it's either a huge Fatty that was fused to the floor, or an undead version of It Lives.
- Body Horror: It's a rotten, deboned monster with a giant maggot and a rotten... something inside. That's not something that should be inside anyone's body.
- King Mook: Gus, the giant maggot that serves as Rotgut's Phase 2, is one to Spitties. It most closely resembles the Tainted Spitties seen during the Ascent.
- Mook Maker: The first phase can vomit out Globin and Glazing Globin goos along with Small Maggots, the second phase can shoot out Attack Flies, and the third phase can shoot out Leeches.
- Sequential Boss: Has three separate phases. First it's a fight with the creature itself. Once that's defeated, it eats you and you kill a maggot in its gut. Then you kill it by destroying an organ deeper inside that looks suspiciously like a ballsack.
- Stationary Boss: It can't move in any of its three phases.
- Swallowed Whole: After defeating the first phase, it sucks you in with its Vacuum Mouth and you have to kill a giant maggot and Rotgut's core.
- Took a Level in Badass: Its third phase is considerably harder than it was in Antibirth, firing a lot more bullets than before.
- Unexpected Gameplay Change: The second and third phases use Crawl Space physics and controls, turning the game into a 2-D platforming shooter.
- You Don't Look Like You: The only boss returning from Antibirth to get a major redesign. Its current design looks like a rotten face with no skull inside, and the final phase replaces the heart with a strange organ that looks like a ballsack. Only the maggot in the second phase is unchanged.
The Harbingers
- Combat Breakdown: Interestingly, most of the Horsemen actually get easier in their second phases, usually due to you destroying parts of them. The main exceptions are Famine, who switches to a Spread Shot that isn't much easier to dodge than his charge and Pooters, and Conquest, who never changes behavior.
- Pestilence is reduced to spitting Attack Flies after losing his head, whereas his first phase spawns Chargers.
- War loses all of his existing attacks after his horse is destroyed, at which point all he does is run at you. And he frequently gets knocked down while you're firing on him, cutting his combat potential even more.
- After jumping off his horse, Death's only attack is to spawn Knights which, more often than not, get run over by said horse. The horse itself also follows a much more predictable pattern than his first phase's scythes and Hourglass.
- Degraded Boss: All four harbringers appear as boss enemies in Cathedral and Sheol onwards.
- Heel–Face Turn: The 7 Seals item will spawn a lil harbinger familiar that cycles between the five horsemen and spawns locusts based on the current horseman.
- Horsemen of the Apocalypse: The very same (except the Headless Horseman). Like many portrayals, Pestilence initially took Conquest's place before Conquest himself was added.
- Offscreen Teleportation: Most of them charge against you through the screen and return from the other side. Essentially, they're weaponizing the concept of Wrap Around movement.
- Quirky Miniboss Squad: Despite being full bosses in their own right and fought one at a time, they still fit the bill. Their item drops, the Cube of Meat and the Ball of Bandages, become more powerful by collecting more Cubes or Balls from multiple Horsemen, they can be summoned by the Book of Revelations, multiple Horsemen will appear at the same time as normal enemies in later levels, and they're easily recognizable. They also will all appear when fighting two of the final bosses: Mega Satan and The Beast, the later having the Ultra versions of the horsemen.
- Sequential Boss: With two stages. Except for Conquest and the Headless Horseman, the latter being a Dual Boss.
- Signature Roar: The Horsemen that charge at you let out a distinctive shout before doing so.
- Uncatty Resemblance: Each of the Horsemen's horses look similar to their rider.
Famine

The first Horseman, Famine floats around spawning Pooters and charges across the screen if Isaac stands horizontally to him. Upon taking enough damage, Famine's horse and body are destroyed, and his floating head fires a triple shot at Isaac.
- Body Horror: He represents degradation in general, so this is a given. The lack of lips is especially noticeable, making his Slasher Smile all the more deranged-looking.
- Eyeless Face: Downplayed, as he only has small pinpricks in his eye sockets instead of actual eyes, but it's easy to miss.
- King Mook: His second phase has him fighting similar to a Maw by shooting 3 bullets at Isaac and slowly moving towards him, which could also lead to an inverted version of this trope because Maws start naturally spawning in the caves, which is the next chapter.
- Losing Your Head: After taking enough damage, Famine's body explodes, leaving only his floating head. He's reduced to just slowly moving around and firing triple shots at you.
- Mook Maker: Creates Pooters.
- Nightmare Face: Famine's face isn't pleasant to look at, to say the least. His Ultra form somehow has it worse, as he gains a proper Eyeless Face and his Slasher Smile seemingly reaches from ear to ear. And when his body is destroyed, the way his head moves as he fires bullets makes it look like he's laughing maniacally even as you kill him.
- Scary Teeth: His pearly whites are on display, revealing how pointy and dangerous they are. Though he never uses them to attack with.
- Slasher Smile: Famine has this as his trademark.
- Upgraded Boss: Blue Champion Famine shoots out bullets instead of spawning Pooters and will veer towards Isaac while charging. In his second phase, he shoots out a bullet spray similar to Monstro's.
- Warm-Up Boss: As the Horseman of the Basement, Famine has the lowest health and simplest attack pattern out of the Harbingers.
- Wrap Around: Famine charges out the side of the boss room and back in through the other side.
Pestilence

The second Horseman, Pestilence leaves a trail of green creep, creates chargers, and spews explosive green shots that leave creep puddles. His head is destroyed in his second phase, and he spawns flies instead of chargers and fires shots faster but more chaotically.
- Artistic License – Religion: Pestilence is not an official Horseman and was never mentioned in the Book of Revelations, actually making himself and other portrayals of him look more like OCs than canonical Biblical villains since the canon horsemen are Conquest, War, Famine, and Death.
- Body Horror: No eyes, rotting body with swollen parts, filled with explosive, possibly-toxic fluids, and surrounded by maggots and flies.
- Degraded Boss: Like the other Harbingers, he can be found in later floors as a normal enemy after Womb. He can also be found in Corpse, making him the only Harbinger to be encountered in the alt path.
- Green Around the Gills: His entire body is sickly green, swollen, and leaking some sort of disease-ridden fluid. So is his horse.
- Incurable Cough of Death: His hoarse coughs summon flies.
- Losing Your Head: Only the body (still riding the horse) remains after the first part, leaving a gaping hole in his neck where it used to be.
- Mad Bomber: Will vomit up explosive ipecac shots.
- Mook Maker: Chargers and Spitties at first, Attack Flies later. Black Champion Pestilence will spawn Trites and later Spiders instead.
- Upgraded Boss: Black Champion Pestilence leaves white creep instead of green creep and fires six bullets instead of ipecac shots.
- Walking Wasteland: As the personification of disease and toxin, he leaves a trail of creep everywhere he moves.
- Your Head Asplode: When entering his second phase, Pestilence's head detonates akin to an Ipecac shot.
War

The third Horseman, War alternates between charging across the room and filling it with troll bombs. At half health, his horse is destroyed and he chases after Isaac while occasionally stopping to cry.
- Bullfight Boss: After losing his horse, he starts running after you constantly like Lust. He can be momentarily knocked down by hitting him enough.
- Bull Seeing Red: He's red, and his horse has bull horns and charges.
- Mad Bomber: One of his attacks drops bombs randomly.
- Oh, Crap!: After losing his horse, hit him enough times and he'll fall to the ground stunned, with a terrified look on his face.
- Prone to Tears: War bursts out crying after his horse is killed and stops chasing you to cry about it some more after taking more damage.
- Red Is Violent: His entire body is red, being a personification of violence and hatred.
- Upgraded Boss: Gray Champion War has more health and is larger, summons two Mega Troll bombs and spawns a Troll bomb when charging, and shoots out six bullets when stunned.
- Wrap Around: Like Famine, his charge takes him out one side of the room and back into the other. He performs his three times instead of once.
Death

The fourth Horseman, Death spawns scythes that chase after Isaac and uses The Hourglass to slow his movement. In his second phase, he dismounts his horse which charges across the room constantly, while Death spawns Knights.
- Death's Hourglass: A literal example, in that one of his first stage's attacks is to use the Hourglass item on Isaac and slow him down.
- Dual Boss: He hops off his ride on his second stage, which goes on ramming aimlessly while he hovers around spawning Knights.
- Early-Bird Cameo: Death can appear in the Boss Rush, which otherwise only features bosses from before Chapter 4.
- The Grim Reaper: The skeletal kind, complete with black cloak and scythes.
- Mook Maker: Creates Knights, or Maws and Leeches with his Black Champion version.
- Red Eyes, Take Warning: His Black Champion form has glowing red eyes in his sockets.
- Shout-Out: One of his attacks is very similar to one that a certain other Death you may know of uses.
- Sinister Scythe: He can summon flying, spinning scythes to attack.
- Visual Pun: His champion form is black. Reinforced by the enemies summoned by the champion version: the Red Maws summoned by the first form reference the swelling caused by the disease, while the Kamikaze Leeches refer to the use of leeches as a treatment for the blood build-up.
Conquest

The forgotten Horseman, Conquest occasionally replaces Death (War in Wrath of the Lamb). He only has a single phase, and he switches between calling down beams of light or leaving the room and creating an army of clones that all charge at Isaac.
- Be Careful What You Wish For: Some players complained that War was "too easy" for a boss in the Depths.
- Blindfolded Vision: Despite having a blindfold over his eyes, he can see you just fine and charges when you get in his sight.
- Bolt of Divine Retribution: One of only two bosses in the game to summon beams of light from up high.
- Doppelgänger Attack: He can charge across the screen alongside five or so clones. In Rebirth, it's upgraded to about a dozen.
- Genius Bonus: The secret calls him "A Forgotten Horseman", reflecting the fact that he's been replaced by Pestilence both in the game and in nearly every other version of the Horsemen of the Apocalypse. Also, it was replaced because it was too similar to War. Conquest has improved versions of War's attacks.
- Holy Hand Grenade: His beam attack.
- Light Is Not Good: He sports a white blindfold, has an attack involving beams of light, and is a Horseman of the Apocalypse.
- Missing Secret: Weird variation. Conquest does not need to be specifically unlocked, but there is an unused picture for unlocking him. Subverted in Rebirth, where taking ten angel room items unlocks him.
- Shared Life-Meter: During Conquest's Doppelgänger Attack, hitting any of his duplicates will cause damage to the main Conquest. If his health drops to zero during this attack, all Conquests will die at the same time.
- Sixth Ranger: An additional horseman added later. Technically, the original passage from the Book of Revelations likely referred to Conquest, not Pestilence, but the most modern usage of the horsemen ignore Conquest.
- Victor Gains Loser's Powers: Drops his White Pony on defeat.
The Headless Horseman

The Headless Horseman has a low chance to replace any of the Harbingers. He is a Dual Boss between his body and his head, and he uses a combination of attacks from the original four Horsemen.
- All Your Powers Combined: The head has Famine's triple shot and War's triple charge, while the body is Pestilence minus spawning enemies. Plus, you fight two bosses at the same time, which is what happens when Death loses half his health.
- Body Horror: His head appears to be missing his jaw, letting his tongue and blood drop out of his mouth.
- Degraded Boss: The head alone can appear in normal rooms once you reach the Depths. The body can as well starting from Sheol/Cathedral.
- Dual Boss: The boss is split into: his head, that charges and shoots small bullets, and his body, which shoots large bombs and leaves trails of blood.
- Early-Bird Boss: While the Headless Horseman is manageable with a few items, he can just as easily show up in the Basement and wipe the floor with you due to being much stronger than just about any other Basement boss.
- Headless Horseman: Well, yeah.
- Maniac Tongue: Justified. While he's a boss and his tongue always sticks out, he also doesn't have a jaw.
- Victor Gains Loser's Powers: Drops his Pony on defeat.
Shared
The Fallen

A demon that can replace any regular boss after Isaac enters a Devil Room, who drops a random item from the Devil Room pool on defeat. The Fallen fires projectiles or chases Isaac then shoots a 4-way Brimstone beam. At half health, The Fallen splits into two copies of itself which each possess the same attacks.
- Asteroids Monster: After 50% of his health his gone, he splits into two versions of himself.
- Bullfight Boss: Does this when he isn't shooting. The charge is stopped by shooting him enough times or when he reaches you, after which he'll shoot blood in every direction.
- Degraded Boss: In Sheol. He's later fought at full strength when the Satan fight begins.
- Dual Boss: A Double Trouble boss room in Womb or Utero can contain two Fallens or a Fallen with Little Horn.
- Early-Bird Boss: He can replace any boss that's not pre-set by the level. If you're really unlucky, he can appear as early as Basement 1, which in most cases is long before you can get access to any of the more powerful items. Thankfully, Rebirth toned this down and made him nearly impossible to encounter before Caves 1 (the only way is a Red Chest taking you to the Devil Room and you getting ultra unlucky).
- The Dragon: To Satan. He even acts as the first stage of his master's boss fight!
- Fallen Angel: It's in his name, after all. It's especially apparent when he precedes his master, Satan.
- High-Pressure Blood: He shoots Brimstone lasers in all four cardinal directions simultaneously for one of his attacks.
- Nerf: In Rebirth, The Fallen's health scales based on the floor, making him significantly weaker on early floors. Additionally, he now only appears if you've been inside a Devil Room previously.
The Legend of Bumbo
Loaf
- Bad Boss: He'll stomp across the battlefield, crushing and killing his own mooks without any regard.
- Flunky Boss: Spawns Dips and Corn Dips.
- Talking Poo: Well, he doesn't talk, but he's a giant monstrous humanoid poo.
- Toilet Humor: A poop-themed enemy named Loaf. Definitely something to expect in a Binding of Isaac installment.
The Duke
- Suspiciously Similar Substitute: He's this game's version of The Duke of Flies, even boiling down to having almost the same name. Although, unlike his predecessor, he shoots out bullets.
- Flunky Boss: Just like The Duke of Flies, he'll spawn flies between attacks.
Peeper
- Eye Scream: His eyes are detached from his body and you can hit it to make it switch lanes.
- Expy: He's pretty much a skinny version of The Bloat, whilst also borrowing Peep's name. Although he lacks the brimstone lasers and jump attack, his eyes are always detached and he shoots out bullets.
- Red Eyes, Take Warning: If one of his eyes turn red, that means it's about to attack you.
Shy Gals
- The Dividual: There's three of them, though you only have to defeat one to defeat them all.
- Creepy Twins: Well, Creepy Triplets.
- Expy: Of Shy Guys. They also bear some similarities to Mask of Infamy.
- Same-Sex Triplets: They're all referred to as girls.
- White Mask of Doom: Which protects them, unless you manage to knock it off.
Dusk
- Speed Blitz: He has quite a lot of movement points, starting at the end of the room and being able to move all the way up and attack you in one whole turn. Be prepared to protect (or heal) yourself when fighting him.
Gibs
- Blob Monster: A giant cube of green slime containing organs.
- Dem Bones: Among the organs suspended in its body include some bones and a skull serving as its face.
- Flunky Boss: Spawns small goo enemies.
- Sickly Green Glow: It appears to be glowing, although it's most likely light reflecting through it.
Gizzarda
- Dem Bones: A skull and some bones inside some weird rotting purple goop…
- Flunky Boss: She's a boss who spawns flies.
- Mighty Glacier: She only has one movement point, but has high health and can resist certain attacks each turn. She also counterattacks every time you hit her, unless she's boogered up.
Sangre
- Attack Its Weak Point: The red, glowing heart within its ribcage, which has to be exposed in order for you to hurt it.
- Dem Bones: It's a floating skeleton with a heart.
Pyre
- Flaming Skulls: It's one giant flaming skull that glows different colors.
- Puzzle Boss: You must match tiles based on the color of its fire to beat this boss.
Bygone
- Body Horror: A still-animate, half-rotten corpse that's host to a swarm of flies. Gross.
- Deep Breath Reveals Tension: Bygone's ghost has an idle animation that makes it look like it's struggling to breathe. Seem familiar? It should.
- Flunky Boss: Spawns flies and is on this page for a reason.
- Final Boss: For The Legend of Bum-bo.
- Our Ghosts Are Different: The ghost that spawns during its second phase, which bears a resemblance to The Lost and Delirium (albeit less "melty").
- Undead Counterpart: Bygone is yet another incarnation of ???, the Blue Baby.