The Legend of Zelda: A Link Between Worlds (Triforce of the Gods 2 in Japan) is the 17th installment in The Legend of Zelda series, released for the Nintendo 3DS in 2013.
As indicated by its Japanese name, the game is essentially a sequel to A Link to the Past, albeit set many generations later. Chronologically, it takes place after Link's Awakening and the Oracle games, but before the original game and featuring a new Link. This makes it the 7th game in the "Hero Defeated" branch of the Hyrule timeline leading to the NES games. Shigeru Miyamoto was directly involved in the production, in contrast to the other post-Ocarina of Time games being handled more by Eiji Aonuma.
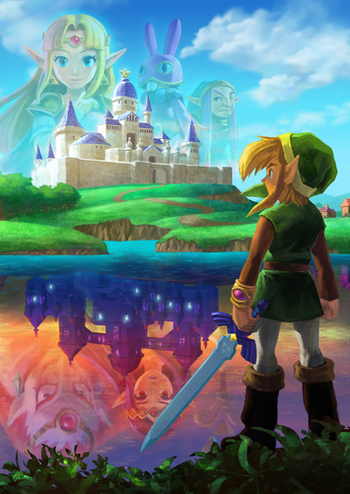
Although Hyrule appears similar to A Link to the Past, it is set long after that story and features a brand new Link. The plot sees this Link, an apprentice to a blacksmith, encountering an Evil Sorcerer named Yuga who is traveling across Hyrule turning people into paintings. With help from Princess Zelda, the elder Sahasrahla, and the seedy rabbit-costumed merchant Ravio, he embarks on a quest to halt Yuga's reign of terror. His journey eventually brings him to a Mirror Universe with a decaying kingdom called Lorule (a land similar to the Dark World from its predecessor) ruled by Zelda's Alternate Self, the somber Hilda. Satoru Iwata has hinted at the existence of a "mirror" of the Triforce within this world, which shows up on the game's logo as an inverted black Triforce.
The game once again features Dual-World Gameplay, though this time Link travels back and forth between Hyrule and Lorule. He is aided in his quest with a magic bracelet that gives him the ability to turn into a 2-dimensional painting, letting him walk along walls and enter narrow openings. The open-ended nature of the original NES game makes a return (which would be expanded on significantly in The Legend of Zelda: Breath of the Wild), and in a twist on the traditional Zelda Dungeon Crawling formula, after a certain point in the game, you can complete the dungeons in any order you want.note This is done thanks to a shop owned by Ravio, where you can rent and eventually purchase various items depending on which is needed to enter a particular dungeon.
The Legend of Zelda: A Link Between Worlds features these tropes:
- 11th-Hour Superpower: The Bow of Light. Unlike the other games, you can only use it against Yuga while merged in a wall.
- 20 Bear Asses: Making any potion other than the red ones requires the collection of ten of a certain type of monster part per dose. Justified as said monster parts are ingredients for the potion.
- Ability Required to Proceed: Much less prominent in this game when compared to others in the series, thanks to the non-linear progression of its story. However, reaching the whereabouts of Desert Palace still requires a specific item (the Sand Rod) that can only be rented (and potentially purchased) after the completion of another dungeon (Thieves' Town).
- Adipose Rex: Oren, the Queen Zora. At least until you find her Power Limiter.
- Affectionate Parody: Ravio pokes fun at standard player behavior — he's awkward, self-centered, and obsessed with hoarding money. (He's even carrying a comically-oversized rupee sack in the ending!) A sharp-eyed player will also notice that he destroys all the pots in Link's house after "renovating" it. The comparison becomes even more obvious when he's revealed to be Link's Lorule counterpart. This is all Played for Laughs, of course.
- A.I. Breaker: Done with the optional Dark Link fights of varying level. At high levels, Dark Link gets close to perfect play, but can't handle the boomerang's return trip.
- Alien Landmass: The world of Lorule is literally falling apart at the seams, and is crossed by deep chasms where the land falls away into an endless black abyss dotted with crumbling chunks of the landscape and waterfalls endlessly pouring the waters over the cliffs.
- All Your Powers Combined: The villain Yuga, who uses the power of the sages (who are all color coded, even their frames in painting form) to summon the power of Ganon with a portal made of pretty rainbows.
- Already Undone for You: You see Osfala enter the Eastern Palace immediately before you enter it, yet you'll find all the traps and puzzles seemingly untouched as you follow him all the way to the final room. He apparently went through with just the Sand Rod, which sorta explains why none of the traps have been altered (none involve using the Sand Rod) but leaves the bigger question of how he was able to traverse the dungeon at all.
- Alternate Self: Hilda for Zelda, Yuga for Ganondorf, and Ravio for Link. Heck, almost everyone in Hyrule has one in Lorule, and vice-versa, with the exception being the sages themselves.
- American Kirby Is Hardcore: The game has a more colorful box art,
 while the American box art uses the same picture with a gold and black color scheme. The latter was also used in Europe, although the European Collector Edition features a reversible cover with the original Japanese illustration.
 - And I Must Scream: The Priest, Gulley's parents, and the Witch all have their children/grandchildren transformed into paintings and kidnapped by Yuga. While the Priest and the Witch saw him but were powerless to stop him, mind you. Gulley's parents aren't aware of it until Link saves him and reassures them that he's OK, but until then, they're very worried. This is only compounded with how Gulley is an outgoing child who likes to go to a grove, surrounded by monsters who attack on sight, suddenly disappears.
- Antepiece: The game revolves around a mechanic that allows you to merge into walls and travel along them. The boss of the Thieves' Hideout dungeon must be defeated by merging into his shield, waiting for him to hold his arms out while looking for you, and then emerging and hitting him in the back. This would seem unintuitive, since shields aren't walls. Fortunately, a hallway earlier in the dungeon is lined with those same shields, and they have hearts or rupees drawn on them, indicating that you can merge into the shield to collect them. Also, immediately before the boss, there is another shield moving back and forth across a gap, which you must merge into in order to get to the treasure chest containing the Big Key (required to even access the boss).
- Antlion Monster: Antlion-like enemies called Devalants in the Sand Palace Dungeon. They bury themselves and create sand vortexes that they're visibly at the center of, and they try and get you to fall into. Some also shoot fireballs. You defeat them by using the Sand Rod to get them above ground, then attacking them.
- Anti-Frustration Features:
- You no longer have to collect arrows, bombs, or magic, as nearly all the items simply run off of your (rather quickly replenishing) stamina meter, making a host of puzzles much, MUCH easier. To make things simpler, some dungeons have purple potions that instantly replenish this meter, to avoid situations that would otherwise just require wasting time.
- Certain tasks in the game become easier if you fail them the first time. For example, if the thief girl gets caught during the Escort Mission, fewer enemies will spawn when you retry, and the ones you already beat don't come back.
- If you fail the ghost chase in The Lost Woods, you will start out with fewer ghosts up to two times.
- The ball hones in on the crows in the baseball minigame.
- The Fast Travel system (Irene's broom) is introduced very early on, making it much easier to get around the overworld.
- The Maiamai Map tells you how many Maiamais are left in a particular area of Hyrule or Lorule.
- If you happen to beat a boss while standing right where the Heart Container appears you won't collect it immediately. While it may not have been the intention, this can help players doing low health runs.
- If you merge with a wall to escape a Wallmaster, it will slam its palm down immediately (and miss because you're 2D), sparing you the sometimes-lengthy wait for their attack that you'd otherwise have to endure.
- Anti Poop-Socking: If you make a good deal of progress in one go, generally triggered by getting a full heart container, the nearby weather vanes will start shaking, flapping their wings, and making noises to direct your attention to them so that you won't forget to save and lose it. Alternatively (or sometimes as well), playing roughly for an hour straight will make them suggest taking a break when you save, complete with a Beat in between. Irene will also pipe in on the subject, saying that Link looks tired.
- Apocalypse How: The Loruleans rejected the gift from the gods and opted to completely destroy their Triforce. While this was done with the best of intentions to prevent further warring over and abuse of its power, this inadvertently caused Lorule to begin to crumble without the protection of their Triforce to hold it together. They didn't understand that the essence of the gods is literally the foundation of their creation that prevents it from reverting back into the chaos it once was. As the generations went by, Lorule fell further and further into disrepair and edged closer to its doom. It is unknown how it would have affected Hyrule, but at least Lorule would have eventually completely died out had Link not intervened.
- Arc Welding: This game came out after the Hyrule Historia finally nailed down a canon timeline, but in the process placed the original Legend of Zelda after Link to the Past. This creates a problem because Ganon was destroyed in Link to the Past, but is back on his feet for Legend of Zelda. Furthermore, in The Legend of Zelda, the Triforce has been split into three pieces with the Triforce of Courage having gone missing, but it was whole at the end of Link to the Past. This game takes place between the two games, thus Ganon's revival at the hands of Yuga and Yuga's subsequent defeat allows an excuse that Ganon wasn't completely destroyed and remained alive in the Dark World, and also explains that at the end of Link to the Past, Ganon got one piece of the Triforce, the royal family got another, and the third piece has vanished to reappear when the legendary Hero is needed again.
- The Artifact: While religious references are fair game for Nintendo in 2013 (and there are quite a few in this game, to the point that Lorule abandoning its gods is a major plot point), some bits of SNES-era censorship remain from A Link to the Past, likely for consistency purposes. The Sanctuary is still a "Sanctuary" rather than a church, and the dungeons are labeled as "Palaces" rather than "Temples" like in other games.
- Artifact Mook:
- Lorule has enemies from the Dark World of A Link To The Past where in that game, they were strongly implied to be the transformed forms of those who ventured into the Dark World without the protection of the Moon Pearl. Their presence in Lorule, essentially a dystopian Parallel Universe to Hyrule, makes little sense from an in-universe standpoint beyond adding on to the already dark atmosphere.
- Soldiers are once again enemy units in the game in spite of the Hyrulean forces not being Brainwashed and Crazy as in A Link to the Past. Handwaved in that they're conjurations made by Yuga to keep the kingdom distracted, but it's not explained why he chose to make enemies based off the old Hylian guard uniform.
- Art Initiates Life: The paintings of the armored guards throughout Hyrule are brought to life by Yuga's magic.
- Artistic License – Physics: Lorule Castle has a portion which requires Link to move spiked balls out of his way by letting other spiked balls roll into them. As anyone who knows the basics about collisions (or even has just played pool) knows, the rolling ball should stop after hitting the stationary ball, which would leave Link just as stuck as before.
- Ascended Glitch: The Ghost of the Misery Mire from the original SNES version of Link to the Past returns, now as full-bodied shallow water Kus.
- Asteroids Monster: Two giant Bari encountered as minibosses split into fifteen Biri each.
- Attack the Tail: Like in A Link to the Past, the tail is Moldorm's weak point, as all attacks from Link to the rest of the body will simply be bounced or repeled.
- Battle Theme Music: Among many other nods to A Link to the Past, the game brings back the classic boss theme from that game for the Hyrule bosses (except Yuga, who uses a Boss Remix of his Leitmotif for his boss fights), now with a modern remix. But in a twist, the Lorule bosses use a brand-new theme (though its instrumentation and some of its cadence are derived from the Hyrule boss music). The game also has a theme for the enemy ambushes in the dungeons, as well as one for the minibosses. In the first phase of the Final Boss battle, Yuga's merged form with Ganon gets a theme that merges the latter's A Link to the Past boss music with his own leitmotif; in the second phase, they get an extra theme that incorporates Zelda's Lullaby into the mix. Lastly, the Dark Link fights that can be obtained via StreetPass play a Boss Remix of the dungeon theme from Zelda II: The Adventure of Link (which makes sense, as that was the debut game for Dark Link himself).
- Beautiful Dreamer: There's a reason Zelda wakes up before Link when they return to Hyrule in the ending.
- Bee-Bee Gun: Bees can be used as supporters in battle, but without the normal and golden bee distinction from its SNES predecessor. Regular bees appear and attack you when you cut tall grass, but you can catch them in a jar to use as a weapon for later. They will target a single enemy and sting them until they die, and will fly away once their target goes down.
- Before the Dark Times: Princess Hilda says that "Lorule was just like Hyrule. So very beautiful. So very... promising". This was before all the events that let Yuga make it a haven for monsters. Hilda even tells Zelda that she has to borrow Link to save her kingdom because all of Lorule's native heroes are long gone. It turns out the kingdom's decay started well before any of this: Lorule had its own upside-down Triforce that was just as much an object of greed as its Hyrulean counterpart. The key point where they diverged from Hyrule is that, in order to keep it out of the hands of evil people, they destroyed their Triforce rather than seal it away. They found out the hard way that this was the equivalent of tearing the glue out of a wooden model, and Lorule started crumbling apart as a result. The whole Evil Plan seen in A Link Between Worlds was actually formulated by Hilda as a way of taking Hyrule's Triforce to replace their own.
- "Begone" Bribe: An exchange with a Hinox is spelled out and Link can choose how much to blackmail the enemy for. Ask for too much, and the Hinox attacks you.
- Big Bad: Yuga. Double Subverted. He's actually The Dragon to Hilda, the main antagonist, but he betrays her and gets the Triforce pieces for himself; he had been using her and her kingdom's plight from the very beginning.
- Big Boo's Haunt: The Dark Palace, which not only a much scarier atmosphere but also has many pitch-black rooms and spooky enemies like Poes and Ghinis, as well as a sinister background music.
- Big Damn Heroes: After the final boss fight in Lorule Castle, Princess Hilda makes one last attempt to get Link to give her the Triforce by refusing to release Zelda from her picture frame prison unless he does. However, Ravio appears to talk Hilda down.
- Bigger on the Inside: All of the buildings, especially the dungeons. Gets strange when there are points in certain dungeons where you go outside — but it's still counted as an area "in" the dungeon, and thus subject to the same scale.
- Blackout Basement: There are once again caves and dungeons that are pitch black except for a dimly-lit circle around Link, when he has the lantern equipped. In the Dark Palace, snuffing out the torches reverses the effect for invisible platforms and walls, which glow in complete obscurity (meaning your lantern makes them invisible, looking like a dark circle around Link).
- Bleak Level: Much of Lorule, due to its decrepit state when compared to Hyrule, but further exemplified with Skull Woods, which is filled with skulls and undead enemies.
- Bombardier Mook:
- Zirros, enemies found in Lorule, are flying creatures resembling mushrooms with wings and attack exclusively by spitting bombs at Link. They normally stay well above Link's head, dipping down only to deliver a payload, and will retreat if Link approaches them, making dealing with them tricky.
- Keeleons float high in the air and periodically drop bombs down towards Link. Link must use the Fire or Ice rods to take them out, as their attacks are the only ones that reach high enough to actually touch the floating creatures.
- Boss in Mook Clothing: The Ball and Chain Soldier, like in A Link to the Past. The game even includes one with a flaming ball and chain in a final dungeon Boss Rush where the other three you fight were the official bosses of their previous dungeons.
- Boss Remix: Yuga is fought to a remix of his leitmotif.
- Boss Rush: The final dungeon, Lorule Castle, has Link battle retreads of two bosses, a miniboss, and a Boss in Mook Clothing.
- Bowdlerise: Much less prominent in this game than in A Link to the Past. It lets the priest stay a priest this time (that the plot of the game involves actual sages must have helped), but the Sanctuary is still referred to as such and references to prayer were changed to "morning preparations"; the term and concept of "gods" is used liberally, in keeping with other modern Zelda games and their mythology. Temples are called "palaces" again, but that at least may be for continuity reasons.
- Breaking the Fourth Wall: Maiamais will sing to the Item Get! jingle when they're collected.
- "Bringer of War" Music: Like in A Link to the Past, the Death Mountain theme opens with militaristic staccato beats, giving it a warlike energy evocative of "Mars".
- Brutal Bonus Level: Treacherous Tower, Lorule's equivalent of the Tower of Hera. It has up to 50 floors of enemies you have to defeat in large groups, acting like the Savage Labyrinth and Cave of Ordeals from other Zelda games (though this one can be made easy by first unlocking the Great Spin).
- Bubblegloop Swamp: The game brings back the Great Swamp from its predecessor (A Link to the Past), as well as its corresponding Lorule equivalent and subsequent dungeon. However, in the absence of the Misery Mire dungeon in Lorule, the Swamp of Evil adopted its name, and instead of a dungeon it has a large, sandy battlefield where the boss of Desert Palace (from Hyrule) is fought. This means the resulting Misery Mire is a Hailfire Peaks mixture between Bubblegloop Swamp and Shifting Sand Land.
- Bug Catching: Like in A Link to the Past and Skyward Sword, the Bug-Catching Net can be used to capture bees, as well as fairies.
- Bullet Hell: Cuccos, of course. They are now a Mini-Game. Getting the heart piece is easy. The crazy 100% Completion Bragging Rights Reward is to do "Endless Mode" for 999 seconds (about 16.6 minutes) perfectly. This causes the farm girl giving Link the quest to call him the Cuccomaster and presents a giant Cucco that replenishes Link's hearts at her ranch anytime he visits. And this minorly changes the ending.
- Bullfight Boss: Knucklemaster, the boss of Skull Woods, attacks by closing into a fist and firing itself at Link. The easiest way to dodge is by merging with the wall it runs into.
- But Thou Must!:
- Dampé will ask you to use the Captain's sword in order to save Seres until you accept.
- The same happens when Ravio asks you to borrow your house.
- By the Lights of Their Eyes: Some of the Eyegores that function as a Mini-Boss are in unlit rooms. Their eyes light up and act like a flashlight in front of them.
- Call-Back:
- The intro retells the events of A Link to the Past.
- Much like in A Link to the Past, you must collect the Pendants of Courage, Power, and Wisdom to unlock the Master Sword in the Lost Woods.
- Call-Forward: After rescuing her and later finding her in a cave, the thief girl gives you 100 rupees and says, "How about we just keep this a secret to everybody." The "secret to everybody" line is also said by a hiding Hinox if you talk to him after he has bribed you.
- Canon Immigrant: In a matter of speaking. The song played during racing and Cucco Ranch minigames is actually a remix of the Time Attack theme from Nintendo Land's Legend of Zelda: Battle Quest mode.
- Carbuncle Creature: The Gemesaur King, which looks and acts much the same as its predecessor from A Link to the Past, with the exception that while the Helmasaur King is red with a green gem the Gemesaur King is dark grey with a red gem-like organ.
- Cardboard Prison:
- Getting caught by the cult around Dark Palace has Link thrown into a cell in the middle of the courtyard he's trying to sneak through. Because the game's whole gimmick is turning into a painting and maneuvering across walls, Link can walk right out. Justified in that, if it weren't for that gimmick, it would be impossible for Link to get out.
- Zigzagged with the Thief Girl; she is placed in a locked jail cell when Link first meets her, but if she gets captured during the Escort Mission, she is put back in that same now-unlocked cell, and the guards don't bother to lock the door again.
- Cash Gate: The game has a few instances of this, but mainly in the form of Link's arsenal: most of the his items, which are necessary for beating dungeons and traversing the overworld, must be purchased from Ravio. If you're confident in your ability to not die at any point in the game, you can simply rent the items instead for lower prices, though you trade-off the ability to upgrade them in the process.
- Casting Gag: Ayumi Fujimura goes from voicing Fi in Skyward Sword to voicing Princess Zelda herself in this game.
- Casual Interstellar Travel: The powerfully magic Mother Maiamai explains to Link that she and her many children were on a great voyage through all the worlds until they happened upon the heavily unstable Lorule. The dimension is on the verge of collapsing, thus Mother Maiamai was separated from her children between Hyrule and Lorule. She pleads for the hero to find and rescue her scattered babies.
- Chaos Architecture:
- In a bizarre aversion, this is the first Zelda game ever to have the same geography as a previous titlenote , although Ocarina of Time and the Nintendo GameCube version of Twilight Princess have some subtle similarities.
- There are still some weird differences between Lorule and the Dark World, such as Turtle Rock and the Ice Palace being swapped. Then again, the two are separate places that just happen to resemble each other strongly.
- Played straight with the interiors of the Hyrule dungeons, although no one expects to do the same puzzles again.
- Cheated Angle: In order to emulate A Link to the Past's art style in 3D, namely the lack of perspective and characters being fully depicted from the side despite being seen from above, typical for most 2D top-down games, all assets in the game are actually tilted away from the camera. Since the camera always pans at the same angle, this trick is barely noticeable and surprisingly effective, as demonstrated here◊. Interestingly, you can actually notice it if you wall-merge next to certain objects or set pieces, but it's only really noticeable if you're looking for it.
- Checkpoint Starvation:
- Definitely something the
 first-time player will discover on Death Mountain if they go out of their way to grab a Piece of Heart and an empty bottle early in the game. They will have to contend with moving platforms over fiery molten rock chasms. Plus encounters with multiple Lynels, centaur-like beings that resemble fire-breathing lions, that take off three hearts per hit (twelve hearts in Hero Mode). These factors can easily screw up your no death run.
 - In the Thieves' Hideout, unlike the other dungeons, you can't leave to save before the boss because the entrance closes shut when you pass by with the girl, which means if you lose to Stalblind, you'll have to do the Escort Mission all over again. And if you leave the dungeon with a Scoot Fruit, you still have to do the Escort Mission again.
- Definitely something the
- Chekhov's Gun:
- When Yuga turns Seres into a painting, he says how "her grace" will be pleased. It is a quick hint to the fact Hilda is in on his attacks.
- The musty old bracelet Ravio gives Link in exchange for letting him stay in Link's house. After Yuga turns Link into a painting in the Eastern Palace, the bracelet allows Link to escape... and gives him the power to enter and exit walls at will.
- The whole monster mask cult ("mumbo jumbo, mumbo jumbo...") apparently got started by Sahasrahla's Lorule counterpart as a way for the Loruleans to cope with their kingdom falling apart and keep from descending into thievery and other forms of wickedness in their despair. These monster masks are based on the monster forms that people stuck in the Dark World would take in A Link to the Past. Ravio is dressed as a rabbit, the form Link took in that game before getting the Moon Pearl, which foreshadows the fact that he is Link's counterpart in Lorule. Furthermore, it also foreshadows his role as a Defector from Decadence, since Hilda and Yuga, two Loruleans who don't wear monster masks, are the main villains whose plan he wants no part of.
- Chest Monster: Some Like Likes disguise themselves as Red Rupees.
- Circling Birdies:
- Happens to Link when Yuga avoids his attack, causing him to run into the wall Yuga became a painting on.
- Done for comedic effect at the end when Ravio's bird friend Sheerow flies circles around his head after the former is knocked on his ass by an earthquake.
- Climax Boss: Yuga, appearing in Hyrule Castle as a boss with a very similar backstory and battle to Agahnim in A Link to the Past. It's after he's defeated that Link actually learns about Lorule and the captured sages.
- Collection Sidequest: Maiamais. Every ten you collect will let you upgrade an item (provided you've bought it from Ravio, rather than merely having rented it). Collecting all 100 unlocks an upgrade for your Spin Attack.
- Color-Coded Characters: The dialogue boxes of certain characters are colored differently from the standard brown. The Sages' are the same as the paintings they become trapped in, Zelda's are yellow, Hilda's are gray, Ravio's are purple, and Yuga's are black with moving scribbles in the background and yellow text.
- Continuing is Painful: If you die while you have a rented item, you have to rent it again. The game also returns Link to Ravio's shop if he dies on the overworld (even in Lorule) and, though an option to restart in a dungeon is available, it's best to go back there anyway unless you own the item needed.
- Common Place Rare: Lampshaded. The vendor selling a bottle for a high price is noted by a nearby shopkeeper to be a charlatan, and one character gives you a bottle after he's done using it with the expectation that you'll throw it away.
- Continuity Nod:
- The first artwork image of Link revealed portrays him similarly to how he appears in A Link to the Past, whereas the later artwork first shown in an August 7 Nintendo Direct clip seems to be inspired by the Oracle games.
- Gulley's reason for not knowing what saving is? "I'm just a kid."
- The overworld music for Lorule is the Dark World theme from A Link to the Past.
- And the theme of the Treacherous Tower is an arranged version of the "Dark World Dungeon" Theme, also from A Link to the Past.
- Once again, the bug-catching net can be used to reflect projectiles in the final battle.
- The theme that plays in the Seven Sages' chamber is a remix of the theme that played in the location of the same name in Ocarina of Time. And speaking of that game, its Game Over theme is used in this game as well, followed by a remix of the Game Over theme from the original game.
- The jingle that plays after saving a game is the flute melody from A Link to the Past — fitting, since the save points are weather vanes exactly like the one that gives the flute its power in that game.
- The palace theme from Zelda II plays whenever you battle someone's Shadow Link.
- Whenever Link leaves the Sacred Realm, the Seven Sages strike the same poses as the ones from Ocarina of Time, when they sealed away Ganon.
- A few of the lost Maiamais are found where there were warp vortexes in A Link to the Past.
- One Lorule shopkeeper will mutter "Ay lliw nihtemos yub" under his breath, whether you do buy something or not.
- One of the songs the Bard in the Milk Bar will play is the Ballad of the Goddess.
- Link is closely associated with the local blacksmith.
- Yuga, much like Ghirahim before him, hums his own leitmotif.
- The shopkeeper on the west side of Lake Hylia is a Suspiciously Similar Substitute to one of the merchants from the original game. It isn't immediately obvious, though, as his design is based not on the sprite, but the artwork from the original game's manual.
- When Link obtains the Triforce of Courage, he does the same two-handed Item Get! pose he did when obtaining a Triforce Piece from the original game.
- Continuity Snarl:
- The intro claims that the Triforce was split and its parts went to their respective owners after Link made a wish at the end of A Link to The Past. However in the Oracle games, which take place between these two games in the timeline, the Triforce is whole and at the castle. Other differences in historical events imply that either this game is actually making reference to unshown events or historical records have been compromised.
- The sages - often said to be descended from each other - feature various races found in Hyrule, including a Zora. This is consistent with Ocarina of Time, but not A Link to the Past, where all the sages were Hylian.
- Conveniently an Orphan: Potentially applies to the entire main cast. Both Link and Zelda are (probably) young teens with no parents in sight, and it's safe to assume that Ravio and Hilda are in the same situation.
- Cosmic Keystone: The Triforce. Specifically Lorule's Triforce, which was destroyed by Princess Hilda's ancestors generations ago. Though they had good intentions in doing so (wanting to stop the constant fighting over its incredible power), they didn't realize until it was too late that the Triforce's existence kept their entire world from slowly crumbling into oblivion.
- Crapsack World: Lorule is a dark, gloomy land, there are gigantic chasms all over the place, and everyone is grouchy and miserable. Fortunately, this is undone when Lorule's Triforce is restored.
- Cute Monster Girl: Oren the Zora Queen used to be this; her role as Adipose Rex is only shown because her Power Limiter is stolen.
- Cute Witch: Irene, who gives Link rides around Hyrule.
- Damn You, Muscle Memory!:
- Remember playing A Link to the Past? Not only does the Nintendo 3DS have the exact same amount of buttons as a Super Nintendo controller, it replaces where you dash from, you also use two items, and the start button is now pause instead of "Menu".
- Remember swimming in Link's Awakening and the Oracle games? A to swim faster and B to dive, right? For no reason at all, these are now swapped: Expect to dive unexpectedly a lot while trying to move faster.
- Damsel in Distress:
- A young thief girl is imprisoned in a monster's lair operating in Thieves' Town. After a grueling marathon to get her to safety, the resident "Boss", Stalblind, hinders their progress, refusing to let the girl go, and mocks her for actually thinking she was home free. The demon then proceeds to battle Link.
- Princess Zelda, who is captured by Yuga in a painting so he can claim the Triforce of Wisdom, and is kept by him within Lorule Castle.
- The Sages likewise are also trapped within painting by Yuga, but after he claims the Triforce of Power, he scatters them across Lorule and within dungeons guarded by fearsome monsters.
- Darker and Edgier: While the game is rather lighthearted, it features a Tragic Villain whose actions and motivations bring up some darker and more complex themes than its predecessor, in line with the more plot-driven 3D entries.
- Dark Is Not Evil:
- The Lorulean counterpart to the Bee Guy is the Devilish Girl. The only thing that could hint towards her being evil are the fact that she resembles a demon and the fact that she doesn't expect the ones taking on her challenges to survive (although she's genuinely amazed if you do manage to beat them).
- Lorule itself and Princess Hilda are also a case of this. Lorule isn't an evil place, it's just an Alternate Universe version of Hyrule, that is in a bad state of disrepair because its Triforce was destroyed. Hilda isn't evil either, just desperate...without the wisdom to find another way, she became a Well-Intentioned Extremist.
- Dark Reprise:
- The Lorule equivalent to Hyrule Castle uses a darker version of the latter's theme song as its own, and it builds with each defeated boss.
- A harsh-sounding organ version of "Zelda's Lullaby" plays when Yuga turns her into a painting.
- Dark World: Although Lorule isn't the Dark World from the original game, it's very similar.
- Deadly Dodging: Merging into the wall as a painting can serve as this, making the painting immune while the opponent ends up hitting the wall when they charge. It's first performed by Yuga, where Link ends up knocking himself out, but then Link can use the merge tactic against Knucklemaster to stun it by tricking it into punching the wall.
- Death Glare: Hilda flashes this at Link when she reveals she plans to steal Link's Triforce of Courage to save her kingdom. A severe Out-of-Character Moment for an Anti-Villain.
- Death Is a Slap on the Wrist: If you managed to buy Ravio's items, then you won't lose them upon defeat. Ravio even jokingly encourages you to get defeated as many times as you please when you buy an item for the first time.
- Death Mountain:
- In Hyrule, a "drier" variety than Lorule's, with occasional sections involving lava.
- In Lorule, snow covered variety.
- Degraded Boss: This occurs with Moldorm and Arrghus, who go from dungeon bosses to mini bosses later in the game (both appear in Lorule Castle, and the former also appears as the 'boss' in the enemy gauntlet of Treacherous Tower).
- Demonic Possession: Inverted! Yuga merges with Ganon to obtain the Triforce of Power. Afterwards, he is in complete control.
- Demoted to Extra: The game does this to Ganon. While he has a major influence on the backstory by virtue of his role in The Legend of Zelda: A Link to the Past, this game sees him quickly revived by and then fused with Yuga, who did all this just to get the Triforce of Power. After said fusion, his only real role in the plot is as a collective unit with Yuga. On top of that, he doesn't have a single line before the fusion.
- Descent into Darkness Song: Lorule Castle's theme adds more and more to it as you progress, but as you get closer to the end, you hear Ganon's theme as a bit of a bridge in the tune.
- Detachment Combat: Stalblind, the boss of Thieves' Hideout can detach his own head, which will fly around the arena spraying black mist while his body continues trying to chop Link to pieces.
- Developer's Foresight: One of the treasure room features timed gates which the treasure hunters inside hint you have to dash through with the Pegasus Boots. You can also barely pass them if you place upgraded bombs next to the switches. If you solve the puzzle this way, they will praise your cleverness instead of your speed.
- Did You Just Flip Off Cthulhu?: What the early stages of the battle with Knucklemaster can be summarized as. Continuous use of the wall-merging technique makes it appear that Link is in one giant taunting session with the boss of the Skull Woods. The monster cannot even change strategies, and knocks itself out repeatedly, as Link is invincible in a painting-state. When it Turns Red, however, the heat really gets turned up.
- Digitized Sprites: The wild audience of the Treacherous Tower is pre-rendered, to avoid rendering too many characters in addition to the (already numerous) monsters in the arena with you. The effect is somewhat reminiscent of Donkey Kong Country's visuals.
- Disc-One Final Dungeon: The game largely repeats the events of A Link to the Past, and thus Hyrule Castle once more displays the trope after this generation's Link has collected the pendants and Master Sword; it's where the existence of Lorule is revealed and Link first travels there.
- Disconnected Side Area: Despite being of the same general configuration otherwise, Lorule is crisscrossed by enormous chasms, resulting in these. Only two dungeons out of seven share a section of the world map with each other, with those two being located in the section containing Lorule's counterparts to Hyrule Castle, Link's house, and Kakariko Village. The only way to access the different sections before inspecting the weather vanes there is to take a portal from Hyrule.
- Disc-One Nuke: The upgraded Fire Rod shoots a large pillar of fire which deals as much damage as the Master Sword, travels an entire screen's worth of length, can be shot downwards and travel up and down stairs to hit enemies on different heights, and hits enemies several times with a single use, making Hyrule Castle and the Lorule overworld much easier especially in Hero mode. It's available as soon as you finish the three Hyrule dungeons and only requires a modest amount of Rupees (mitigated by Ravio's one-time discount on the first purchase) and finding ten Maiamai.
- Distressed Dude: Osfala, because he's just unprepared when facing Yuga and ends up being turned into a painting. Link later rescues him, and summons him as a Sage.
- Double Meaning: After clearing a certain number of dungeons, we get this, foreshadowing Hilda's plan to steal the Triforce of Courage.Hilda: But I must have courage, or all is lost.
- Double-Meaning Title: In keeping with the tradition set by A Link to the Past, the first Zelda game with a pun (in English at least). A Link Between Worlds, referring to Link traveling back and forth between the two dimensions, and the connection between them (which itself could be the various portals, Link again, the various Alternate Self characters, or the parallel Triforces, which let the Loruleans first know about Hyrule and which serve as the primary driving force of the conflict).
- Down the Drain: The sewers underneath the Sanctuary, which doubles as a Noob Cave. The Swamp Palace is a more classic version of this, requiring Link to lower and raise water levels.
- Dreaming of Things to Come: The game opens with Link having a premonitory dream in which he faces a mysterious shadow. Later, Zelda reveals she had the same dream.
- Dual-World Gameplay: Lorule is this game's version os the Dark World, as its title might hint at. You travel between Hyrule and Lorule through special cracks, which require you to turn into a painting to pass through.
- Dungeon Town: Thieves' Town. Thieves' Hideout is an Elaborate Underground Base.
- Early Game Hell: Hero Mode is like this, since without the unlockable 'mail', you take quadruple damage compared to the normal game and with low hearts, many enemies can wipe Link out in one or two hits. It gets much more bearable when you get to buy the items and stuff after three dungeons... and then goes back to being hell when you enter Lorule. Until two or three dungeons later, when you get things like a more powerful sword, the blue mail, and more hearts.
- Easing into the Adventure: The game's story starts with Link delivering a sword to soldier.
- Easter Egg:
- Having one of the elemental Rods equipped in the X slot when playing the Octoball Derby makes Link use it instead of the stick you normally get.
- There is an alternative version of the Milk Bar rendition of the Death Mountain theme where the flute segment goes crazy and off-tune, likely a scrapped recording that was left in as a joke.
- Elemental Baggage: The Sand Rod can only generate walls of sand if there is actual sand nearby to change. Otherwise, it just causes a small burst of dust to rise up and stun whatever's hit. (The upgrade extends the number to up to eight, but works the same way.)
- Elemental Weapon: There are four Magic Wands Link can purchase from Ravio over the course of his adventure: Ice Rod, Fire Rod, Tornado Rod, and Sand Rod.
- Elite Mooks: The Lynels, which not have a lot of HP but can also inflict a lot of damage to Link. They're still tough to beat after Link gets an armor upgrade.
- The End of the World as We Know It: Prior to the Final Boss battle, it's revealed that Lorule, Hyrule's alternate dimension counterpart, was crumbling away after Princess Hilda's ancestors destroyed Lorule's Triforce. Death Mountain suffers from an everlasting winter, the swamp region is always flooded, constant earthquakes have torn the land apart, and the kingdom is overrun with monsters. Without the Triforce, Lorule would eventually be destroyed. Luckily, Link and Zelda use their own Triforce to restore Lorule's Triforce.
- "End of the World" Special: During the game's ending, Link uses the Hyrulean Triforce to restore the Triforce of Lorule, reversing that world's inexorable decay as a result.
- Enter Solution Here: To get into the Thieves' Hideout, you need to fill in the blanks to some song lyrics. These lyrics are sung by a few people scattered around town, so you need to Talk to Everyone to obtain them.
- Epunymous Title: Following in the footsteps of the original.
- Escape Rope: The Scoot Fruit is a one-use item that returns you to the dungeon entrance.
- Escort Mission:
- In the Thieves' Hideout, you have to escort a girl to the exit and protect her from the enemies who want to put her back in her cell. Although she doesn't fight the enemies, having been stripped of all her gear when imprisoned, she is required to solve some of the puzzles in the dungeon and get to the boss.
- The Bomb Flower is needed to destroy several rocks that impede mission completion, in the Swamp Palace and Lorule Castle dungeons. You have to protect it from enemies while you travel to the location you want to use it in, as even the slightest bump will set it off.
- Evil Is Not a Toy: Yuga attempts to revive Ganon and take control of him. He succeeds, but then Hilda thinks she can use Yuga to revive Ganon and rebuild Lorule with the power of the Triforce. She's very wrong. Yuga had his own plans for world conquest, and turns on her with the help of Ganon's power.
- Evil Learns of Outside Context: Hyrule's alternate-dimension counterpart Lorule suffers a massive civil war that results in the destruction of its own Triforce; since the Triforce is a Cosmic Keystone, Lorule begins to collapse (with the implication that the entire dimension will cease to exist after enough time passes). Hilda, the Princess of Lorule, somehow learns of Hyrule's existence and, in a passionate but misguided move, sends the Evil Sorcerer Yuga to the other dimension to steal its Triforce and thus bring stability back to their own kingdom.
- Evil Twin: Averted. No one is really out and out evil over their counterpart, rather just a different take on the character, or put through a darker lens. Even Hilda, who is playing and betraying you, is doing so because she has run out of options, and does it with a great deal of remorse.
- Evolving Title Screen: The title screen's 3D background shows the area where the player last saved.
- Exactly What I Aimed At: In the Final Boss battle, to land the final blow, you must aim a light arrow away from Yuga. Since the room is circular, and both of you are merged into the wall, the arrow travels around the room and hits him in the weak point in his back, forcing him out of the wall to be finished off with the Master Sword.
- Excuse Plot: Downplayed. Compared to other modern Zelda games, A Link Between Worlds has a fairly sparse plot with more emphasis on gameplay, just like A Link to the Past. However, what bits of plot there are contain some fairly complex and tragic characters and themes, especially concerning Lorule and the state that it's in.
- Explosive Breeder: Mother Maiamai has exactly 100 babies that you must thoroughly search Hyrule and Lorule in order to rescue.
- Expy: From the bird's eye view the game has, Ravio bears a striking resemblance to Nabbit. Humorously, in the October 1st Nintendo Direct, Iwata devoted a minute to dispelling any possible fan theories.
- Eye of Newt: In order for the witch to make potions for Link, she needs him to bring her Monster Tails, Horns, and Guts, which she uses to make Blue, Yellow, and Purple Potions respectively. This is lampshaded by one NPC who is understandably squicked out by the Purple Potion, and advises Link not to buy it.
- Face Death With D Ignity: The ultimate choice made by Hilda, knowing that this would theoretically also affect her whole kingdom. After realizing that her actions would lead to the very thing that her ancestors were trying to prevent, she decides to face her world's demise with as much dignity and grace as she can muster... only for her to lose any sense of composure when Link and Zelda's Selfless Wish restores Lorule's Triforce.
- Final Boss, New Dimension: Neither a final boss nor a superboss, nor a unique dimension, but Zaganaga deserves a mention: its dungeon is in Hyrule, but the boss itself is in Lorule.
- Final Dungeon Preview: Because Link initially enters Lorule from Hyrule Castle, the first place he sees in the other world is the castle's counterpart. He is sent away from Lorule Castle to rescue the Seven Sages and obtain the Triforce of Courage so that he can defeat Yuga, who is restrained by Princess Hilda in the throne room. Once he has done so, the barrier on the castle is removed and he can navigate the entire place, eventually returning to the throne room.
- Foreshadowing:
- In the tutorial section of the game, soldiers can be seen trying to wipe off paintings of mooks from the castle, foreshadowing the painting aspect of the game.
- Ravio being Link's Lorulean counterpart was hinted at long before his reveal. He hoards money, possesses various tools and weapons similar to those from past Zelda games (which he uses with his left hand), barges into a stranger's home and rearranges the furniture (your pots also go missing), realizes that you'll actually be fine when you "die", wears a bunny hood (matching Link's rabbit form in the Dark World in A Link to the Past before gaining protection), and has a winged companion. To make things even more obvious, Ravio's house in Lorule matches the location of Link's house in Hyrule. Ravio being able to retrieve Link's rented items even when he "dies" in Lorule, is also a big clue.
- There are various hints to Hilda being a villain:
- The post-dungeon scenes in Lorule of Hilda monologuing to Zelda about how much she envies her in a poorly lit room will probably set off a few red flags.
- Yuga drops a couple comments early on about "Her Grace", even making a direct comparison to Zelda.
- Ravio's house, mentioned above, contains his diary, which alludes to what Hilda is actually trying to do, and that Yuga is "duping" her. However, this foreshadowing is only available in Hero Mode, so by the time you see this, it's just a a bit of extra exposition.
- Hints to the Seven Sages:
- At a certain point within the story, when you use Irene's bell to summon her, only her broom, without Irene, will come to pick up Link. Eventually, it's revealed that she has been abducted and turned into a painting. This is also foreshadowed by the fortune teller's prophesy that convinced her to help Link in the first place. Turns out it's true after all, even if it's a bit vague.
- Similarly, at one point Gulley goes missing and his mother is shown searching for him.
- For the loading screen while in Lorule, the Triforce is shown as inverted and grey. It's grey because their Triforce was destroyed. As the end credits starts after it's restored, the inverted Triforce gains back its golden color.
- Free-Sample Plot Coupon: Zelda herself gives you the Pendant of Courage, claiming it was a special charm for her. In A Link to the Past, it is earned after completion of the Eastern Palace. Although you have to go through the Eastern Palace before its true nature is revealed.
- Freeze-Frame Bonus: Snap a picture of your screen just as Link suddenly freezes while traveling between worlds. While he wears the Green Tunic, he's a dead ringer for Dark Link. And if you do the same when you have the Red Mail, the freeze-frame instead shows him wearing his normal green tunic.
- Friendly Fireproof: Averted for enemy projectiles — once a projectile has been let loose, it can harm anyone on the screen. Zoras, Octoroks, and enemy archers are just some of the foes that can be tricked into defeating their allies via proper use of Deadly Dodging.
- Full Health Bonus: Like in other 2D Zelda games, Link's sword can create a Sword Beam when swung, but only if his hearts are full.
- Fusion Dance: Between Yuga and Ganon. And no, Ganon is NOT in control of the fusion.
- Generation Xerox: This game takes place a few hundred years after A Link to the Past and is essentially a sequel to it. As a result, this game's Link seems to live an almost carbon copy of his predecessor's entire life story, complete with Identical Grandson and Expy forms of the prior game's entire cast list.
- "Get Back Here!" Boss: Dharkstare; it tends to move out of range of its weakness the Fire Rod, forcing Link to chase it down in order to melt its icy armor, and once you do melt it Dharkstare bounces away from you until it regenerates his armor; chasing it in this phase is more troublesome because of the arena's slippery floor.
- Giant Animal Worship: Gemesaur King and Stalbind. Many Loruleans have forsaken their homes and duties to Hilda to follow these beings, and revere them. Understandable with Gemesaur King.
- Giant Mook: Some of the enemies have varieties of these as a dungeon's Mini-Boss.
- Good Morning, Crono: The game starts off with Link being woken up from a nightmare by the blacksmith's son, Gulley.
- Gods Need Prayer Badly: Subverted in Lorule. The world is on the verge of collapse, the sanctuaries are all abandoned, while clergymen/philosophers can do nothing but mourn the people forsaking their gods (even questioning if they in turn have forsaken mortals). Loruleans have become depraved and worship monsters such as Gemesaur King, who in turn, need human devotion in order to become more powerful and god-like.
- The Goomba: Blobs, which are a variety of Buzz Blob that can be attacked without being electrocuted even without a stronger sword.
- Gotta Catch 'Em All: Collect Maiamais and return them to their mother for upgraded items. Catch all 100 and you get an improved spin attack that is very useful in the Treacherous Tower.
- Godzilla Threshold: The people of Lorule engaged in constant warfare over the Triforce, and the leaders of the kingdom eventually decided that the fighting had grown so terrible that the only way to end it was destroying the relic itself. This was an extremely bad idea, as the Triforce is a Cosmic Keystone; without it, Lorule itself began to disintegrate. This leads to another Godzilla Threshold moment: Princess Hilda of Lorule decides that the only course of action is to steal Hyrule's Triforce, which involves partnering with the Evil Sorcerer Yuga to summon Ganon—as in, the world-destroying monster—to get it.
- Grappling-Hook Pistol: The Hookshot, in its default form, returns in this game. It is usable in eight directions rather than four like in A Link to the Past. It can also be upgraded to work faster and inflict damage, whereas in ALttP it would only stun enemies that weren't specifically programmed to die from it.
- Gravity Is a Harsh Mistress: If an enemy knocks you off the edge of a bottomless pit, you hang in the air for a second before falling. The same is true for them if you knock them off the edge.
- Greater-Scope Villain: Ganon. Although not as prominent, Ganon's presence can be felt, as he is heavily featured in the game's backstory and is mentioned by the elders as the Demon King that nearly brought Hyrule to ruins long ago. Subverted when it is revealed that reviving Ganon is part of Hilda's plan, since she wants the Triforce for the benefit of Lorule, and Yuga wants the Triforce for himself. Neither of them care about Ganon other than that, and Ganon himself doesn't get to do anything before Yuga absorbs his power and takes over his body.
- Great Offscreen War: The game treats the events of A Link to the Past as this. There is also the war fought for the other Triforce in Lorule, very much like the one fought in Hyrule. Unlike Hyrule, they destroyed the Triforce to keep it from being anymore trouble, which ended up being a very big mistake.
- Grim Up North: The north of Lorule is covered in perpetual blizzard, is swarming with Lynels, and is home to the Treacherous Tower, a lengthy monster gauntlet.
- Guest-Star Party Member: The girl who you help escape from the Thieves' Hideout, as a Shout-Out to the girl from A Link to the Past. This time around she isn't the boss.
- Gusty Glade: The House of Gales and several similar mini-dungeons feature plenty of fans that blow Link in fixed directions and must be activated or shut off when needed. They also have many puzzles that require Link to use the Tornado Rod to go between floors.
- Hailfire Peaks: Turtle Rock, the Lethal Lava Land dungeon, in the middle of Lorule's equivalent of Lake Hylia (though the inside of the dungeon proper is pure Lethal Lava Land). The Ice Ruins are obviously a Slippy-Slidey Ice World dungeon, but the lower reaches show the orange and red glow of lava (this is entirely aesthetic, since you never go low enough to actually interact with the lava). The Desert Palace is a weird example: in order to reach it, you travel back and forth between Lorule's swamp and Hyrule's desert that are otherwise completely separate, but the boss of the dungeon is fought in a cordoned off part of the swamp that has inexplicably had a bunch of sand from the desert transplanted there.
- Heads I Win, Tails You Lose: Happens after the first fight with Yuga. Losing to him results in a Game Over like normal, but when you beat him, he traps you as a painting in a wall and escapes.
- Helpful Mook: Wall Masters return, but this time you occasionally have to manipulate them to solve puzzles, such as having them slam down on a switch that's out of your reach. Some of the dungeons wouldn't even be solvable without them!
- Hijacked by Ganon: Yuga succeeds in his goal of reviving Ganon at the end of the first quest, but instead of Ganon being able to practice any goals of his own, Yuga merges with him almost immediately in order to take the Triforce of Power for himself, defying this trope.
- Hijacking Cthulhu: Yuga merges with Ganon and takes control of all his power.
- History Repeats: Lorule started to gradually crumble away after they destroyed their Triforce. Ravio kicks Hilda into a Heel Realization after telling her that taking Hyrule's Triforce away from them would simply cause them to go through the same decay that is now affecting Lorule.
- Holy Pipe Organ: A Link Between Worlds remasters the theme of the church-like Sanctuary from The Legend of Zelda: A Link to the Past, now featuring a pipe organ alongside the choir. When Yuga appears in the Sanctuary to kidnap Seres, his leitmotif receives two remixes with an Ominous Pipe Organ.
- Humans Need Aliens: Despairing over their crumbling world and feeling abandoned by the gods, the Loruleans have turned to the monsters for salvation. This has opened up the citizens to all manners of abuse conceivable, though on the flip-side, unlike Hyrule, people are more tolerating of them, and it's formed closer ties with some benign monsters as well.
- Hurricane of Puns: A bee-loved quirk of the Bee Guy.
- Ice Palace: The Ice Ruins, which seems like a Hailfire Peaks due to hovering above the inside of a volcano, but is just a straight up Slippy-Slidey Ice World. The Fire Rod is required to melt the large ice blocks that obstruct Link's progress.
- I Choose to Stay: After rescuing all of her children and talking to enough NPCs afterwards, you can trigger a scene where Mother Maiamai and her babies continue their travels on to another dimension. The 72nd Maiamai you saved, however, chooses to remain in Hyrule, asking Link to wish her luck in becoming as big and as powerful as her mother.
- Identical Grandson: A character named Sahasrahla who looks exactly like the one who appeared in A Link to the Past tells to Link a story from "the days of my grandfather's grandfather's grandfather...".
- Improvised Weapon: Yuga Ganon carries the proud tradition of Zelda Final Bosses being vulnerable to mundane equipment, with the Bug Catching Net being able to reflect his second phase energy balls.
- Inconveniently-Placed Conveyor Belt: Conveyor belts are present in Thieves' Hideout, and while they can become a hindrance, Link can make clever use of them thanks to the switches that invert their directions.
- Infinity -1 Sword: The red Tempered Sword/Level 2 Master Sword. It can be reforged by giving the blacksmith in Hyrule two chunks of Master Ore, which aren't very difficult to find in Lorule's dungeons.
- Infinity +1 Sword: The Golden Sword/Level 3 Master Sword. You can unlock the sword's full potential by finding two more pieces of Master Ore and taking them to the Lorule blacksmith. This is a little trickier than the above, since the first three are in dungeons, but the fourth is in an area of Lorule only accessible from one area in Hyrule which you probably wouldn't visit unless you're collecting Maiamais or using a guide, since it's not required for normal completion.
- Informed Attribute: The thieves say Link has a "fetching" voice, but we never hear him speak outside of his usual vocalizations.
- In Love with Love: According to the Rumor Guy, Princess Zelda seems to have this. According to his story, she would wake up every night to stare longingly at a portrait of a princess and hero (presumably those of a previous incarnation) cuddling up, indicating she wants to find love in her own life.
- Instakill Mook: Lynels become this in Hero Mode, as they now deal twelve whole hearts worth of damage per hit. The max is twenty, and that's with 100% Completion. By the time you actually meet the Lynels, you'll still be well under ten hearts, and even if you do upgrade your tunic to the Blue Mail beforehand, six hearts is still a pretty big chunk of your health.
- Interface Spoiler: Just in case you still were unaware of the game taking place in two separate worlds, the fact you have to find 100 Maiamai but the ones shown in the Hyrule map total only 50 will give it away.
- It Has Been an Honor: Ravio's last words to Link, spoken just before Hilda sends Link and Zelda back to Hyrule.
- It's All Upstairs From Here: The Tower of Hera returns in an altered form. There's also the Treacherous Tower, which is a gauntlet of several minibosses and enemies for up to 50 floors.
- It Seemed Trivial: This trope is Played for Laughs. Big Bad Yuga kidnaps the Seven Sages of Hyrule and turns them into paintings for an evil ritual that resurrects Ganon. Link is then tasked with rescuing the Sages. One of them, a miner named Rosso, remarks—after he's been freed—that he's known that he is a Sage for years, but didn't think it was important enough to tell anyone. It's also downplayed in that even if the heroes had known about Rosso's Sagehood, there was little they could to do to protect him from Yuga, as the villain possesses teleportation powers that allow him to reach anywhere in the world.
- Just Eat Gilligan: What would happen if the Triforce was destroyed before it became a plot point? As it turns out, this game: Princess Hilda's ancestors invoked this trope to keep the Triforce's power away from evil forces, only to later discover that the Triforce was the Cosmic Keystone keeping the world together. Without it, Lorule is both figuratively and literally crumbling apart, forcing her to try and acquire Hyrule's Triforce to fix it, leading to the events of the game.
- Juxtaposed Reflection Poster: One piece of promo art shows Link standing in front of Lake Hylia in Hyrule, with the Mirror Universe of Lorule in its reflection.
- Kick the Dog: Yuga actually kicks Link aside as he leaves the Sanctuary.
- Last Lousy Point: The Cucco Ranch minigame, where the player must dodge swarms of angry Cuccos who are attacking Link in a small, enclosed space. You lose instantly if any of the Cuccos touch you. To get the Piece of Heart you need to last for 30 seconds on the hardest difficulty, which is a decent challenge but nothing too ridiculous. However, completing this also unlocks Endless Mode, and some sadistic developer decided to put another reward for lasting 999 seconds (~17 minutes) on Endless. It's mostly a Bragging Rights Reward, not needed to max out Link's stats (all you get is a giant Cucco that sits on the world map and gives you hearts when you talk to it), but it ensures only the most insanely dedicated players will be able to truly 100% the game.
- Later-Installment Weirdness: The game gives Link access to all items from Ravio's shop, rather than the dungeons. Instead of getting them at certain points in the story for free, like you normally would, you have to rent the equipment (cheaper, but you lose it if you die) or, in an aversion of Money for Nothing, buy it (each item is 800 to 1200 rupees).
- Legendary in the Sequel: The events of the previous game, A Link to the Past, are shown as a series of paintings in the entry way inside Hyrule Castle.
- Lethal Joke Item: Much like previous installments in the series, a somewhat innocuous item can be used against the final boss. The harmless bug catching net swings in such a way that you can accurately reflect the boss's projectiles twice in a row. Also applies to the upgraded lantern and bug catching net, which have power rivaling the fully upgraded Master Sword, but good luck hitting anything with the former without stunning it first.
- Lethal Lava Land: The Hyrulean version of Death Mountain features lava hazards in the eastern caves. Its counterpart in Lorule has magma in its belly but is otherwise covered in ice. Turtle Rock serves as the resident "fire/lava dungeon" (weirdly enough, it is located right in the middle of Lorule's equivalent of Lake Hylia).
- Lighter and Softer: Than A Link to the Past, at least up until the first visit to Lorule. In the opening for this game, Link is casually delivering a sword to a careless guard captain. Compare that to the prequel, where he's avenging his dead uncle on a stormy night where the king has been assassinated, and Hyrule is mostly deserted due to greed for the Triforce in the Sacred Realm, now the Dark World. Of note is the fact that this is one of the very few modern Zelda games to be rated E by the ESRB. Subverted when you see that Lorule's fate is just as bad, if not worse, than the Light and Dark Worlds of A Link to the Past, and it takes the idea of a Crapsack World and runs with it; even more so since Lorule's situation has more overbearing religious themes, unaffected by SNES-era censorship this time around.
- Line Boil: Link in his drawing form, as well as the objects Link collects in said form.
- Living Drawing: The game's main mechanic is Link's ability to turn into a painting which can move horizontally along walls, allowing him to solve puzzles and move to places which would otherwise be unreachable.
- Long Song, Short Scene:
- Various characters' leitmotifs are given very little use. For the sages (Irene, Rosso, etc.), this is played ONCE during a cutscene in which you talk to them. The cutscenes are about 20 or so seconds long at most, and are easily skipped through at record speed. Then they get captured by Yuga and you never hear their theme songs again. Yuga's own themes are given similar treatment, since both (yes, he has two leitmotifs; one plays in his earlier appearances and the other plays when he captures Zelda) are only played during certain cutscenes, which are also rather short.
- The Chamber of Sages theme. You visit this area about six times throughout the game, and are almost always done there in well under half a minute. The song goes on longer than that.
- The music is changed slightly when Link is merged with a wall, giving many songs alternate versions, yet he can only stay in this form for a matter of a seconds due to the rapidly decreasing stamina meter, so they can't play as long as the standard versions of those songs (and even the last few seconds don't help, because a loud alarm plays over the songs).
- The song played when Mother Maiamai is upgrading items, which plays only during the very short cutscene in question but has some pretty epic chanting in the background.
- The Lost Woods: The first half of the trope-naming forest is a straightforward ecosystem, but before getting to the Master Sword, it turns into The Maze which requires you to follow a Poe. The Lorule version, the Skull Woods, is a more sinister incarnation with a maze-like design that also features multiple entrances to its associated dungeon, just like in A Link to the Past.
- MacGuffin Delivery Service: Hilda's plan actually depends on Link getting the Master Sword and rescuing the Seven Sages, as he needs to do that in order to get the Triforce of Courage, which is an essential part of Hilda's plan to steal a new Triforce for Lorule. Defeating the penultimate boss is the first thing Link does in the entire game that does not somehow advance the Big Bad's plot.
- Magic Wand: The game brings back the Sand Wand from Spirit Tracks (now known as Sand Rod), as well as the Fire and Ice Rods from A Link to the Past, and introduces the Tornado Rod. The latter item allows Link to eject upwards with the help of a powerful gale, allowing him to hop onto moving platforms from above, remove dirt from the floor, and stun enemies. All four rods, like all other items for sale in Ravio's shop, can be later upgraded to increase their power (a bigger radius for the gale, a stronger blaze, more ice blocks at a time, and unlimited stability for the created sand wall respectively).
- Mana Meter: A Link Between Worlds introduces a Mana/Stamina Meter known as the Energy Gauge that replaces consumable items like arrows, bombs and magic. It quickly replenishes when not being used. It can be upgraded with a scroll found in the Ice Ruins.
- The Man Behind the Man: Hilda, to Yuga, until he later turns on her and absorbs her power.
- Maybe Ever After: A gossiping man will reveal that every night, Princess Zelda will gaze wistfully at a painting of a previous generation of Link and Zelda, implying that Zelda is of the age to want a romantic attachment. This puts the final shot of the game of Link and Zelda looking at the same painting together and smiling at each other in a different light.
- Meaningful Name:
- Yuga's name is based on the Japanese word for "painting," which obviously fits with his painting obsession. But there is another meaning to it, when you read the name with Hinduism in mind. In this case, Lorule can be seen as a universe, which is in its last epoch, the Kali Yuga, as it is headed to its imminent destruction. In addition, almost all Loruleans have lost their virtues, which is also a marking for the last era of the cycle, as humanity starts absolutely virtuous in the first era and declines through the four Yuga ages to a World Half Empty, which is destroyed at the end. After the Kali Yuga has passed, the universe will be created anew in a new Yuga cycle.
- The Kali Yuga is generally the time of the Downfall of a culture and this game is an entry of the downfall timeline. So, the Kali Yuga metaphor also works for Hyrule.
- Yuga's name is based on the Japanese word for "painting," which obviously fits with his painting obsession. But there is another meaning to it, when you read the name with Hinduism in mind
- Meta Twist:
- In the Thieves' Hideout in Lorule, you'll find a girl locked in a cell asking for help, who promises to give Link the Sage Painting after her rescue. Players who have played The Legend of Zelda: A Link to the Past would know that in the Thieves' Town dungeon in the Dark World, the maiden there was in fact the boss in disguise. An experienced player is thus fully prepared for a betrayal at any time. The game teases you by making it an Escort Mission and having Link work together with her to go through the dungeon. Upon finally reaching the boss door, the game reveals that the girl is in fact, not actually the boss that the player had been expecting (though they do fight Blind's Suspiciously Similar Substitute, Stalblind). That's not even the end of the teasing. After the battle, Link has to cross a narrow bridge with the girl behind him, teasing that she might push him off. In the end, she keeps her word, and gives Link the painting as promised.
- As soon as a veteran learns Yuga's plan involves reviving Ganon then the obvious implications of him usurping the role of main antagonist will be expected. Not this time though.
- Mini-Dungeon: There are several smaller puzzle dungeons over Hyrule and Lorule, usually accompanied by a Treasure Hunter who will give the player a hint as to how to get to the rupees.
- Money for Nothing: Double Subverted. Nintendo is making a conscious effort in this game to make rupees a more necessary part of the quest in the form of item rentals. However, money is also really easy to come by, and the wallet can hold up to 9999 rupees from the beginning of the game. There's also enough hidden treasure that with enough exploration, one can easily own every item before doing even half the dungeons.
- Money Spider: The boss of Dark Palace, Gemesaur King, is basically Helmasaur King from A Link to the Past, but with rupees buried in it. As such, every time you hurt it, you get rupees. Lots of them. It's a money golem dinosaur.
- More Criminals Than Targets: Thieves' Town is entirely made up of thieves and various assorted criminals. It takes place in Lorule, which is supposedly a normal, functional kingdom. It's implied by Princess Hilda that the kingdom seriously went downhill after they destroyed their Triforce. Most likely the town wasn't always that way. There also are citizens who aren't dangerous, but are very strange (they appear to all be in some mask cult).
- Multi-Mook Melee: Treacherous Tower, which is a variation on the multi-floor caves; in addition to costing money to enter, you have to choose how many floors you go through at the start, and you only get your Rupees at the end rather than at various points in the middle. At its core, though, it's still the classic "kill the enemies in each room, rinse and repeat" type dungeon. The prize for the Beginner difficulty level is only a handful of Rupees, but Intermediate rewards Link with a Piece of Heart, while Advanced rewards him by upgrading his Lamp (first completion) and Bug Net (second completion).
- Multishot: The bow can be upgraded to loose three arrows at once.
- Musical Nod:
- The somewhat more relaxing, guitar-based remix of the Dark World music from ALTTP sounds very similar to the version heard in Super Smash Bros. Brawl.
- Both of the game's equivalent to the Hyrule Field themes include expanded portions partially based on the Hyrule Field theme from The Legend of Zelda: Ocarina of Time.
- My God, What Have I Done?:
- The Shady Guy seems to genuinely regret stealing the Smooth Stone from the Zoras after Link tells him just what its importance was to them.
- Hilda has this when Ravio points out she's no better than the people who nearly destroyed Lorule fighting over their Triforce.
- Mythology Gag:
- Majora's Mask can be seen hanging on the right wall of Ravio's shop (which is also Link's house).
- As a painting, Link resembles the introductory artwork from The Wind Waker.
- The very Talon-like bartender is based on Mr. Barten. And his Lorule counterpart seems to be based on Ingo/Gorman.
- Link getting a transformation power as a result of the villain trying to permanently transform him? It's not the first time in the series that happened.
- If you extort the aforementioned Hinox too much, he'll try to kill you to get the rupees back. This isn't the first time Link has stolen from an innocent and paid for it with his life.
- The northeast house in Kakariko Village has a picture of Makar. Next to it is a picture of the crustacean design on Link's islander outfit from the same game.
- The Milk Bar has pictures of the sages' instruments.
- Link uses a sword that he was supposed to deliver to someone else.
- New Game Plus: Hero Mode is available after you first complete the game. If you thought Nintendo Hard wasn't a thing anymore, just know that you take quadruple damage in this mode. Until you get the Blue Mail, a lot more attacks become strong enough to take you down in one or two hits.
- No Cutscene Inventory Inertia: Averted everywhere except the one credits scene Link is in, where his Master Sword and Tunic are both their original colors regardless of any upgrades.
- No Fair Cheating: If you use Irene's broom to try to beat the Hyrule Hotfoot minigame more easily, the NPC at the finish line scolds you for cheating and won't give you the prize until you beat the minigame fairly unless you warp to Lorule, then use Irene's broom and warp back. It's a lot of trouble to go through for a supposed shortcut, though.
- No Man Should Have This Power: As was the case in Hyrule, the people of Lorule began to lust for their Triforce's limitless power, and many lives were lost as people warred over it. The Loruleans were sick of the gift from the gods. To put an end to this, Hilda's ancestors decided that their Triforce had become too much trouble, but rather than seal it away, they opted to completely destroy their Triforce. This has disastrous consequences.
- Noob Cave: The secret back-entrance to the Sanctuary in the prologue. Finding the way into it from the graveyard is also your first puzzle.
- Nostalgia Level: As a whole, the game bases its overworld layout almost exactly on that of A Link to the Past. Also, among the many returning dungeons, the Tower of Hera stands out the most for having a very similar map design to its SNES counterpart, even retaining the gameplay gimmick (blocks that can be toggled with switches to solve navigation puzzles) and the boss (Moldorm).
- Notice This: The weather vanes will squawk and spin around to remind you to save if you've recently done something plot-important.
- Not the Way It Is Meant to Be Played: You can actually run off and explore Hyrule on your Captain's Sword errand, though you'll run into monster encounters that will attack defenseless vulnerable little you, with no means of fighting back except throwing bushes at them.
- Nothing but Skulls: In Lorule, skulls replace pots, so you'll see a lot of them, and no sign as to where the rest of the bones went. There's one room at the start of Lorule Castle that takes the cake, and is sure to provide a few hearts on each visit.
- Now You Tell Me: The Devilish Girl running the Treacherous Tower forgets to tell Link that nobody has survived the Advanced level until he's already paid and entered.
- Numbered Sequels: In Japanese and Korean, the game is Triforce of the Gods 2 (Triforce of the Gods being A Link to the Past's Japanese title).
- Obvious Villain, Secret Villain: Yuga the obvious villain from the start and Hilda the hidden mastermind.
- Oculothorax: Chasupas, Lorule's equivalent to Hyrule's common bats, are giant eyeballs with bat wings.
- Odd Name Out: The seven sages all have names relating to the colors of the rainbow — with the exception of Impa, since her status as a Legacy Character means that her name predates the theme.
- Offscreen Villainy: From the moment he is first introduced and converts Seres into a painting, Yuga travels throughout Hyrule and collects all of the seven sages. The only ones you actually witness him capturing are Osfala and Princess Zelda - Impa, Gulley, Rosso, Oren, and Irene all disappear while Link is busy progressing his quest through the dungeons of Hyrule to collect the three Pendants of Virtue. Gulley's disappearance is called out by his mother after Link completes the Eastern Palace, Oren's absence is implied by the Zora attendant who is found standing outside the House of Gales, and Irene's broom turns up empty as soon as Link steps out of the Tower of Hera, but players likely won't notice the others are gone unless they specifically go back to check.
- Ominous Latin Chanting: Used for the Yuga battles and for The Very Definitely Final Dungeon. In contrast to the wordless chants used in the Skyward Sword soundtrack for Ghirahim, the Yuga battles feature actual lyrics.
- Opening the Sandbox: The sandbox is opened when you enter Lorule. You need to go through seven dungeons, but you can do each of them in any order you please (with one exception: you can't reach the Desert Palace without going through the Thieves' Hideout first).
- Organ Drops: Monster Tails, Monster Horns, and Monster Guts are used to make Blue, Yellow, and Purple Potions respectively. Lampshaded by one NPC who is understandably squicked out by the Purple Potion, and advises Link not to buy it.
- Overly Narrow Superlative: Irene claims to be the most talented witch in her generation. The only other witch in the game is her grandmother.
- The Overworld: Compared to A Link to the Past, this game shows it more directly in Hyrule's ballpark instead of Lorule (the Suspiciously Similar Substitute of the original Dark World), as the latter is made up in large part of Disconnected Side Areas, each of which can only be accessed from a specific part of the more unified Hyrule.
- Parental Substitute: It's heavily implied that the blacksmith's wife has looked after the parent-less Link on many occasions. She knitted his own tunic and made him an item pouch. Whenever he arrives late for work and her husband gets furious, she tells Link behind her partner's back, he will not start the day's work without breakfast.
- Patchwork Map: The A Link to the Past version of Hyrule returns, showing the same lake near the same desert, with a field (steppes?) and mountains or hills separating them. Again, justified if Lake Hylia and the river leading to it are all that's keeping the rest of the region from desertification.
- The Pen Is Mightier: The villain Yuga has a long, paintbrush-shaped wand for casting spells and summoning monsters. When he takes over Ganon's body, the paintbrush is fused with the evil king's trident.
- Pent-Up Power Peril: Queen Oren of the Zora relies on a special gem—the Smooth Stone—as a kind of Power Limiter. Once it's stolen, she begins to bloat to a gigantic size, growing bigger and bigger as her power overflows from her body. Link has to recover the stone before Oren's power completely consumes her (and, presumably, the other Zora).
- Phantom-Zone Picture: Yuga turns Zelda and the Seven Sages into paintings. He is able to turn himself into a non-imprisoned painting that can move along walls, an ability Link can also use.
- Player Data Sharing: The game has a feature where the streetpassnote loads other players' profiles. These players can be fought as Shadow Links for an amount of money based on their difficulty (players can customise their Link's equipment and make battles with their shadow as easy or hard as they like).
- Plot Coupon: The Pendants of Virtue are back. This time, they have the symbols of the Goddesses like the Spiritual Stones and the Pearls of the Goddesses. The color of the Power and Wisdom pendents has also been fixed, as in Link to the Past, Power was blue and Wisdom was red, unlike everything else that followed. In Lorule, the paintings of the Seven Sages are what must be collected, to restore them back to normal and free the sages.
- Pop Quiz: Answering correctly the theft-related questions in the entrance gate of Thieves' Hideout is required to enter.
- Power Up Letdown: There are upgrades to your items as a reward for finding lost Maimais. Most are nice, a couple are Disk One Nukes, and then...
- The Nice Sand Rod. The original variant is already at best an item tailored specifically for one dungeon and is almost never used, and the nice variant has longer-lasting pillars that go farther: the range of the original is never an issue, and more often than not you want the pillars to go down so they'll get out of your way.
- Nice Bombs. They now have a bigger blast radius and do more damage than regular bombs. The issue is bombs are almost never used for combat, and they also hurt Link: basically this upgrade just makes it more difficult to use your bombs without getting caught in the resulting explosion. The most you can say about this upgrade is it allows you to do a couple of puzzles slightly quicker than normal.
- Production Foreshadowing:
- There is a certain mask hanging in Link's House, and it's one of the few things Ravio doesn't mess with. That mask is Majora's Mask, and the re-release of the game was announced a bit less than a year after the release of A Link Between Worlds. It was likely intentional, as said remake started production soon after Ocarina of Time 3D was released.
- The seal that Yuga-Ganon places on the gates of Lorule Castle resembles malice.
- Progressive Instrumentation: The theme of Lorule Castle changes a little each time Link defeats a boss or miniboss (and thus weakens the seal of the gate leading to the throne room), transitioning gradually from what looks like the reverse version of Hyrule Castle to Ganon's Leitmotif.
- Pun-Based Creature: One of the enemies in Lorule's overworld resembles a hopping flower with reptilian jaws and legs. It's called the Snap Dragon.
- Punny Name: The name of the other world in this game is called "Lorule" in order to contrast with "Hyrule".note
- Quest for a Wish: There's the scheme of Hilda and Yuga of Lorule to steal Hyrule's Triforce to replace Lorule's, which had been destroyed centuries before by Well Intentioned Extremists who were unaware that it was a Cosmic Keystone without which their world would slowly crumble. Once again, Link is more concerned with keeping it out of evil hands than using it for himself. Once he recovers it, he realizes that he can use it to wish for the Lorulian Triforce to be restored. Win-win!
- Quicksand Sucks: There are quicksand pits in the final room of the Desert Palace and the battlefield of Zaganaga in Lorule's Misery Mire. The Sand Wand makes a return since its debut in Spirit Tracks (now under the name of Sand Rod) to allow Link to cross over them safely with the created solid sand tiles.
- Racing Minigame: The Hyrule Hotfoot (sponsored by the Racing Bros.), in which Link has to perform a run session from the northeast area of Lake Hylia to a grassy area behind Rosso's house (located near the entrance to Death Mountain). In the first trial, Link will have 75 seconds to complete the race, while in the second he will only have 65. It is recommended to use the dash ability of the Pegasus Boots. Link will be disqualified if he uses Irene's broom to warp between areas in Hyrule, but he can use the trick in Lorule.
- Real-Time Weapon Change: The optional "quick equip" mechanic you unlock after completing the first three dungeons allows you to switch objects by touching the screen without pausing the game.
- Rearrange the Song:
- Much of the soundtrack from A Link to the Past is re-used and updated here.
- The Lorule dungeon themes are all variations on the original NES game's dungeon theme.
- Recurring Boss: Yuga is fought three times. Once in the Eastern Palace, then a second time in Hyrule Castle, and then a third time at the end of the game.
- Red Eyes, Take Warning: Hilda has red eyes, which is Foreshadowing for her being the Big Bad. In a subversion, they're not completely evil, but a Well-Intentioned Extremist who undergoes a Heel–Face Turn in the ending.
- Redemption Equals Death: When Hilda finally allows Link and Zelda to return to Hyrule with the Triforce, she does so with the full knowledge that this means death for her ENTIRE WORLD. Fortunately this apocalypse is averted when Link and Zelda wish upon the Triforce to regenerate Lorule's own Triforce, resulting in a World-Healing Wave.
- Red Herring:
- Rosso's Ore Mine, despite having a sequence of signs leading the player along through Death Mountain, is just a pile of rocks that has absolutely nothing important. It seems to only exist as an excuse to lead the player to the portal for the Ice Ruins section of Lorule's Death Mountain.
- The thief girl in the Thieves' Hideout, which veterans would predict is actually the boss, just like in the dungeon it's a homage to. She's not.
- Reduced-Downtime Features: The game ties all previously resource-consuming items (wands, bow, bombs) to a regenerating "stamina meter", eliminating the need to leave a dungeon to replenish/farm items.
- Reforged Blade: The game follows a similar structure to that of A Link to the Past in how the Master Sword is forged (being a sequel to it), but uses Master Ore found as a treasure in dungeons. Also, the sword's second upgrade is done by another blacksmith, who was brought out of his Despair Event Horizon after looking over his counterpart's handiwork.
- Regenerating Mana: The magic meter is replaced with an energy gauge that refills over time, and since it is used for every item, this is a necessity.
- Retcon: The game takes place after A Link to the Past, and Link holds the Master Sword despite the fact that the end of A Link to the Past stated that "the Master Sword sleeps again... forever".
- Revisiting the Roots: A return to the 2D roots of The Legend of Zelda after years spent refining the mechanics of the 3D iterations of the series and after 2.5D games like Phantom Hourglass and Spirit Tracks went for more of an experimental hybrid approach. It also harkens back to the much more non-linear titles of the franchise's early years.
- Rewarding Vandalism:
- You're even more encouraged to do so now due to the renting/purchase system.
- It's implied Ravio also suffers from this, as the only missing furniture in Link's house after his "renovations" are the pots. This makes sense, given that he's Link's Lorule counterpart.
- Ribcage Ridge: Like in A Link to the Past, the outer area of Skull Woods features passageways that go through ribcages.
- Ring-Out Boss: Inverted with Margomill, the boss of the House of Gales. It is incapable of damaging you except by knocking you off of the platform you're standing on.
- Rhymes on a Dime: Mother Maiamai rhymes everything with her name; she doesn't tell us why.
- Same Content, Different Rating: Unlike in A Link to the Past, the game's content and themes are roughly the same as those of other modern Zelda games (apart from the T-rated Twilight Princess); the complexity and peril are on a similar level, and there's no SNES-era censorship to neuter any religious themes and references (with Lorule's relationship with its gods being a major theme of the game). Despite this, while most modern Zelda games are rated E10+note , A Link Between Worlds is rated E just like its predecessor, which may be due to the top-down perspective and graphics making the violence less realistic (although this still brings into question why its rating is lower than The Legend of Zelda: Spirit Tracks, which had a similar perspective and less detailed artstyle).
- Same Plot Sequel: The game is a deliberate homage to A Link to the Past, and therefore follows a very similar story. Once again, an Evil Sorcerer causes havoc in Hyrule and abducts the descendants of the seven sages to resurrect Ganon. You are tasked by Zelda and Sahasrahla to find the three Pendants of Virtue and obtain the Master Sword. Once you've done it, you land in the Dark World and have to rescue the descendants of the sage before facing the sorcerer in his lair. This is an Invoked Trope on the part of the antagonists, not too dissimilar from Metal Gear Solid 2: Sons of Liberty. The Triforce of Courage was sealed away in an unknown location, bound to the soul of the Hero, between the events of A Link to the Past and A Link Between Worlds. In order to break the seal on it, the hero’s successor must show a display of true courage, so the antagonists set out to goad the new Link into reenacting out the closest thing they know to such a feat, the events of A Link to the Past, in order to unseal the Triforce of Courage. This goes off without a hitch, but Link manages to keep the Triforce from their grasp in the end.
- Sand Blaster: The Sand Wand from The Legend of Zelda: Spirit Tracks returns, now called Sand Rod. Once again, it allows Link to create solid walls by erecting sand from the floor. In this game, he can use them to either pass between high spots without falling into the floor, cross pits of quicksand (proving vital to fight Zaganaga in Misery Mire), or use the wall merging ability with them.
- Save Both Worlds: Link starts out trying to save Hyrule, but soon finds that its counterpart, Lorule, is in even worse shape. In the end, it looks as though Hyrule will be saved at the expense of Lorule, which would make this a subversion... but Link and Zelda then wish on the Triforce for Lorule's Triforce to be restored, saving Lorule, and making this a Double Subversion.
- Save Point: The game requires going to a weather vane to save. Thankfully, they also serve as Warp Whistle destinations, and there's one at the entrance of every dungeon, so it's always easy to reach one. They also squawk and spin around as a reminder to save after important events or accomplishments.
- Second Hour Superpower: The "merge" power isn't obtained until the first dungeon has been completed.
- Segmented Serpent: Moldorm, like its inspiration in A Link to the Past, resembles a set of four uncannily hamburger-like segments ending in a bright red, vulnerable tail.
- Selfless Wish: In the ending, Princess Hilda sends Link and Zelda back to Hyrule before Lorule fades away completely. While Hilda and Ravio prepare to face the end of their world, Link and Zelda make a wish together upon Hyrule's Triforce to restore Lorule's destroyed Triforce. Realizing her world has been saved, Hilda breaks into Tears of Joy.Princess Hilda: Thank you, Princess Zelda... Oh, thank you... And to you as well, Hero of Hyrule... Thank you, Link!
- Set a Mook to Kill a Mook: Octoroks will carelessly damage any monsters in their line of fire. Also, two of the enemy archers in Hyrule Castle can be tricked into shooting each other.
- Shifting Sand Land: The Desert of Mystery and its sand-themed dungeon from A Link to the Past return, now as an enclosed territory that can only be accessed from Misery Mire in Lorule. It can only be properly navigated by using the Sand Rod (which allows Link to create solid sand bridges and reach key areas that lead to the entrance to Desert Palace). Once inside the dungeon, Link has to find a way to fill the western rooms with a large torrent of sand so he can reach spots that are unreachable even with the Sand Rod, and eventually find the Titan's Mitt to lift heavy boulders. A unique distinction is that the Desert Palace's boss isn't fought there, but in the sandy part of Misery Mire itself.
- Shout-Out: The German version has a shout out to, of all things, The Bold and the Beautiful. The show is called "Reich & Schön" in German, meaning "rich and beautiful"; whenever you find 100 rupees in a chest, the game notes "you feel rich and beautiful".
- Sinister Geometry: The monolithic-like structure in Lorule's Sacred Realm. It's actually their inverted Triforce's tombstone. Inscribed on it is an account of Hilda's ancestors who destroyed the sacred relic to prevent chaos. When Zelda and Link wish upon their Triforce to restore Lorule's, the tombstone explodes.
- Skippable Boss: An unintentional example is that you can skip the boss of the Skull Woods via a glitch. You won't get its Heart Container, though.
- Slippy-Slidey Ice World: The Lorule version of Death Mountain is covered in ice, and it also hosts the resident ice dungeon, the Ice Ruins. There are several bodies of ice that can only be melted with the Fire Rod.
- Snowy Sleigh Bells: Faint jingle bells can be heard in the background of the Ice Ruins' theme. Some also ring each time the dungeon's boss Dharkstare summons some icy satellites.
- Sound-Coded for Your Convenience: Maiamais make small squeaking noises. Some are hidden in trees or under rocks or tiles, making this trope the only means of indicating that they are nearby.
- Spotting the Thread: Veterans who played A Link to the Past will find this is subverted in this game. During Lorule's counterpart of Thieves' Town, the game essentially spoonfeeds you the exact same scenario as the first one with Link finding a captive girl who claims she can help him if he will only take her outside. Fans of the original likely will come to the conclusion that she's the dungeon boss who will reveal itself at the entrance and be wary of her. After working together to make their way back through the dungeon, the reveal that she was being perfectly honest comes to light when she's captured by Stalblind, the real boss, and then takes him to the house containing the dungeon's Painting upon his defeat.
- Spread Shot: The Nice Bow, which fires three arrows, one straight ahead, the other two at opposite angles.
- Sprint Shoes: The Pegasus Boots are back, and once again allow Link to perform a dash that allows him to run at great speed, while thrusting his sword to hit anyone or anything who gets on the way.
- The Starscream: Yuga. He pretends to follow Hilda's orders all the way up until he takes possession of Ganon, at which point he reveals to her that he was never loyal. There are some vague hints to his true motives throughout the game, but are subtle.
- Stealth-Based Mission: In order to reach the Palace of Darkness, you have to go all the way avoiding the guards. Thankfully, avoiding them is pretty easy thanks to Link's wall merging ability, and if you do get caught, you'll always be sent to the nearest cage.
- Step into the Blinding Fight: After its weak spot is hit several times, the Gemesaur King roars and snuffs out every torch in the room, plunging the arena into darkness. Link must then relight the torches while dodging the beast's attacks, temporarily stunning it before it snuffs out the light again.
- Stylistic Suck: The Milk Bar arrangements of the game's themes are usually well-done, but there's one version of the Lorule Death Mountain theme where Flute Boy completely loses the melody in the second half.
- Subliminal Seduction: If you reverse Lorule Castle's music, eventually you get the classic Hyrule Castle theme.
- Superboss: Gramps can be fought after earning all 50 Challenge Medals. He has 20 hearts, all of Link's fully upgraded gear, and knows the Great Spin.
- Suspiciously Similar Substitute:
- Lorule, to A Link to the Past's Dark World. It isn't the same realm, but it is similar enough to be mistaken for it: Six of the Dark World dungeons make a return, and the seventh is likely an altered version of the last one. The same types of enemies are in the same locations, and the only thing missing is the Pyramid of Power, with Lorule Castle now in its location. The overworld music is also the same. Weirdly enough, the ending sees you visit the Sacred Realm (i.e. the Dark World freed from Ganon's influence).
- The witch Irene and her grandmother to Maple and Syrup, respectively. The Lorule fortune teller refers to the Lorule counterpart of Irene's grandmother as "Mapes", further hinting at the connection.
- The proprietors of the Hyrule and Lorule Milk Bars each resemble Talon and Ingo, respectively (the Hyrule barkeeper even gets his milk from an unseen Lon Lon Ranch). Which is funny, because those two were already Shout Outs to Mario and Luigi.
- Yuga is a cross between Ganondorf, Agahnim, Ganon, Chancellor Cole, and Ghirahim, and many other Zelda villains. He's fought as the first boss and has a personality like Ghirahim, he looks like Ganondorf's Distaff Counterpart (despite, y'know... still being male), he captures the sages to revive Ganon like Agahnim, and backstabs and merges with the full demonic power like Cole.
- Swamps Are Evil: Oddly enough, the swamp around the Swamp Palace seems fairly decent; the aptly named Misery Mire is dark and foreboding.
- Sweet and Sour Grapes: After Hilda gives up on stealing Hyrule's Triforce to save Lorule, Link and Zelda use the Triforce to give Lorule back its own.
- Sword Beam: The Zelda staple returns, allowing Link to fire beams when his Hit Points are full.
- Sympathetic Villain, Despicable Villain: Princess Hilda of Lorule wants Hyrule's Triforce to replace Lorule's destroyed Triforce to prevent Lorule from crumbling into nothingness. [Her partner, Yuga, doesn't care about Lorule and betrays her, intending to use the Triforce for his own ends. While Yuga dies trying to take the last piece of the Triforce from Link, Hilda ulitmately agrees that the destruction taking Hyrule's Triforce would cause isn't an acceptable price for Lorule's salvation. She allows Link and Zelda to return the Triforce to its rightful home; in turn, Link and Zelda sympathize with Hilda's ultimate goal and use the Triforce to restore Lorule's Triforce, giving Hilda what she wanted all along.
- Tactical Suicide Boss: The Knucklemaster is only vulnerable when you avoid its punching attack, causing it to smash into the wall and reveal its weak point. If it would stick to the attacks where it slams the floor, it would be impossible to kill.
- Tagline: "A New Adventure in the Beloved World of Hyrule!"
- Take a Third Option: At the end the options seem to be to leave the Triforce on Lorule, saving it but dooming Hyrule to destruction. Or taking it back to Hyrule, dooming Lorule to destruction. Instead, Link and Zelda make a wish on their Triforce to restore Lorule's Triforce, saving both worlds.
- Teleport Spam: Yuga tends to do this on the first phase of the final fight against him, which isn't surprising, given that the fight itself is a reference to the final battle of The Legend of Zelda: A Link to the Past and Yuga is merged with Ganon.
- Tennis Boss: The final boss Yuga (now merged with Ganon) does this twice. The first time has the standard type of one ball; the second time, he uses two balls.
- Thematic Sequel Logo Change: The Triforce on the logo is projecting a shadow, representing the opposite world of Lorule and its nature as a dying world due to the destruction of their Triforce. It also represents how the Lorule Triforce is positioned in an inverted fashion compared to that of Hyrule's.
- Theme-and-Variations Soundtrack: The Sage Dungeons are all arrangements of the same motif, even the Desert Palace, which is in Hyrule and had a counterpart in Link to the Past.
- Theme Music Power-Up:
- Hyrule's overworld music gets increasingly triumphant and intense as the first part of the story goes on. In the beginning, it's pretty relaxed. Then it becomes a standard theme after obtaining the Captain's Sword. Then, after getting the Master Sword, it becomes orchestral.
- After Link receives the Triforce of Courage and is sent to Lorule Castle, the overworld theme becomes a more triumphant version of itself. Of course, you can dawdle, beating up monsters and collecting leftover heart pieces and enjoy the music.
- Theme Song Reveal: The final dungeon Lorule Castle is a giant boss rush each boss you kill adds another layer to the music. The final form of the music adds in Ganon's theme revealing that you're not just fighting Yuga but the all powerful influence of Ganon inside Yuga's mind.
- The Thing That Would Not Leave: Ravio taking up residence in Link's house is an escalating one during each visit at certain points in the game:
- He asks to stay.
- Your pots disappear.
- He says he's a merchant and he would like to sell some stuff here.
- He starts advertising for adventurers to come visit his shop.
- He dumps all of Link's belongings to the corners of the room and sets up shopping counters.
- He puts up a massive billboard with his face on it on top of Link's house.
- Last, but not least; he changes the name on the sign from "Link's House" to "Ravio's Shop".
- Third-Person Person: Dampé unusually refers to himself in this manner, contrasting his portrayal from previous games in the series.
- The Three Trials: Like in A Link to the Past, Link has gather the three Pendants of Virtue, though in practice he visits one dungeon for an unrelated reason, then learns he already acquired the first pendant before entering it, then going after the other two. Instead of the Dark World, Link ends up reaching Lorule after his fight against Yuga.
- Toggling Setpiece Puzzle:
- The Tower of Hera from A Link to the Past makes a return in this game, and so does its gimmick of featuring the barrier blocks that change their states when pressing the crystal orbs. The game also has the conveyor belts from Thieves' Hideout, whose direction can be inverted when hitting a nearby orb; doing this is the only way to make them transport a bomb (or a living explosive enemy known as Bawb) into an orb that is unreachable otherwise.
- The Swamp Palace features faucet-like mechanisms that modify the water level on its floor. Their sides have levers that can be pulled with the Hookshot; pulling the one on the right will make the mechanism spin clockwise and raise the water level while pulling the one on the left will make the mechanism spin counterclockwise and lower the water level. The icon at the central top of the machine will tell the current level: One blue rectangle if the room is almost completely dry, two if the room is half-full, and three if it's full. There are platforms and areas that can only be accessed at certain levels, as well as rafts that can be used as bridges.
- Triumphant Reprise: After Link has rescued all the sages and attained the Triforce of Courage, the Dark World/Lorule overworld theme song sounds more upbeat and heroic in contrast to the bleaker version that played before.
- Turns Red: All the bosses feature this phase. After taking damage, they all get increasingly redder, angrier, and more dangerous as the battle progresses.
- Twinkle in the Sky: Inverted. If you throw something (like a pot) off a tall building, it will fall a good distance and then disappear in a twinkle.
- Uncommon Time: Ganon's Battle Theme Music reappears with a 4/4 intro before launching into the 2/4 and 14/16 melody.
- Unlockable Difficulty Levels: Like in Skyward Sword, Hero Mode is unlocked upon beating the game once where enemies hit harder, though unlike in the 2011 game there are still plenty of health recovery items.
- Variable Mix: It's a Zelda trademark by now.
- In the Maiamai cave, if you have Mother Maiamai upgrade an item, the background music will go from simple harp and flute to a full orchestra with a chorus chanting "Mai, mai, mai mai mai!"
- Again with Maiamais, every time you find a baby, it sings (squeaks?) along to the traditional "you got a thing" fanfare.
- In Lorule Castle, another instrument will be added to the background music with every successive victory in the Boss Rush. Once you beat three of four, Ganondorf's theme gets mixed in.
- The Very Definitely Final Dungeon: Lorule Castle, located at the center of Lorule and accessible after you've freed all Sages (though it's Hilda who breaks the seal with her magic, not the Sages with theirs). The second half of the game begins and ends in the domain of Hilda.
- Video Game Caring Potential: A minor example: You don't technically have to tell the Sages' loved ones that they're safe after you rescued them, and there's no in-game reward for doing so, but putting their minds at ease feels so damn good.
- Video Game Cruelty Potential:
- In addition to the classic staple of being able to attack Cuccos (and getting killed by them in retaliation), there is a peaceful Hinox (those cyclops monsters that normally throw bombs at you) living in a cave under a waterfall in the northeastern section of Lorule's Dark Palace region. He will quickly give you five rupees to make you not tell anyone where he's hiding. You can continue to extort him and the amount of rupees he gives increases. But if you extort him too much, he will call you a monster and try to kill you. Unlike the Cuccos, however, you can't unpress this Berserk Button by simply leaving the cave and going back in, as he'll still want you dead.
- In another example of the deliberate use of Money for Nothing in this game, you can unpress Hinox's Berserk Button by saving and quitting, and then reloading your save file, making extorting him a great way to get fast cash.
- Void Between the Worlds: As a painting, Link can enter very thin vertical gaps in walls that lead to a technicolor void used to go between Hyrule and Lorule.
- Voluntary Shapeshifting: Yuga can become a painting, as well as turn others into drawings. This, combined with a bracelet Link received from Ravio, is how the young hero gets the same shapeshifting ability as well. He is also unaffected by gravity while in this state.
- Warp Whistle: Irene the witch's purpose, as she can be summoned to get Link a ride to other places in Hyrule and Lorule. Even after she gets turned into a painting (and later, a Sage), her broom can still bus you around.
- Well-Intentioned Extremist: Hilda wants Hyrule's Triforce in order to restore Lorule to its former glory, since Lorule's Triforce was destroyed instead of being sealed away.
- Wham Line: At first, Yuga's transforming people into paintings seems to be a personal mission with no great stakes. Then Sahasrahla reveals exactly who he's targeting, and things get a lot more serious:Sahasrahla: Seres is a descendant of the original Seven Sages who sealed Ganon in darkness all those years ago.
- What a Piece of Junk: What the Lorulean blacksmith regards Link's Master Sword as. He pours his heart and soul into tempering swords to reach their ultimate capability, and the sight of kids picking up any weapon or ancient relic they find lying around depresses him. It's not until Link finds ores for the Hyrulian blacksmith to temper the sword that he becomes impressed with the craftsmanship of his counterpart and sees the true potential in the blade.
- What Happened to the Mouse?: After Link completes the rhyme for the Spear Boy to enter the Thieves' Hideout, he says hopes the Bard can put his words to song. Despite implying that he's going to the town's Milk Bar, he disappears from the game entirely after that.
- What the Hell, Hero?: Ravio forces Hilda to realize that stealing the Triforce from Hyrule would simply be the very same "war for the Triforce's power" that led to her Lorule's Triforce being destroyed in the first place.
- Where It All Began: Two of the first rooms of Lorule Castle you see become eventually the final rooms of the game. You can even use the first portal located between the two princess's studies to use Princess Zelda's study as a makeshift Fairy Fountain before the final battle.
- Why Don't You Just Shoot Him?: Subverted. For all his evil gloating, Yuga recognizes that Link is a true threat to his plans, and blasts him away with his magic, turning him into a painting on the wall. It's only thanks to Ravio's magical bracelet that Link is able to escape.
- Wishing for More Wishes: A Variant. The Triforce has no explicit numerical limitation on wishes, but only one person can possess it at a time. In the ending it is shown that it can create more Triforces, but the implication is more that it fixed the old one rather than pulling a new Triforce out of thin air.
- World-Healing Wave: Link and Zelda wish upon the Triforce to restore the Triforce of Lorule, reversing its collapse; this causes Princess Hilda to cry with tears of joy after she just had accepted the fate of her once doomed kingdom.
- Wormsign: Zaganaga creates a sand whirlpool before popping up.
- Wrong Assumption: Osfala thinks that he's the destined hero who will save Hyrule for Princess Zelda from Yuga. He's immediately captured by the villain and, once rescued, is forced to accept his role is to aid Link, the real hero.
- Wrong Genre Savvy:
- Osfala, like Ralph and Groose, initially thinks he's the hero of the story and goes through the Eastern Palace with nothing but a Sand Rod he borrowed from Ravio, but ends up captured by Yuga. He later realizes that Link really is the hero and that he's just a Sage, and is very disappointed.
- Sahasrahla is convinced that the plot is the same as in A Link to the Past, urging Link to go through the same trials and collect the same tokens. In truth, things are a bit more complex.
- Hilda's ancestors tried to invoke No MacGuffin, No Winner, believing it would solve all the problems caused by war. It didn't, quite the opposite actually.
- Yellow/Purple Contrast: Zelda's golden-blonde hair contrasts with Hilda's dark purple hair. As cross-dimensional counterparts, this also shows in Zelda's magic being associated with light while Hilda's is associated with shadow. Late in the game, it's revealed that Link and Ravio have a similar contrast.
- You Didn't Ask: Link's task in the second part of the game is rescuing the Seven Sages, who were magically sealed in paintings by the villain Yuga. Five of the seven didn't know about their special status. The only two who did were Impa, who did take precautions to protect herself (Yuga implies that Impa was the last Sage he captured), and Rosso, a burly mountaineer. When he's freed from his prison, he casually remarks that he's known about his Sagehood for years, but never bothered to bring it up because it seemed so unimportant; if he'd told someone beforehand, he might have been able to be kept safe. However, given that Yuga not only has teleportation powers, but can trap people so long as there's a flat surface nearby, it would have been dang near impossible to defend against him.
- Your Princess Is in Another Castle!: You've collected the three Plot Coupons, retrieved the Sword of Plot Advancement, and stormed the castle. Now all that's left is to defeat this evil wizard guy, but that ends up being the hardest part: Yuga, during the battle, sends Link to Lorule, and the latter is told by Princess Hilda that he has to rescue seven sages there. Up to that point, Link had only completed one third of his quest. ...Wait a minute...
- You Shouldn't Know This Already:
- In the last phase of the final boss, you must shoot a Light Arrow away from Yuga so that it encircles the room and strikes him in the back. This does not work in the previous phases despite the circumstances allowing it to still be a viable option, as the arrows just disappear when you shoot them that way.
- Averted with the password in the Thieves Hideout. If you remember the song lyrics from an earlier playthrough, you can enter the dungeon without having to seek the clues in the town.